A Distant Light

- The quest begins once you complete the Main Quest called The
Veins of Eora.
The first step to completing it is to make your way to Hasongo,
which is at #48 on the World Map.
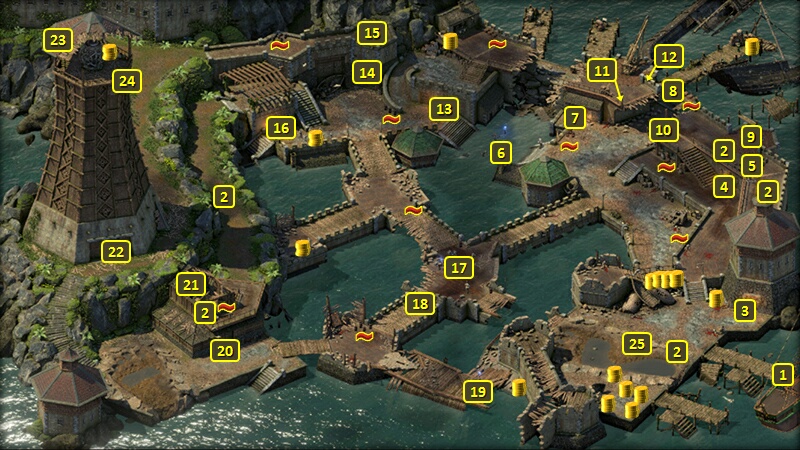
- You start off at #1 on the map of Hasongo.
You will have to fight Coral Nagas at points marked #2.
- A Rauatain survivor named Zuhira will be at #3. She will offer
information on Eothas' attack, as well as indicating that a bombardment
may be used against the Nagas that now occupy Hasongo.
- There is a line of barrels at #5, that help protect the Naga Archers
south of them. You can deal with the Archers with spells and missile
fire of your own, or use abilities like Leap or Evasion to get close to
them without having to smash through the barrels.
Some of the barrels will have Cave Grubs inside of them if you shatter
them.
- Go through the door at #4 to enter the Cannon
Rampart.
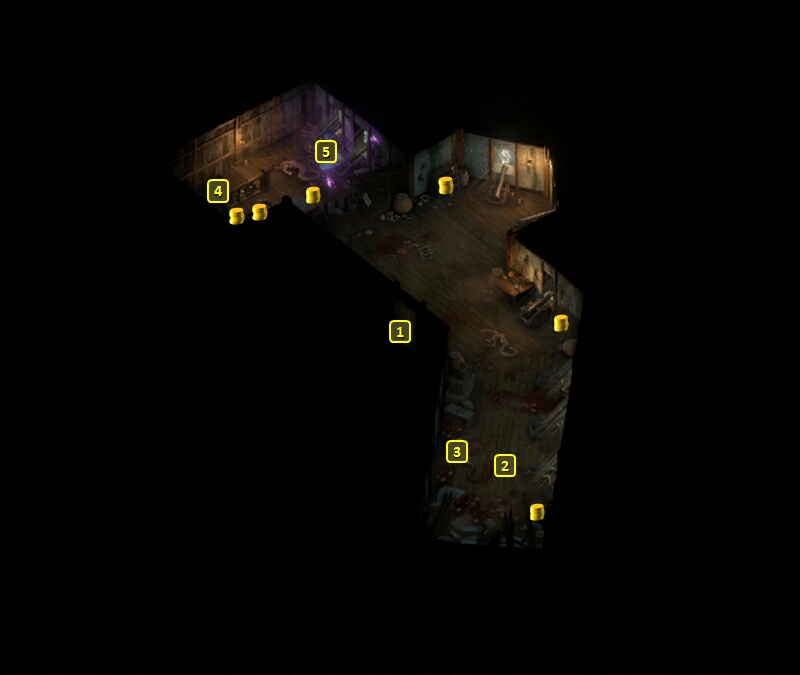
- You start off at #1 on the map of the Cannon
Rampart. You will have to fight a few Coral Nagas at #2. If you're
willing to risk it, hitting one of the Gunpowder piles with a firearm
can detonate a few explosions that may wipe out the Nagas in one blow,
although you may need to be careful with the placement of your own
party members.
- The dead body at #3 has the Artellirist's
Manual.
- Return to Hasongo. There will
be a large group of Coral Nagas at #6, including a couple of Coral Naga
Shamans who stand next to Totems that they use to summon Storm Blights.
Go through the door at #7.
- An alternative way to make progress is to use a Rope
and Grappling Hook on the pole at #10, shimmy across to to #11,
and then go through the door at #12.
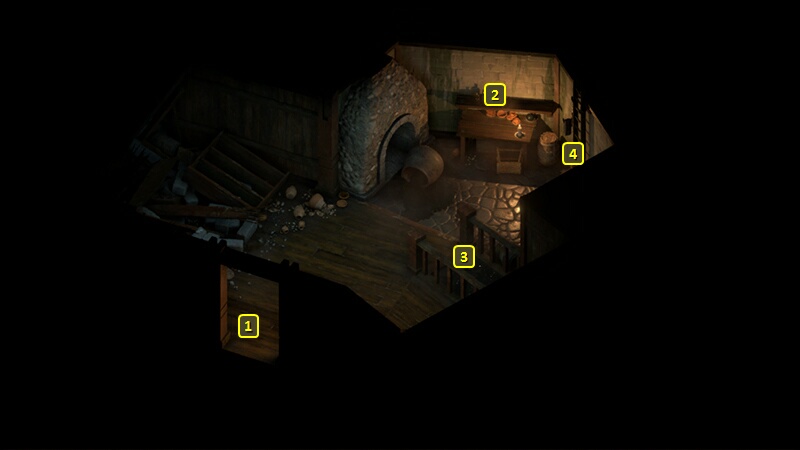
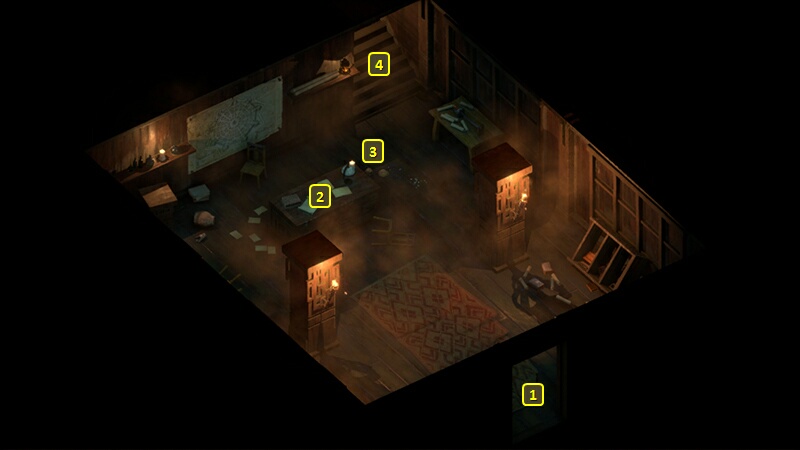
- You'll now be in the Kitchen,
at #1 if you came through the main courtyard of Hasongo or at #4 if you
shimmied your way through the battlements.
You'll find Cooking Fat on
the counter at #2.
- Go to the flooded hallway at #3, and click on it to begin the scripted
interaction. You can make a Survival check of 4 to get a sense of
direction.
Take the passage to the left, which leads to a door. You can open the
door with either a Might check of 14, or using a Prybar.
The way will then be clear to reach the Cannon
Rampart, this time at #4.
- The soul of a Naga named Yanass will be at #5. Use your Watcher powers
to communicate with it. You'll learn that somebody named Sugaan is the
leader of the Nagas here. He was sent to infiltrate and discover a way
to secretly enter Hasongo, but died when Eothoas arrived. You can have
him join the souls following you, which may prove helpful for this
Quest.
- Return to Hasongo, and go
through the door at #16.
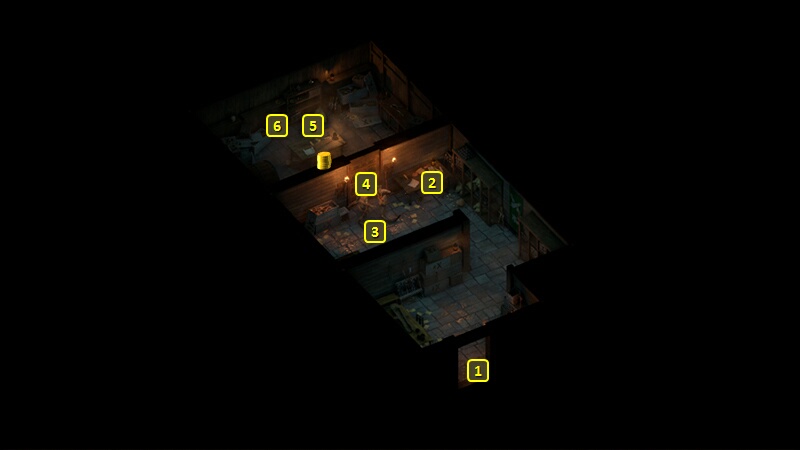
- You'll start off at #1 on the map of the Engineering
Workshop. You will have to fight a couple of Coral Nagas at #3.
- The door at #4 can be opened with either the Storeroom
Key or a Mechanics skill check of 10.
- Aimuro will be at #5. He'll offer an account of Eothas' attack. He'll
also hint at possible ways to reach the Fleet Master's Office that don't
necessarily rely on blowing your way through every Naga in the area.
Lastly, he'll indicate that you're welcome to use a prototype shell that's
in the chest behind him.
- The chest at #6 has the Explosive
Shell in it. Now return to Hasongo.
- One way to make progress is to use the Bombard at #8. Clicking on it
begins a scripted interaction, and using it has certain requirements.
One requirement is to load it with the Explosive
Shell from the Engineering
Workshop.
Another requirement is to rotate it so that it's facing in the general
direction of the Coral Naga at #17. You either need a character to make
a Might check of 18, or use the Cooking
Fat from the Kitchen to
loosen the gears.
After rotating it, you'll need to aim it at the Nagas. That requires
either a character to make an unassisted Mechanics check of 10, or to
use the Artellirist's Manual
from the Cannon Rampart. Maia
can also aim it.
Using it once it's ready will wipe out the Nagas at #17, and at the same
time blow away the pile of rubble at #18 that was acting as an obstacle.
That provides the most direct way of reaching the Fleet
Master's Office through the door at #20.
You could have fought and killed them directly, although that wouldn't
do anything about the pile of rubble at #18. There are also
alternatives.
- One alternative is to go up the stairs just a little east of the Engineering
Workshop. Follow it west and then south, fighting small groups of
Nagas along the way. The door at #21 allow allows entry into the Fleet
Master's Office.
- You'll now be in the Engineering
Workshop, either at #1 or #4 depending on which pathway you took.
The table at #2 has the Letter
from Laefarn, which indicates that the local Dawnstars had dreams
of Eothas' arrival beforehand.
- Return to Hasongo. The door
at #22 leads to the Lighthouse
at #1.
*NOTE* If you wanted a direct route to the door at #22 with a minimum of
fuss and fighting, go to #14 on the map of Hasongo. There are two ways
to reach the top of the tower at #15.
One is for everyone to climb up. Party members with lower Athletics
scores may fall and suffer the Twisted Ankle (-20 Reflexes) Injury and
remain at the battom.
The other is to use a Rope and
Grappling Hook. If you do so, you'll have to kill a couple of Coral Nagas
who come out of the nearby water to attack you.
Now you can head west along the ramparts and then south along the trail
until you reach the door at #22.
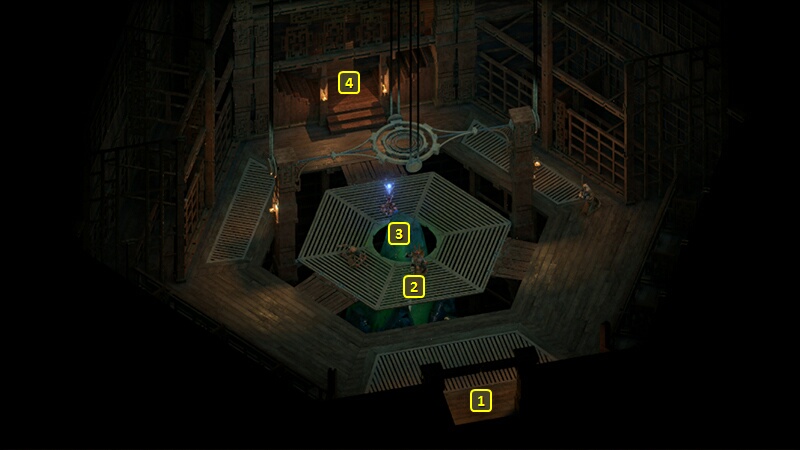
 The leader of the Nagas, Suugan, will
be in immediate view at #2 on the map of the Lighthouse once you enter. His initial inclination is to
attack, along with the numerous other Nagas at his side. You can
certainly reciprocate, and obtain his Amulet called the Strand
of Favor should you win.
The leader of the Nagas, Suugan, will
be in immediate view at #2 on the map of the Lighthouse once you enter. His initial inclination is to
attack, along with the numerous other Nagas at his side. You can
certainly reciprocate, and obtain his Amulet called the Strand
of Favor should you win.
Alternatively, you can to convince him to willingly let you access the
nearby Adra pillar. You can indicate that you are the Herald of Berath
during the conversation, but that won't be enough by itself. The Clever
response that asks Berath for another display won't work as a follow-up,
but the Religion check of 7 will.
Indicating that Eothas came for the Adra itself, or that you can repair
the Adra as a Watcher are other attempts that get your foot in the door.
A Metaphysics check of 6, or calling on the spirit of Yanass to speak to
Suugan, are the follow ups that will convince him to let you access the
pillar willingly.
- Now click on the Adra pillar at #3 to speak to Eothas again. If you
make a combined Intellect check of 16 and Metaphysics check of 4, you'll
discover the nature of the soul link you share with Eothas.
He'll also now return a portion of your soul to you. If you had absorbed
the souls in Heritage Hill as part of your Pillars of Eternity 1
History, you will now gain +1 Might and +5% Health.
If you sacrificed one of your companions to Skaen's pool as part of your
Pillars of Eternity 1 History, you will gain benefits depending on which
companion you sacrificed as follows:
- Aloth - +1 Intellect, +5 Reflexes
- Devil of Caroc - +1 Dexterity, +1 Penetration vs. Kith
- Durance - +1 Constitution, +5% Health
- Eder - +1 Might, +2 Deflection
- Grieving Mother - +1 Resolve, +5 all Defenses vs. Intellect
Affliction attacks
- Hiravias - +1 Dexterity, +1 Slashing Armor Rating
- Kana - +1 Intellect, +5 all Defenses vs. Dexterity Affliction
attacks
- Maneha - +1 Might, +5 all Defense vs. Might Affliction attacks
- Pallegina - +1 Resolve, +1 Shocking Armor Rating
- Sagani - +1 Perception, +2 Accuracy vs. targets at greater than 4m
Range
- Zahua- +1 Constitution, +5% beneficial effect duration
He'll indicate that he's heading to a place called Ashen Maw. That
completes the Quest, and you'll get 18,000+xp.
- Sugaan, if you didn't attack him earlier, will now be grateful and
give you the Strand of Favor
before departing.
Maia will want revenge. It's up
to you whether you're willing to talk her out of it, or fall in with her
request to attack Sugaan and the Nagas.
- Completing this Quest triggers the next Main Quest, He
Waits in Fire.
Death's Herald
Completing this Quest means the Gods will want to speak to you again. It
will occur if you sail on the World Map long enough after completing the Quest.
And again, many of the replies can be grouped into Aggressive, Sassy or
Diplomatic. And they affect what kind of Death's Herald power you receive
at the end of the conversation.
Possible replies the moment you're pulled into Berath's realm:
- (Bow), Diplomatic, positive with Berath.
- "You know, I'm starting to look forward to these chats." (Clever
disposition) Sassy, positive with Berath.
- "Maybe try a door next time." Sassy, positive with Berath.
- "This shit again?" (Aggressive disposition) Aggressive, negative with
Berath.
Berath says: "Tell me what you have learned." Possible replies:
- "He makes for Magran's Teeth." Diplomatic, positive with Berath.
- "He's still smashing his way across the Deadfire, destroying
everything in sight." (Passionate disposition) Sassy, negative with
Berath.
- "I have nothing new to report." (Shady disposition) Aggressive,
negative with Berath.
Berath either lays a hand on you or comes close enough for you to smell her.
Possible replies:
- "He makes for Magran's Teeth." Diplomatic, positive with Berath.
- "You won't kill me. You need me." (Passionate disposition) Aggressive,
negative with Berath.
- "I have nothing new to report." (Shady disposition) Aggressive,
negative with Berath.
Wael says: "This is the first interesting thing to happen in ages, and we do
so love a riddle." The reply "Yes, it's so interesting when hundreds of kith
die so Eothas can take a stroll." is Sassy and earns positive with Wael.
Magran says: "But I will bear down upon Eothas with all the heat and fury of
the earth... if I must." Possible replies:
- "There must be another way to stop him." Diplomatic.
- "Worth trying, at least." Only available if you reforged Abydon as
part of your Pillars of Eternity 1 History. Sassy, positive with Ondra.
- "Thousands of kith will die!" (Passionate disposition) Aggressive,
positive with Wael, negative with Berath.
- "You should seize this opportunity to slow him while you can. There
might not be another chance." (Aggressive disposition) Only available if
you reforged Abydon as part of your Pillars of Eternity 1 History.
Aggressive, positive with Ondra, negative with Berath and Magran.
Ondra says: "The death of thousands now could prevent the death of millions
later." Only happens if you reforged Abydon as part of your Pillars of
Eternity 1 History. Possible replies:
- "A difficult calculus but a logical one, too." Diplomatic, positive
with Ondra.
- "But you don't know if you'll save millions! You might kill thousands
for nothing." (Passionate disposition) Aggressive, negative with Ondra.
Berath says: "Speak with him, Watcher. Discover what it is he plans."
Possible replies:
- "I'll do my best." Diplomatic.
- "It's not like I have a choice." Sassy, negative with Berath.
Ondra says: "Sacrifices of the few protect the futures of the many. You
cannot let your petty, mortal feelings blind you to the urgency of the
dilemma Eothas has thrust upon us." But only if you chose not to empower
Woedica at the end of your Pillars of Eternity 1 History. Possible replies:
- "Perhaps you're right." Diplomatic, positive with Ondra.
- "Funny how it's always kith who must make the sacrifices, never you."
Sassy, positive with Galawain and Wael, negative with Berath and Ondra.
- "My 'petty mortal feelings' are the only reason your wrists don't
chafe in Woedica's shackles." (Aggressive disposition) Aggressive,
positive with Magran and Wael, negative with Berath and Ondra.
What Death's Herald power you get after this conversation depends on the one
you had beforehand, and your dialogue choices during this conversation.
If you chose at least two Diplomatic replies, and your Diplomatic replies
either exceeded or equalled the number of Sassy or Aggressive replies AND:
- If you were still left with the basic Visage of Death's Herald power
after the Stranded Quest, you now get Mien
of Death's Herald. It adds the Insightful (+5 Perception) Inspiration
for 30 sec.
- If you already had Mien of Death's Herald, the Insightful Inspiration
gets upgraded to the Aware (+5 Perception, 50% chance of converting
Grazes to Hits) for 30 sec.
- If you already had Wit of Death's Herald, you now get Raiment of
Death's Herald. It gives the Watcher both the Insightful (+5 Perception)
and Smart (+5 Intellect) Inspirations for 30 sec.
- If you already had Ire of Death's Herald, you now get Awe of Death's
Herald. It gives the Watcher both the Insightful (+5 Perception) and
Strong (+5 Might) Inspirations for 30 sec.
If you chose at least two Sassy replies, your Sassy replies exceeded the
number of Diplomatic replies, your Sassy replies exceeded or equalled the
number of Aggressive replies AND:
- If you were still left with the basic Visage of Death's Herald power,
you now get Wit of Death's Herald. It adds the Smart (+5 Intellect)
Inspiration for 30 sec.
- If you already had Mien of Death's Herald, you now get Raiment of
Death's Hearld. It gives the Watcher both the Smart (+5 Intellect) and
Smart (+5 Intellect) Inspirations for 30 sec.
- If you already had Wit of Death's Herald, it gets upgraded so that it
now provides the Acute (+5 Intellect, +1 Power Levels) for 30 sec.
- If you already had Ire of Death's Herald, you now get Cruelty of
Death's Heard. It gives the Watcher both the Strong (+5 Might) and Smart
(+5 Intellect) Inspirations for 30 sec.
If you chose at least two Aggressive replies, and your Aggressive replies
exceeded or equalled the number of Diplomatic or Sassy replies AND:
- If you were still left with the basic Visage of Death's Herald power,
you now get Ire of Death's Herald. It adds the Strong (+5 Might)
Inspiration for 30 sec.
- If you already had Mien of Death's Herald, you now get Awe of Death's
Herald. It gives the Watcher both the Strong (+5 Might) and Insightful
(+5 Perception) Inspirations for 30 sec.
- If you already had Wit of Death's Herald, you now get Cruelty of
Death's Herald. It gives the Watch both the Strong (+5 Might) and Smart
(+5 Intellect) Inspirations for 30 sec.
- If you already had Ire of Death's Herald, it gets upgraded so that it
now provides the Tenacious (+5 Might, +2 Penetration) Inspiration for 30
sec.
The power you get at the end of this conversation can be upgraded after the
Quest called
He Waits in Fire.
| Sorcerer's
Place is a project run entirely by fans and for fans. Maintaining
Sorcerer's Place and a stable environment for all our hosted sites requires a substantial amount of our time and funds on a regular basis, so please consider supporting us to keep the site up & running smoothly. Thank you! |