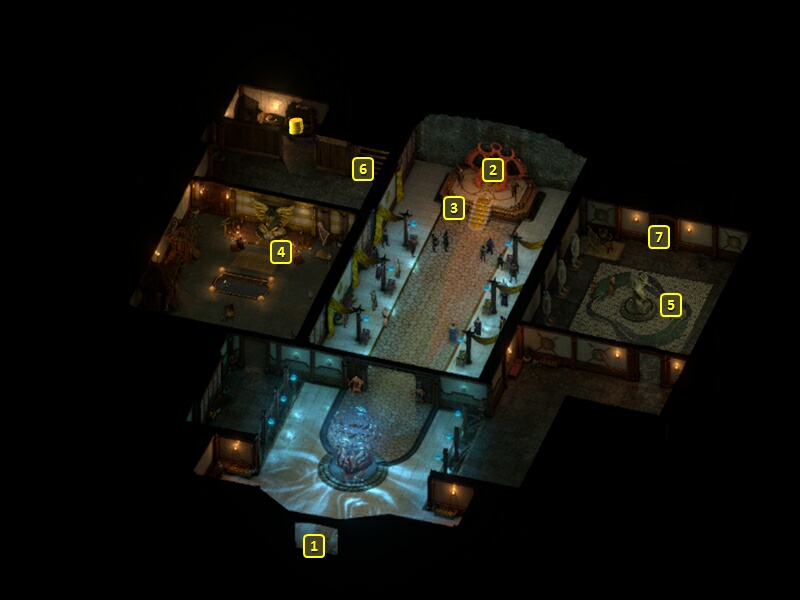
Prince Aruihi, at #3 in the main floor of the Kahanga Palace, will give you this Quest as soon as you have completed
the Trade Secrets Quest. He wants you
to learn the fate of an expedition he sent to Motare O Kozi, and uncover
anything the expedition may have learned.
Go out the door at #1.
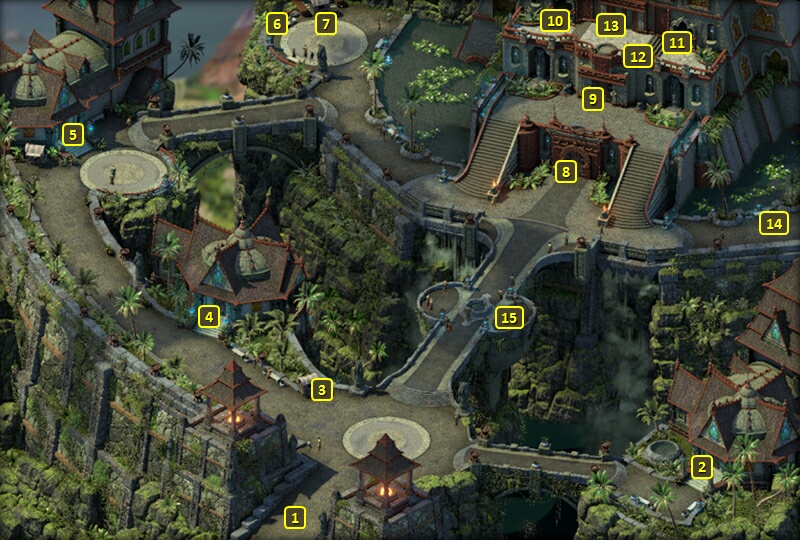
You'll now be at #8 on the map of Serpent's
Crown. You'll want to go to one of the exits, like at #1 or #14.
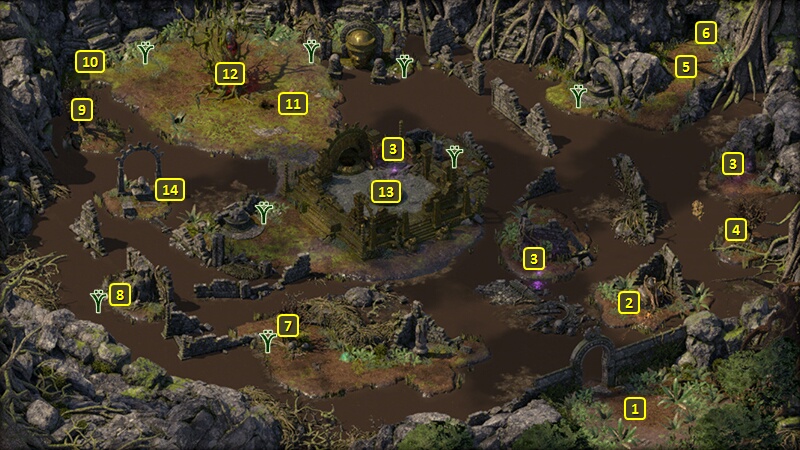
The initial landing point is at #2 on the map of Motare
Island.
Maketau Landing is at #3. A party of Wahaki tribe warriors will be
here, with the intention of denying access to the rest of the Island.
Simply going ahead inland during the scripted interaction will result in
a fight with them, which is a way to get past the Landing.
A Survival check of 4 or a Perception check of 15 will detect an unusual
quiet that suggests a waiting ambush. Going ahead or charging in waving
your weapons are choices that will both result in a fight with the Wahaki warriors.
If you want to pass the Wahaki peacefully, make the Survival or
Perception check, and then select the option that involves putting your
hands out in a gesture of peace.
Follow that up with either a Diplomacy check of 4 or an Intimidate check
of 5. Or you can choose the Aggressive option if you want to attack
them.
You'll have the opportunity to question them as to the nature of the
island, which has apparently become corrupted.
Having 3 positive points of reputation, making an Intimidation check of
7, a dialogue option based on the Watcher being a Druid, or having
completed the Principi Quest called A
Shrewd Proposition can all convince their leader, Etermba, to let
you pass peacefully.
The trees at #4, #7 and #9 are each guarded by a Pwgra. They in turn
will be accompanied by assorted minions, such as Jungle Lurkers (at #4), a Greater Storm
Blight (at #4), a Rotghast Slinger (at #4), Corrupted Tigers (at both #7
and #9) and a Lesser Bog Ooze (at #7). Killing them off is the
straightforward way to deal with things.
Another way is to have your Stealth character sneak past the guardians
and click on a tree to begin a scripted interaction with it. Either a
Druid character in the party (e.g., Tekehu)
or having The Spine of
Thicket Green in your inventory allows you to heal the tree during
the scripted interaction. Doing so turns the hostile Pwgra into a
friendly Delemgan, and her minions won't attack you either. Turning all
three Pwgras back into Delemgans means they'll support you. And that in
turn means having a real chance of persuading The Rotted Lady to end the
corruption that has overtaken the grove.
There will be a large number of Corrupted Tigers and Bog Bats to fight
at #5. A niche at #6 has the Golden
Inner Ring in it.
Spirits of a previous Vailian expedition will be at points marked #3,
and you can use your Watcher powers to interact with them and learn what
befell them.
Xoti can absorb them into her
lantern if she's in the party.
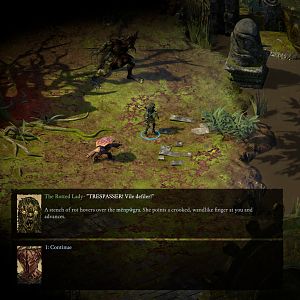
The Rotted Lady is at #11.
Her natural disposition is to attack you. And killing her, along with
the Assassin Vines and Troll that protect her would certainly clear the
way to completing the Quest in violent fashion.
It is possible to resolve things with her peacefully, even if you
previously killed the Pwgras and / or their trees at points marked #4,
#7 and #9. Although if you did heal the Pwgras' trees and turned them
back into Delemgans, they'll add voices of support for you for purposes
of letting you try to heal the tree.
If you want to go the peaceful route, you'll need to indicate a
willingness to heal the tree. Either a Diplomacy check of 8 or an
Alchemy check of 7 will get your foot further in the door. A Druid like
Tekehu can also help matters
along during the dialogue.
At that point, she'll still cling to the belief that the tree and the
rest of the grove are still vibrant and healthy. The Honest reply, or
saying you have no way to heal the tree, will provoke her into attacking
you. The Rational or Benevolent replies will convince her to give you a
chance to heal the tree at #12.
Trying to heal the tree begins a scripted interaction. Destroying the
tree will of course make her and her minions attack you.
A Druid like Tekehu will be
able to speak to the tree and convince it to give up its corruption. If
you have the The Spine of
Thicket Green in your inventory, you can use it to absorb the
corruption out of the tree. Alternatively, you can investigate the tree
and then use your Watcher powers to feed soul essence to the Adra Pillar
inside the tree to heal it.
Healing the tree turns The Rotted Lady into The Green Lady, who won't
attack the party. If any of her daughters remain hostile Pwgras, she'll
indicate she won't interfere if you need to kill them.
There are four symbols, each of which must be aligned with the wheel of
the disc one at a time, and in the proper order. Pushing the disc down
after each selection affirms your choice of that symbol on a given turn.
Getting the symbols in the wrong order can result in Injuries to the
Watcher. The correct order is:
Koiki Fruit
Luminous Adra
Watershaping
Ukaizo
Getting the order right results in you getting the Huana
Chart.
You can now decide whether to let the disk be, or destroy it. Destroying
the disk will provoke an outraged reaction from Tekehu
if he is in the party, but it won't actually result in reputation loss
with him.
A Rauatian Junk ship called the Benevolent
Aegis, led by Captain Pai, will approach you once you've returned
to your ship. He wants to take the Huana
Chart from you, and for the Royal Deadfire Company.
You can choose to attack him, either through naval combat or by boarding
ship, at the outset. Choosing to parley instead opens up different
options:
You can choose to willingly give him the Huana
Chart to earn a reputation increase with the Royal Deadfire
Company and 150cp. You will lose reputation with Tekehu
if he is in the party.
The Watcher can make a Sleight of Hand check (which can be
assisted by other characters) to hide the Huana
Chart from Captain Pai. An unsuccessful check may lead to a
fight with Pai.
You can talk him into leaving willingly if you have at least two
points of positive reputation with the Royal Deadfire Company.
You can make an Intimidation check of 5 based on igniting one of
your own gunpowder barrels at close range. You can follow it up with
Sleight of Hand check of 4 that also earns Clever disposition, or
having one of your companions threaten to light a second gunpowder
barrel, to make him leave willingly.
You can select the Aggressive dialogue option to attack, and again
with the option for either naval combat or boarding.
Now report back to Prince Aruihi. Your rewards will include at least
1,700cp and 11,000+ xp. A Diplomacy check of 5 or having at least 2 good
points of positive reputation with the Huana can get an extra 250cp.
Destroying the stone disk will result in a major loss of reputation with
the Huana, as will having given the Huana
Chart to Captain Pai.
Lying about not having the Huana
Chart in your possession when you actually do earns Stoic
disposition as well as a moderate loss of reputation with the Huana.
The next Huana Quest is From the
Wreckage, but it will not become available until you have
completed the Main Quest called A
Distant Light.
Sorcerer's
Place is a project run entirely by fans and for fans. Maintaining
Sorcerer's Place and a stable environment for all our hosted sites requires a substantial amount of our time and funds on a regular basis, so please consider supporting us to keep the site up & running smoothly. Thank you!
Supporting Sorcerer's Place
Has Sorcerer's Place been useful? If you'd like to show your appreciation
for our hard work on the site, and help us pay the bills the site generates
every month, please consider helping support SP.
Thank you!

 The Rotted Lady is at #11.
Her natural disposition is to attack you. And killing her, along with
the Assassin Vines and Troll that protect her would certainly clear the
way to completing the Quest in violent fashion.
The Rotted Lady is at #11.
Her natural disposition is to attack you. And killing her, along with
the Assassin Vines and Troll that protect her would certainly clear the
way to completing the Quest in violent fashion.