Baldur's Gate logo

Tasloi Black Isle BioWare TSR Xvart


Siege of Dragonspear Online Walkthrough by Beren


INTRO & ABOUT | CHARACTERS | ITEMS | SHOPS
AREAS | QUESTS | IMPORTING ITEMS TO BG2

Disable all ads!

Areas: Prologue | Chapter 7 | Chapter 8 | Chapter 9 | Chapter 10 | Chapter 11 | Chapter 12 | Chapter 13

Chapter 10: Coalition Camp | Bloodbark Grove | Vampire Hideout | Dead Man's Pass | Hidden Cellar | Spider Cave | Dragonspear Castle, Courtyard | Underground River, Surface | Underground River | Kanaglym | Warrens | Dragonspear Castle, Basement | Attack on the Coalition Camp

COALITION CAMP

You'll now have a base of operations from which you can strike out against the Crusade in several ways, before the climactic Siege itself. Numerous side quests are available as well.

Coalition Camp

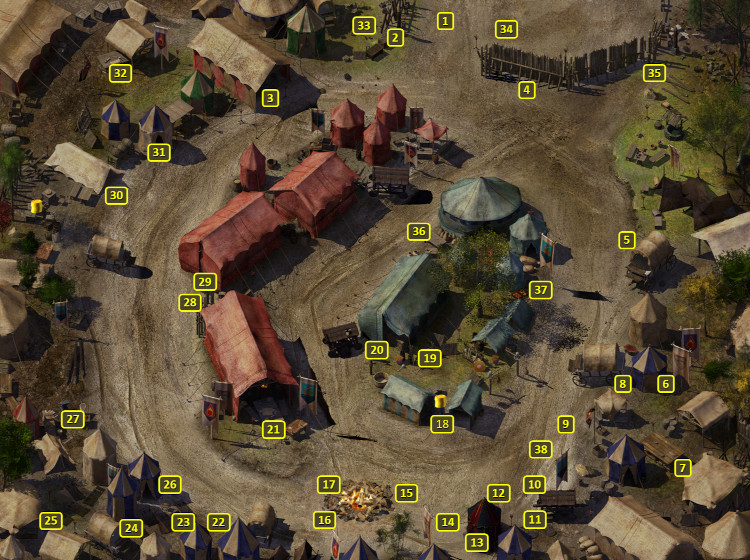
  1. Here is your initial point of entry. There won't be any new accessible areas on the World Map, at least not until you've spoken to other people here and picked up a few quests.

    Spend enough time here and Safana, if she's in your party, will let on that she's pickpocketed several items along the way. And the items she's pickpocketed leads her to believe there is a traitor in the camp. That starts her own personal quest, The Traitor.

    Marshall Nederlok will speak to you, and indicate a displeasure with Commander Torsin de Lancie not ordering an attack on Dragonspear.

    And Glint will be wandering nearby.

    Bence Duncan will be here after you've had a conference with General Stonehand, Marshall Nederlok and Torsin de Lancie. He'll give you the Skie's Gone Missing Quest.

    *NOTE* Leave the Camp for the first time for another area on the world map and you will have an encounter with three Mercenaries led by a Shadowy Figure. You will not be able to use any spells in the area, although you can still use potions and wands and scrolls. The Shadowy Figure will flee if you give signs of winning the fight and his hit points are low enough. One of the Mercenaries has a Battle Axe +1, 2 Potions of Healing and 2 Potions of Extra Healing. Another of the Mercenaries has 2 each of Potions of Healing and Potions of Extra Healing. Another of the Mercenaries has 2 Potions of Healing, 80 Arrows +1, 20 Arrows of Biting and 20 Arrows of Piercing. Another of the Mercenaries has 2 Potions of Healing, 80 Bolts +1, 20 Bolts of Biting and Bolts of Lightning. If you manage to kill the Shadowy Figure he leaves behind 2 Potions of Extra Healing, a Short Sword called Vexation, Shadow Armor and a Letter that suggests that he was acting on behalf of the Hooded Man as a test.

  2. Corwin will be here and ready to join you, if she isn't already in your party.

    A crate directly behind her will have 40 Arrows +1 and 40 Bolts +1.

  3. Here is Belegarm. He sells the same wares as he did in the Coast Way Crossing and the Troll Claw Woods.

    He is also potentially relevant to The Traitor and Memories Of Battles Past Quests.

  4. Here is a Dwarf named Helvdar. He gives the Quest called Helvdar's Lucky Charm. He'd like you to find the leather from a bear in Dead Man's Pass, bring it to Belegarm, and have it fashioned into new boots for him.

    He's also potentially relevant to The Traitor Quest.

  5. Here is a Halfling merchant named Waizahb. She also offers the Quest called On the Fence if you ask her about her special wares.

  6. An Air Djinn named Nazramu will be here, but you can only see him if a party member is wearing the Spectacles of Spectacle. Using a charge pulls him into the Camp, for which he'll be grateful. He then sets up his own shop that offers several unique items.

  7. This crate will have 2 Elixirs of Health, 2 Potions of Healing and Potion of Defense.

  8. M'Khiin will be here if she is not in your active party.

  9. Here is Mizhena, who continues to offer temple healing services as always.

    She gives the Quest called Mizhena's Amulet.

    She is also potentially relevant to The Traitor and On the Fence Quests.

  10. Edwin will be here if he is not in your active party.

  11. Viconia will be here if she isn't in your party.

  12. Neera will be here if she isn't in your party.

  13. Here is the chest that travels with you and holds whatever you want to store, including items you may have found during Baldur's Gate 1.

  14. Jaheira and Khalid will be here if they aren't in your party.

    Khalid being here will actually be your first opportunity for him to join your party.

  15. Dynaheir and Minsc will be here if they're not in the party.

  16. Baeloth will be here if he isn't in your party.

  17. Dorn will be here if he isn't in your party.

  18. Safana will be here if she isn't in your party. Note that she can still give you The Traitor Quest if you approach here after having had the conference with Marshall Nederlok, General Stonehand and Torsin de Lancie at 21 and she isn't in your party.

    Voghiln will be here as well if he isn't in your party.

  19. A War Hammer +1 will be on this rack.

  20. A Potion of Extra Healing will be in this chest.

  21. Approaching this tent results in a conference with Marshall Nederlok, General Stonehand and Torsin de Lancie. They want you to find a way to somehow undermine the network of caverns underneath Dragonspear Castle. On that point Torsin suggests speaking with someone named Phossey Dugdeep. They also suggest being on the lookout for a priest named Hephernaan who has the ear of Caelar Argent.

    Bloodbark Grove and Dead Man's Pass now become accessible through the world map.

    Several more people and Quests now become available throughout the Camp.

  22. A Priestess of Ilmater named Dosia will be here, tending several sick soldiers. She gives out The Uncommon Cold Quest.

  23. A patient named Xerra will be lying on a cot here. You need to speak to him if you want to complete The Uncommon Cold Quest.

  24. A patient named Zidrand will be lying on a cot here. You need to speak to her if you want to complete The Uncommon Cold Quest.

  25. A patient named Yestimell will be lying on a cot here. You need to speak to him if you want to complete The Uncommon Cold Quest.

  26. Here is Hyreth, who gives The Wounded Zealot Quest.

  27. Here is Jegg Hillcarver who has a collection of armor, shields and weapons for sale.

    If you previously obtained the Rhino Beetle Shell from the Spider Cave, then she can craft it into either the Rhino Beetle Plate or the Rhino Beetle Shield at your choice.

    If you previously obtained the Dragon Scales from the Wyrm Cave, then she can craft it into either the Dragonscale Armor or the Dragonscale Shield at your choice.

    You can also ask Jegg to make an armor for M'Khiin if she's in the party, but only if you had previously completed The Creeping Darkness Quest (see below). Jegg can then make Jegg's Leathers.

    If you still have the Voidstone Shards after having completed The Creeping Darkness Quest then Jegg can fashion them into an item of your choice, with the possible selections being 80 Bullets of Darkness +3, 80 Void-tipped Arrows, the Voidsword +3 or the Voidhammer +3.

  28. Here is Simonetta Twoedged, who gives the Memories Of Battles Past Quest.

    She's also relevant to The Traitor Quest.

  29. This locked chest will have a Potion of Healing and 2 Potions of Heroism.

  30. Here is Vigilant Halasan, who gives the Troop Train Quest.

    She's also relevant to The Traitor and Memories Of Battles Past Quests.

  31. Thaird will be here, providing innkeeper services.

  32. Here is Malden Col, who is the traitor that Safana becomes determined to uncover as part of her personal Quest, The Traitor.

    He also has a Seal of Caelar, which can be pickpocketed by a Thief who has a lot of Pickpocketing skill points. If you manage to get it from him, it may make things easier in other parts of the game. If you want to get it from him, you'll need to do so before uncovering him as The Traitor.

  33. Torsin de Lancie and Phossey Dugdeep will be here after the conference. They'll give you two items that are relevant to the Important Events Quest. One is the Barrel of Bwoosh! which is intended to blow a hole in the caverns beneath Dragonspear Castle. The other is a Stone Dowser, which is meant to guide you to the best spot to plant the Barrel of Bwoosh!.

    Phossey will take her leave. Torsin will want to give you an additional item, the Poison of Terror that is intended to weaken the troops of the Crusade. Whether you accept it is up to you. It helps complete the Important Events Quest but is not strictly necessary.

  34. After the conference you will find Sergeant Wilch here trying to bar entry to a Gnome merchant named Wilhelmina. Wilhelmina offers to sell you Wilhelmina's Miracle Turnip Juice. If Neera is in the party then she'll buy it on the spot in pursuit of her personal Quest, The Call of the Wild Mage. If she isn't in the party, you can always buy it from Wilhelmina and then give it to Neera later.

    It's up to you whether you persuade Sergeant Wilch to allow Wilhelmina into the Camp, and it won't really matter. Wilhelmina will disappear for good afterwards.

  35. Rhynwis may be here as part of the Den Of Thieves Quest.

  36. Two individuals will be here after the conference. Pritchard is relevant to Glint Gardnersonson's personal Quest, and The Problem With Pritchard Quest.

    General Stonehand gives the Den Of Thieves Quest.

  37. Sempek and Damius will be here after the conference. They offer The Problem With Pritchard Quest.

  38. Marshall Nederlok will be here after the conference. He is relevant to The Traitor Quest.

Amazon.com
Amazon.ca
Amazon.co.uk
Sorcerer's Place is a project run entirely by fans and for fans. Maintaining Sorcerer's Place and a stable environment for all our hosted sites requires a substantial amount of our time and funds on a regular basis, so please consider supporting us to keep the site up & running smoothly. Thank you!

Disable all ads!