The Siege of Dragonspear won't happen just yet. You have defend the Coalition Camp from wave after wave of attacks first.
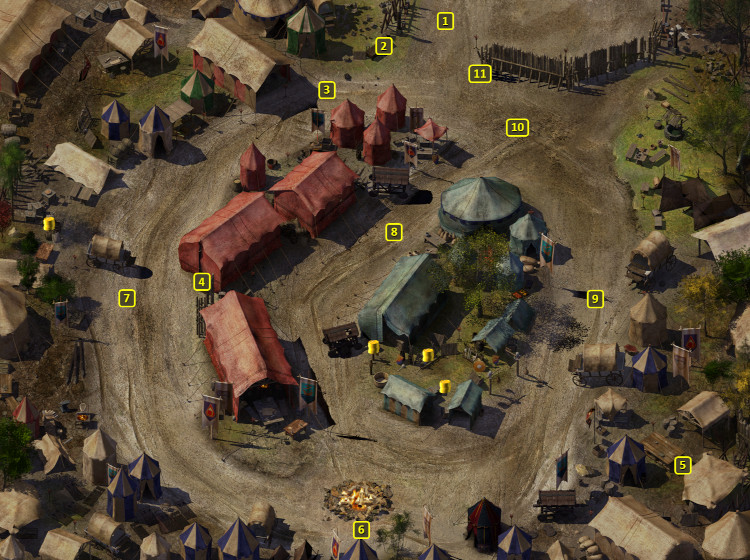
Here is your initial point of entry after having returned from the parley at Dead Man's Pass. Bence Duncan will greet you and inform you that you need to speak to Andrus in the south.
Here is Andrus, who explains that the explosive residue that Phossey used for the Barrel of Bwoosh! is now a danger that can destroy the entire Camp should the Crusade ignite it with fire. Andrus needs you to hold off several waves of Crusade attacks until she can stabilize the residue and prevent the explosion. You may have units available that you can choose with each wave, depending on your prior choices during the game:
Archers
War Mages
Wizard Slayers
"Special Operations", i.e. Rogues from the fencing operation in the Camp.
If you sided with the Dwarves Of Dumathoin during Chapter 8, then several Dwarves will also be available as allies.
If you sided with the Coldhearth Lich and against the Dwarves Of Dumathoin during Chapter 8, then several undead will show up as allies. That also results in a -1 loss of reputation.
A priestess of Ilmater named Dosia will arrive shortly after you speak to Andrus, and then stay next to Andrus. She can offer two types of healing, both before the first attack wave starts, and in between each successive attack wave. Regular healing restores hit points, while special healing restores spells that were expended. You can only choose one or the other before a new attack starts. She'll also die if you use her three times.
You'll now have to fight off four waves of attack. You'll have significant (but not unlimited) time after each wave to loot the dead bodies. The next wave won't trigger until you head back to Andrus, or you take too long looting the dead, and when Andrus speaks to you again. Speaking to Andrus before a wave starts also gives you a choice of allies who will participate in the battle, one of the groups listed above. Speaking to Andrus also gives you a limited amount of time to take advantage of Dosia's healing. *NOTE* One strategy is to let loose any offensive spells at your disposal that will give you the advantage. Spells like Chaos and Slow in particular can minimize how much damage enemies can do to your party members. Once the battle is over, take your time to loot the dead bodies. Now also take the time to cast any healing spells you may have on wounded party members. And if you conducted the battle effectively enough, it should be enough. Go back to Andrus to get the next wave started. Speak to Dosia and choose the special rejuvenating option, which will recoup your offensive spells and healing spells alike. Another possibility is to try to win the battle in restraint in order to avoid Dosia overtaxing and killing herself. That means she'll be available as a healer for the next stage of the game. Most of the Crusaders will have a Potion of Healing.
The first wave will be here against Ogres and Trolls, along with a few mercenaries, led by Yarok The archers are good allies for this fight, as their flaming arrows can permanently kill the Trolls. Yarok leaves behind a Leather Armor called Cornugon's Revenge +2.
The third wave will be here against Cavaliers, Crusader Elites and Crusader Clerics led by Rhayla. Crowd-control spells, like Web, will do wonders if you place it well and get it off fast enough. War Mages who keep their distance will hang back will also fit in with that strategy. Rhayla leaves behind a Long Sword +2, an Elven Chain +1 and a Potion of Extra Healing.
Once all the waves are finished, Marshall Nederlok will arrive and inform you that the siege of Dragonspear Castle is about to begin, and that you'll need to meet up with the other commanders there.
Dealing with all the waves also means that Ophyllis will be at 11.
Ophyllis will be here, but only after you fight off all four waves of attack on the camp. He was on his way to bring your gold back to you, but got robbed of it by the Crusaders. They also left a sword in his chest, which he dies from after the conversation concludes. You can now loot his body for Ophyllis's Short Sword +2.
Sorcerer's
Place is a project run entirely by fans and for fans. Maintaining
Sorcerer's Place and a stable environment for all our hosted sites requires a substantial amount of our time and funds on a regular basis, so please consider supporting us to keep the site up & running smoothly. Thank you!
Supporting Sorcerer's Place
Has Sorcerer's Place been useful? If you'd like to show your appreciation
for our hard work on the site, and help us pay the bills the site generates
every month, please consider helping support SP.
Thank you!