-

- Forums
- Chatrooms
- Gallery
- Gameplay Videos
- Upload
- Articles
- Mod Reviews
- Shop SP: Games, Movies, Books
|
|
| Pillars of Eternity 2 Video-Based Walkthrough by David Milward |
The Sloop
The Drunken Sailor
Rum-Dumb Riggere is being held in the Port Maje jail. He would like you to free him, and he'll join you as a Crew Member. The conversation starts The Drunken Sailor Task. He is in fact one of the best Crew Members there is. He starts off with two ranks in Deckhand, but no other skills. That means he can gain 4 ranks in Deckhand.
The most obvious way is to pay Savia 400cp to free him. There will be an option to talk Savia down to 300cp if you previously completed the Restoring Order Task for her.
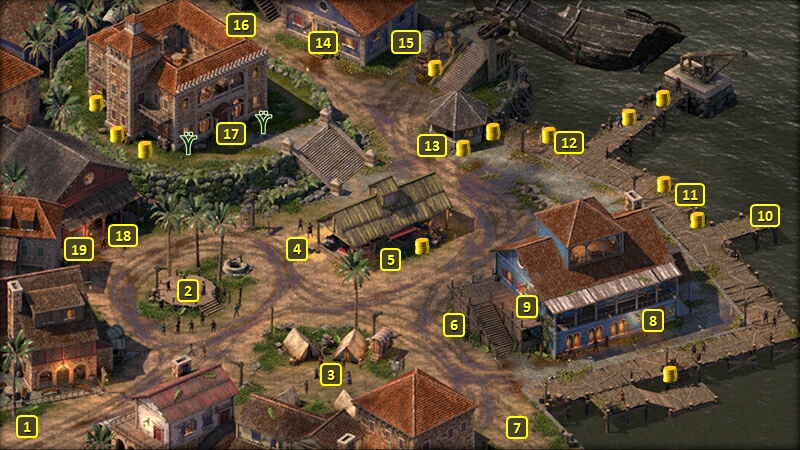
Another approach involves blowing out the back wall of his cell. You can go to the upper floor of Kraken's Eye, the entrance to which is at #7 on the map of Port Maje Harbor. A merchant named Norgun will be in a room on the south side of the upper floor. You can either purchase a Cinder Bomb from him, or steal one from his chest when he momentarily wanders outside his room.
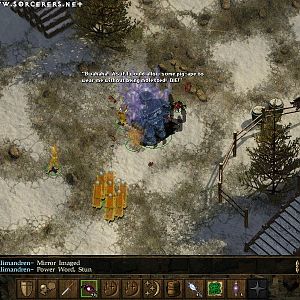
Go back to near the jail building. There's now a portion of the right side of the jail building that you can click on that you couldn't previously. Click on it, and you'll have the option to use the Cinder Bomb to blow out the wall. Ruggere will run out the opening, and the task will be completed.
Note that doing things this way will earn disapproval from both Aloth and Xoti as an Irresponsible action.
I could also pickpocket Savia for the Port Maje Jail Key, which can open the door to Riggere's cell.
I leave the jail for the moment, the door to which is at #14 on the map of Port Maje Harbor. I go to the exit at #16, and switch out Peredyne for Mabel. I have Mabel take Two-Handed Style with her 4th level-up, in order to increase her Damage with her Hunting Bow.
I go back inside the jail, and wait in three hour intervals until Savia is at the far west side of the jail. Now Mabel simply picks the lock to Riggere's cell. Riggere bids me to meet him at the market of Port Maje.
I leave the jail and meet up with him just a little south of #13. He says he'll join my crew once he hears the bell of my ship. I get 1,000+ xp for completing the Task.
*Evil* The Drunken Sailor
*Evil* I have Mabel unlock the door within plain sight of Savia, which provokes her into attacking me. I easily gang up on her. The party and Rum-Dumb Riggere both promptly leave the Jail.
Most of the party members now have enough experience to advance another level. Peredyne takes Divine Purpose.
Zarathos selects Thick-Skinned. He will be wearing Heavy Armor throughout the game, and ultimately one that increases in Armor Rating as he becomes lower and lower in Health. Thick-Skinned also increases Engagement by +1. That also bolsters the same armor's power.
Xoti selects Dance of Death. It will be a good way later on to passively recoup Wounds as long as she avoids getting Hit to the maximum extent possible.
Eder selects Dirty Fighting. The 15% chance of converting Hits to Critical Hits is pretty much obligatory for any build that includes Rogue.
I leave town afterwards.
Stranded
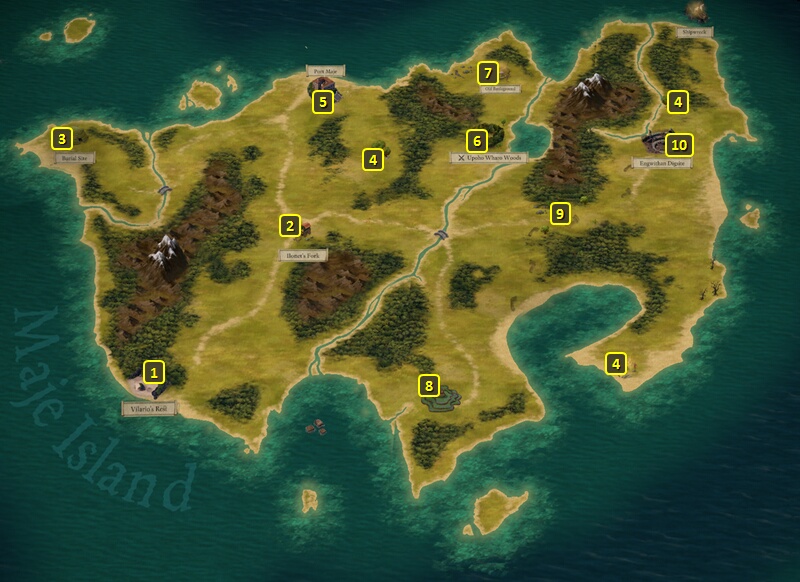
I travel from Port Maje at #3 on the map of Maje Island to Vilario's Rest at #1.
Stormspeaker Ikawha meets me there, just as Huana and Vailian workers have finished putting my ship back together. That completes the Stranded Quest.
Serafen Joins
I am now back on my ship for the first time. I get a letter from somebody named Vatnir, which starts the Quest of the Beast of Winter expansion called An Honored Guest.
The Basic Provisions Task starts, which will easily be completed as soon as I add all of Ammunition, Medicine and Repair Supplies in any amounts.
The Skeleton Crew Task starts, and I will complete that very soon. The Steward reminds me to seek a port as soon as possible to get the ship in true working order.
I switch Eld Engrim to Surgeon, and that's going to be his ongoing role in my Crew for the rest of the game. I place Irrena in the spare Crew, which gives her time to recover from her Injury while consuming Medicine.
I go a little east and soon get boarded by a Principi Dhow. I have an extended conversation with Captain Furrante and Serafen, who joins my party as a Barbarian for either the Good Party and Evil Party. *NOTE* I ALWAYS have him as a Barbarian and NEVER touch Cipher with him. Gaming forums for PoE2 are filled with horror stories of his Wild Mind once in a while activating massive Shocking Damage on his own party at the worst possible moment, very often wiping out his own comrades.
Skeleton Crew
I sail around Maje Island until I reach a Shipwreck near its northeast corner. I reload until I get decent loot from it. An Iron Thunderer Cannon, plus plenty of extras, works for me. I thereafter dock at Port Maje.
Alliria gives the Blunting Belt to Serafen, who wears it for the rest of the game. It adds +1 to both Piercing and Slashing Armor Rating. Serafen's build is based on maximizing armor, so I go all in on any item that can provide Armor bonuses.
Serafen also levels up. Frenzy is his default starting ability.
Blooded is taken at 2nd level. It provides a +25% bonus to Damage while the Barbarian is himself at 25% Health or less.
I select two abilities at 3rd Level. One is Thick-Skinned, which is always a good passive for a Barbarian to take. But it has special meaning for this particular Barbarian build, which emphasizes building up Armor Rating to the maximum extent possible.
The other is Two Weapon Style, as his fighting style will be based on dual-wielding a Sabre and a Flail.
He takes Accurate Carnage at 4th level, which is a standard choice for a Barbarian.
I select two abilities at 5th level. One is Bloody Slaughter, a passive ability that provides a 20% chance of converting Hits to Critical Hits and +50% Critical Hit Damage, both against Near Death targets. This is a good ability to take when you have other abilities or benefits that trigger on landing the killing blow, including ...
Bloodlust, which provides a +20% Action Speed for 10 seconds after landing a killing blow. Also a standard choice for many Barbarians.
He also takes the Sabre weapon proficiency. It provides +2 Penetration with Sabres, but at the cost of +50% Recovery when using Sabres. I don't mind, as his build will be based on living with Recovery Time penalties, but often being able to ignore them through multiple abilities and weapons that can provide instant Recovery.
Xoti gains two abilities on her 5th level-up. One of them is Swift Flurry. It raises Dexterity by +5 and Action Speed by +15%. It also provides a 33% chance of an instant extra Attack when the Monk lands a Critical Hit. Swift Flurry, as long as you ensure a good probability of Critical Hits, is an easy choice over Lightning Strikes for a Monk who is engaged in Melee Combat.
The other is Torment's Reach. It is a formidable ability, as it makes a Primary Attack on the initial target, but then scores Crushing Damage along with Staggered (-5 Might, cannot Engage) on enemies behind the initial target. Using the full breadth of a Monk's activated abilities to their best advantage requires a LOT of micro-management. I tend to prefer that Monks in my core parties enjoy the passive bonuses that come with the Duality of Mortal Presence without expending Wounds, most of the time that is. But I don't mind taking these kinds of activated abilities for a Monk whose participation in ship combat is going to be managed by the computer's A.I.
Eder also gains two abilities on his fifth level-up. He takes Rapid Recovery, which increases the Health recovery of Constant Recovery from 5 Health per 3 sec to 7 Health per 3 sec. Not a bad choice for a dedicated tank.
He also takes Tactical Barrage. It improves Disciplined Barrage so that it also provides the Acute (+5 Intellect, +1 Power Levels) Inspiration for its duration. I often use Disciplined Strikes for damage-dealing builds where I want to maximize their probability of Critical Hits. I often prefer Tactical Barrage for a tank character. Use it first at the start of combat, and the Intellect boost will increase the duration of any subsequent buffs like Vigorous Defense.
Aloth takes Merciless Gaze on his 5th level-up. It provides a 15% chance of converting Hits to Critical Hits. It will eventually help realize the power of the Frostfall, whose powers often depend on landing Critical Hits through either weapons or spells. He takes it on level-up as it won't be available through any of the Grimoires that I have in mind for him.
Alliria takes Infuse with Vital Essence on her 5th level-up. It instantly adds +5 to both Constitution and Intellect, and has a quite significant duration. It's pretty much the first spell almost every Wizard has to cast first, as the Intellect bonus will increase the duration of any buff thereafter, as well as the duration of any other spell. The bonus to Constitution will be welcome for any Wizard multi-class that includes martial abilities as well. And that is especially true for a Blood Mage, who frequently has to take Damage in order to recover spells for re-use. She takes it on level-up as it won't be available through any of the Grimoires that she'll be using.
I fit the left side of the ship with the Vailian Hullbreakers.
I assign Chitupec to be one of my Cannoneers, as he'll be able to reach 3 ranks in Cannoneer. I hire Vanizzi who will be able to reach 4 ranks in Cannoneer, Haema who will be able to reach 4 ranks as Cook, and Ora the Mad who will be able to reach 4 ranks as Deckhand. Rum-Dumb Riggere is already on hand as the other Deckhand.
Assembling the Crew also completes the Skeleton Crew Task. Now I leave Port Maje by ship.
*Evil* Skeleton Crew
Aloth selects Two Weapon Style once I reach Port Maje Harbor again. He'll benefit from the +20% Action Speed as he'll be either attacking with a pair of Scepters, or a Scepter in one hand and Kalakoth's Minor Blights from the other.
Serafen levels up too. He takes the same level-ups up to this point as he does when he's in the good party, although there will be divergences soon enough. But there are a couple of differences in emphasis worth noting.
The Strong Inspiration provided by Frenzy will eventually be upgraded to Tenacious (+5 Might, +2 Penetration) by the Slayer's Claw Axe.
I also expect that Blooded will come into play significantly more often for the evil version of Serafen than the good one, as the evil build encourages Critical Hits against him. I certainly don't mind a passive like this for a character who's restricted to mostly ship combat.
He also takes the Sword weapon proficiency on his 4th level-up. The Half-Sword modal increases Penetration with a Sword by +2, but at the cost of -15 Deflection. But that penalty will actually tie in with encouraging Critical Hits against Serafen.
I fit the left side of the ship with the Vailian Hullbreakers.
I hire Ikuiq (since I let Chitupec die) and Vanizzi as my Cannoneers, and Ora the Mad as my second Deckhand.
Now it's on to Fort Deadlight.