-

- Forums
- Chatrooms
- Gallery
- Gameplay Videos
- Upload
- Articles
- Mod Reviews
- Shop SP: Games, Movies, Books
|
|
| Pillars of Eternity 2 Video-Based Walkthrough by David Milward |
Engwithan Digsite
*Evil* Arrival at the Engwithan Digsite
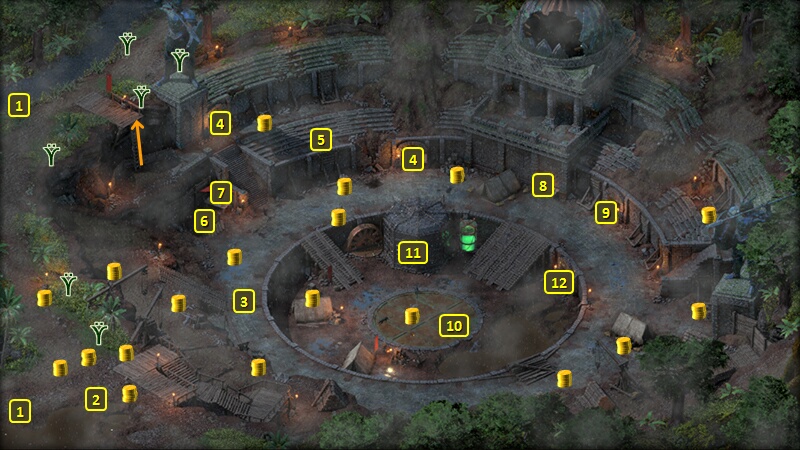
The party arrives at #1 on the map of the Digsite. I go on ahead to #2, whereupon Xoti wants to harvest the dead souls (which aren't there). Zarathos obliges her, and earns a little Shady disposition along the way. He also begins to take a romantic interest in her by caressing her cheek.
My hirelings now have enough xp to advance to the second level. I select Deep Faith for Peredyne, to boost her Defenses. I select Lingering Echoes for Mabel, so that her Whispers of Treason lasts longer.
I conclude by collecting Plants and money from the northwest part of the Digsite and then coming back.
*Good* Peredyne and Mabel take the same abilities when they level-up in the Good party as well.
Weathered Journal Page
There will be a few Boars and Wurms at #3. I set up a shield wall at the top of the bridge to their left. Eder goes on ahead for a bit to get their attention, and then regroups with the shield wall. I attack whichever one comes within reach, using Second Wind, or White Flames from Alliria, or Lay on Hands from Peredyne as needed. I then Flank and take out the Wurms after I've finished with the Boars.
I go south and loot some items, and then go to the table at #7. It has the Weathered Journal Page, which indicates that Oderisi's research may have yielded success.
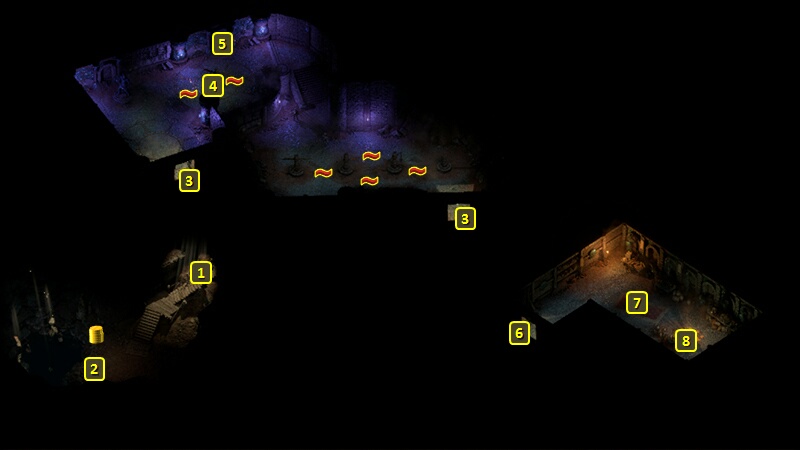
I go down the stairs at #6.
Luminous Adra Pool
That brings me to #1 on the map of the Interior of the Engwithan Digsite. I easily defeat the Wurm and two Brine Imps at #2. I grab the Luminous Adra Dust and Ta Ondra Taras from the vases and go back up the stairs.
Foreman's Quarters
I return to #6 on the map of the exterior of the Engwithan Digsite. I go east, loot some items on the east side, and then go through the door at #9.
That brings me to #6 on the map of the interior, the Foreman's Quarters. I defeat the Cave Beetles and Brine Imps at #7.
I grab the Champion's Medallion from the table at #8. It will come in handy soon. I go back out the door at #6 after that.
Ancient Training Hall
I am back at #9 on the map of the exterior. I go north and up the stairs, the ones at #4 but more towards the northwest corner. There's a Pet cat named Gosha if you're interested.
I am now at door at #3, the one more to the west of the interior. There will be some Skeleton Warriors and a Skeleton Archer led by a Skeleton Sorcerer. They'll have very high Armor Rating to everything else besides Crushing Damage. But their Armor Rating against Crushing Damage is very low. Xoti has her Monk Fists. Eder and Peredyne already have their War Hammers and Shields. Alliria packs a Flail in her main-hand, and a Torch which can function as a Crushing Damage off-hand weapon when needed.
Mabel goes into Stealth mode, and discreetly disarms a couple of traps.
She regroups, and then the whole party goes into Stealth mode. I wait until the two patrolling Skeleton Warriors have gone more east, and then I start to approach. My objective is to get as close as I can to the Skeleton Sorcerer with a view towards taking him out as quickly as possible.
I can't quite get everyone on top of him. So I have Eder and Peredyne Flank him, and wear him down. Alliria and Xoti can't quite reach the Sorcerer, so they instead Flank and wear down the Archer.
I then Flank and take out the Skeleton Warriors one by one after I have taken care of the Archer and the Sorcerer.
Eder takes Determination on his 4th level-up. It provides +20 to all Defenses against any attack that inflicts a Constitution, Intellect or Perception Affliction. A good passive to have for a dedicated tank.
Alliria takes two abilities on her 4th level-up. One of them is Zealous Aura. She'll activate Zealous Focus, which gives everyone in the party +5 Accuracy. I'll leave Zealous Endurance for Pallegina when she joins the party.
She also takes Arcane Veil. It provides a +50 bonus to Deflection, although firearms or other Veil-piercing attacks will ignore that bonus. The starting duration of 12 sec may not sound like a big deal. But high Intellect and an increase in Power Levels as the game progresses will see its duration increase markedly. And then a well placed Wall of Draining (after taking that on the 19th level-up) will increase its duration immensely, usually for the rest of the fight. I take it on level-up because it won't be available through any of the Grimoires that I have in mind for her.
She also took the Wand proficiency. She'll at some point use a Wand as part of an alternate weapon set. And the Interfering Barrage modal will impose an Accuracy penalty on its target, which is well worth the penalty to Damage as Wands don't inflict much Damage to begin with. She equips two of them in her alternate weapon set.
A sarcophagus at #5 has Gauntlets of Accuracy. Alliria wears them for now, although I ultimately intend to give them to Mirke when she joins.
I go east, and disarm the traps near the other door marked #3 but to the east. I thereafter leave the Ancient Training Hall.
*Evil* Ancient Training Hall
Zarathos takes Accurate Carnage. That's a given, since his build involves maximizing the range and damage of Carnage. He also takes Two Weapon Style. The 20% bonus to Action Speed applies to Monk Fists as well.
Zarathos gets the Gauntlets of Accuracy for now.
Xoti gains Withdraw automatically, which can be really handy for when a party member is too close to 0 Health for comfort. She takes Weapon and Shield Style, which is a natural for any character that will use a shield. She also takes Holy Meditation. The +5 Resolve also means +5 Deflection for everyone. The Resolute Inspiration will also add a point of Concentration every 6 seconds for every character. It will be one of the buffs that benefits from endless extension through Salvation of Time.
Eder takes Two-Handed Style, which is a given for when he begins to wield a two-handed axe. He also takes Fighter Stances, with a view towards upgrading to Mob Stance.
Scrawled Note
I am now at the door marked #4, but closer to the center of the Digsite. I bunch everyone back into a little corner between the wall and a tent just to the east. Mabel is tucked behind everyone. Alliria also performs backrank duty for the next fight. She's going to use her two Wands as part of her alternate weapon set, while using the Interfering Barrage modal. The rest of the party forms a half-wall around them.
I send Eder ahead. He finds a Scrawled Note on the table at #8. He continues on to get the attention of the Beasts at #10.
He leads the Boar and three Panthers back to the rest of the party. It's a matter of attacking which steps up to Eder, Xoti and Peredyne, while Alliria and Mabel use Ranged Attacks.
Mabel occasionally uses Whispers of Treason on a Panther that is just behind the Beast that the other characters are attacking, which ensures Flanking.
I of course sometimes have to use healing resources like Lay on Hands or Second Wind. Note that White Flames from Alliria works just as well when she's dual-wielding Wands as when she's dual-wielding Melee Weapons, as long as she's still close enough to her party members.
The party then goes on together and takes out a Wurm who came up the ramp but didn't follow all the way.
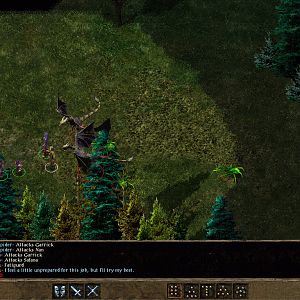
*NOTE* The Drake and the others not following was an unusual and fortunate turn. The strategy involved is still the relatively best one in my opinion, but pulling it off here does require some bounces going my way, and a willingness to use any and every resource at my disposal, like Potions of Minor Healing and the Scroll of Minor Healing I had earlier found on the table at #7. Also, I make the Drake the priority target for Whispers of Treason if and when it gets close enough.
Xoti takes Two-Handed Style on her 4th level-up. The +15% Damage with two-handed weapons will come into play when she starts wielding Twin Eels.
Now I have Mabel equip a Pistol, and then have the whole party go into Stealth mode. They make their way down the ramp and into the central pit. They sneak their way behind the tent on the south side of the pit.
I wait until the remaining Wurm comes closer, and that's when Mabel hits the Gunpowder Barrel with her Pistol. It explodes and severely damages the Wurm.
Eder and Peredyne go to the right side of the tent to tank the Drake and the remaining Panther.
Xoti goes around the left side of the tent and quickly finishes off the Wurm. She then sets up behind the Drake and the Panther in order to Flank them.
Mabel uses Whispers of Treason on the Drake, and it helps me wear down the remaining Panther.
Now I surround and gang up on the Drake. At this point I notice that it's about to use its fiery breath weapon. I have Eder use Knockdown on it, which knocks it down to the ground and prevents the fire breath. I shortly thereafter finish it off.
Aloth Joins
I click on the cage at #11, and release the Animancers who had to keep themselves trapped within. The conversation eventually leads to Aloth joining the party as a Battlemage. I avoided the Honest dialogue option that would have exposed his identity in front of the Animancers, because Alliria didn't want to lose any reputation with him.
I take Thaos' Headdress from him, with the intention of giving it to Ydwin when she joins.
I give him the Wise Teeth Necklace, which he wears for the rest of the game. The +1 bonus to History will help raise his defenses in conjunction with The Giftbearer's Cloth when he gets that. The +1 bonus to Insight is sugar on top.
He starts off with Minoletta's Minor Missiles and Knockdown as his starting abilities. He takes Disciplined Barrage on his 2nd level-up. The +5 bonus to Perception is certainly welcome. The intention is to take Disciplined Strikes as an upgrade. I won't take Tactical Barrage, as I'll be getting an Intellect bonus through another ability instead.
He takes Wizard's Double on his 3rd level-up. It provides a +40 bonus to Deflection that lasts for as long as the caster can avoid a Hit against any of his Defenses. Grazes won't count. Getting the most mileage out of this spell therefore requires maximizing ALL of the caster's Defenses to the greatest extent possible, AND obtaining as many abilities and items as possible that will provide multiple chances to reduce Hits to Grazes. That's the basis for his particular Battlemage build. I take it on level-up because it won't be available in two of the Grimoires that I have in mind for him.
He takes two abilities on his 4th level-up. One of them is Weapon & Shield Style. It provides a +6 bonus to Deflection when using a Shield, and adds the Deflection bonus of the Shield to the Reflexes Defense. It's a natural choice for any shield-tank build.
He also takes Infuse with Vital Essence. It instantly adds +5 to both Constitution and Intellect, and has a quite significant duration. It's pretty much the first spell almost every Wizard has to cast, as the Intellect bonus will increase the duration of any buff thereafter, as well as the duration of any other spell. The bonus to Constitution will be welcome for any Wizard multi-class that includes martial abilities as well. He takes it on level-up as it won't be available through any of the Grimoires that he'll be using.
He also takes the Medium Shield proficiency. I equip him with a Sword, a Medium Shield, and a Fine Leather Armor. He activates the Block modal. The 30% chance to avoid any Weapon Attack outright is well worth the +25% Recovery Time with weapons, especially as it will augment the use of the Wizard's Double spell.
*Evil* Aloth Joins
Aloth joins as a Spellblade (Rogue / Wizard multi-class) instead. Zarathos likewise avoids blowing his cover. But in this instance the opportunities to lose influence will come later. I take Thaos' Headdress away from him, with a view towards giving it to Ydwin.
Aloth starts off with Crippling Strike and Minoletta's Minor Missiles.
He takes Backstab on his 2nd level-up. He'll be able to use Ranged Attacks for +100% Damage as long he's within 2m or less. And he can set it up either with the Eye of Wael Scepter, or his next ability ...
Escape is chosen on the 3rd level-up. A teleport ability is handy to have for a glass cannon like a Spellblade. It also briefly confers Invisibility, which in turn enables Backstabs.
I get two abilities on the fourth level-up. One of them is Dirty Fighting, a passive ability that grants a 15% chance of converting Hits to Critical Hits.
The other is Infuse with Vital Essence. Aloth selects it on level-up because it won't be available in his future Grimoire of choice, Arkemyr's Grimoire.
I go through the door at #12 to enter the Arena Sub-Level.