-

- Forums
- Chatrooms
- Gallery
- Gameplay Videos
- Upload
- Articles
- Mod Reviews
- Shop SP: Games, Movies, Books
|
|
| Pillars of Eternity 2 Video-Based Walkthrough by David Milward |
Maje Island
Upoho Wharo Woods
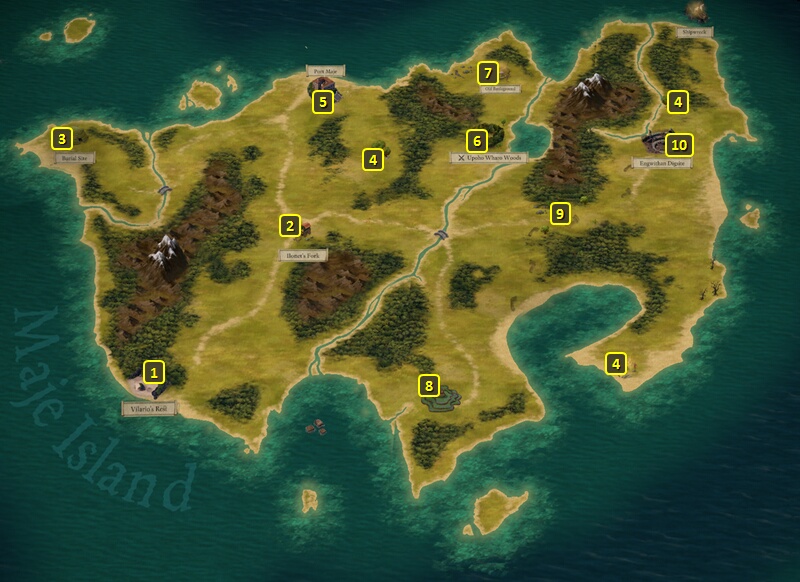
I start off at #3 on the map of Maje island. I travel to the Upoho Wharo Woods at #4. Clicking on it begins a scripted interaction.
Eder makes a Survival check of 2 to reveal the presence of Boars, and then a Perception check of 12 to find a sigil marked on a tree. A History check of 1 could have revealed a little more of its origins.
A Druid and his Boars start to make their way towards the party. I could have made a Stealth check of 2 to keep hidden for the time being. If I had made that first Stealth check, I could then choose to confront him openly or make another Stealth check of 4 to get out of the Woods entirely.
I decide to confront him openly without any Stealth checks, you have some options for how to go about things.
You can parley with him for a bit, and then a few dialogue options will show up. One of them chooses battle, but using the Intimidate skill. It earns disapproval from Eder, whereas attacking right away without any extended parley won't.
Alliria makes a Diplomacy check of 2. She follows up with an Insight check of 3 to convince her to let you leave willingly. A Survival check of 2 woulud also have worked as an alternative follow-up after the Diplomacy check. The Old Druid gives her the Wise Teeth Necklace. I'll hold onto it for Aloth.
I continue north to get some random items from the Old Battleground. I get a fair amount of cash, but I also get a Blunting Belt as a random item. I'll hold onto it for Serafen.
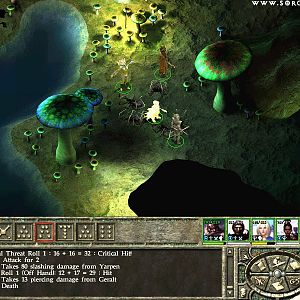
*Evil* Upoho Wharo Woods
Zarathos decides to attack the Druid straightaway. Eder absorbs the onslaught of the Large Boar and two of the Young Boars. Peredyne tanks on one of the other Young Boars.
Mabel uses Whispers of Treason on the Large Boar, which makes it a much easier fight. It not only stops attacking me for the duration, but it helps bring the others down.
Zarathos sets up Flanking on the Young Boars, and I take them down first. They go down easier, and it reduces the overall number of attackers quicker. Xoti and Peredyne use their healing resources whenever needed.
It then becomes a matter of ganging up on the Old Druid, and then the Large Boar last.
Zarathos wears the Wise Teeth Necklace as an interim item.
Whakura Pass
Now I travel to Whakura Pass at #6, which is inhabited by Xaurips. Eder makes a Survival check of 1 to avoid the tripwire. Mabel makes a Mechanics check of 1 to disarm the Corrosive Trap.
I could quietly leave the area, without any confrontation with the Xaurips. But I prefer to search for them.
Sneaking up on them would provide some options. One option is to make a Stealth check of 1 to get close to them before attacking them in combat.
Other options after sneaking use Class-specific abilities to get rid of them. A Ranger can scare them away with a few well-placed shots. A Cipher can force them to kill each other. Any caster class that has a spell that can cause damage to multiple targets can drive them away with the spell. Any of those scenarios lead to you getting some loot without a fight.
But I prefer to draw weapons and attack straightaway. Alliria, Eder and Peredyne form a shield wall. Mabel fires away with her bow at a distance. Xoti waits until the position settles. And once it does, she goes around and behind the Xaurips. She thus sets up Flanking position as I take down each Xaurip one by one. I loot the Xaurips' bodies and the ashen remains for any cash or loot that I can find, and then leave.
I then go to the Engwithan Digsite at #7.