-

- Forums
- Chatrooms
- Gallery
- Gameplay Videos
- Upload
- Articles
- Mod Reviews
- Shop SP: Games, Movies, Books
|
|
| Pillars of Eternity 2 Video-Based Walkthrough by David Milward |
Sea Cave
Waterlogged Note
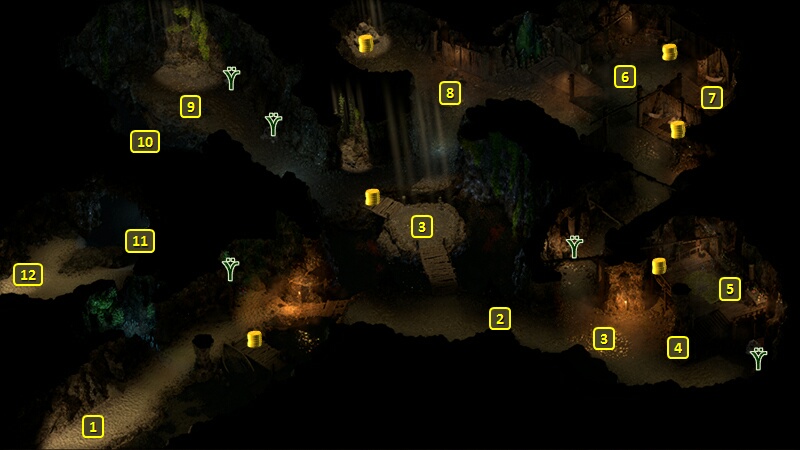
I start off at #1 on the map of the Sea Cave. I go northeast and kill off a couple of Cave Beetles at #2.
I then cross the small bridge and kill a few Skeletons at #3. At least one of them leaves behind a War Hammer, which will come in handy during some upcoming battles.
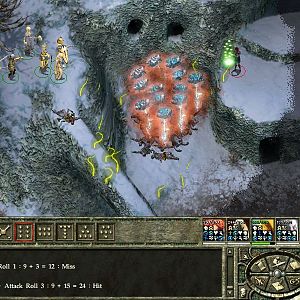
I next travel towards the southeast corner, and kill some Skeletons at #4. A Revenant and Rotghast soon join the fight just as I finish off the Skeletons. I Flank and kill off the Revenant. Alliria uses her White Flames whenever both Eder and herself are down Health. The Rotghast will, when it's down enough Health, use a kind of vomiting attack that can damage multiple party members. When I notice it's doing that, I have Eder use Knockdown on it to prevent that. I eventually outlast all of them.
A corpse at #5 has the Waterlogged Note, which provides some vague background information.
Rusted Copper Construct
I begin by putting together a second weapon set for Eder that consists of a War Hammer and a Medium Shield.
I go ahead to #6, where there's three Skeletons, two Revenants and a Rusted Copper Construct. I let them come to me, with Eder holding their attention, and Alliria staying on the sideline and waiting for opportunities to Flank. Eder starts with his War Hammer set, so that he and Alliria can quickly take out the Skeletons. He switches to his Sabres and Medium Shield set for the Revenants, who have higher Armor Rating against Crushing Damage but weaker Armor Rating against Slashing Damage. He switches back to his War Hammer against the Construct, which has high Armor Rating against Slashing Damage but weak Armor Rating against Crushing Damage. Alliria of course uses her White Flames when it's needed.
The corpse at #7 has a Ring of Minor Protection. Eder wears it for the rest of the game. Its +5 bonus to all Defenses besides Deflection will stack with passives that he will take on level-ups that boost those same Defenses.
Beodul
I encounter Beodul at #8, who is one of the crew members who needs to be found for purposes of the Helping Hands Quest. He's stuck and surrounded by traps, but there's ways to get him out of it:
*Evil* Beodul
Eder as a Swashbuckler has Mechanics as a class skill, so he farms the traps for xp.
Zarathos of course selects the Aggressive reply towards Beodul about having his time wasted.
Sea Bats
I go northwest and fight a few Sea Bats at #9. Flanking, and either Second Wind or White Flames when needed, gets the job done. I then leave the Sea Cave through the entrance at #1.
Now it's time to journey to Port Maje.