-

- Forums
- Chatrooms
- Gallery
- Gameplay Videos
- Upload
- Articles
- Mod Reviews
- Shop SP: Games, Movies, Books
|
|
| Pillars of Eternity 2 Video-Based Walkthrough by David Milward |
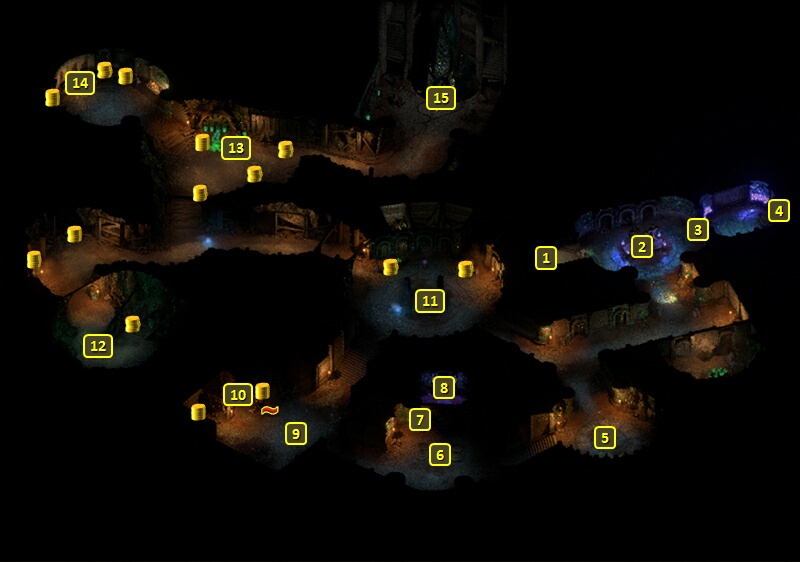
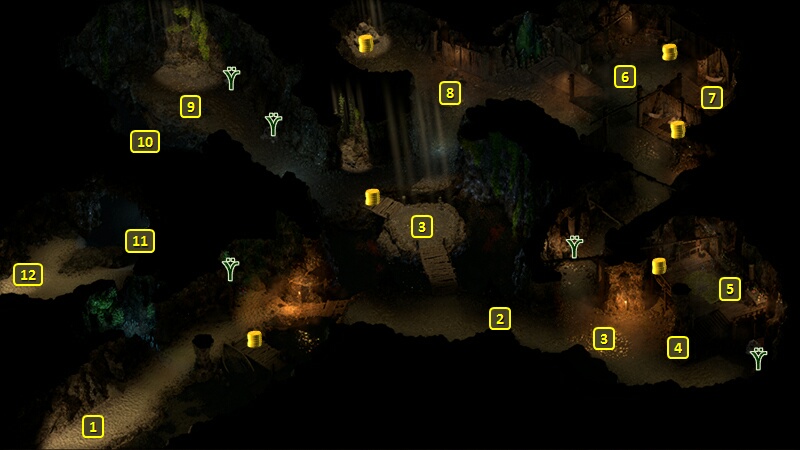
Arena Sub-Level
Champion's Medallion
I start off at #1 on the map of the Arena Sub-Level. I use the Champion's Medallion to open the door at #3.
The sarcophagus at #4 has Ta Ondra Taras, a couple of Adra Ban, and an Amulet of Health. The Adra Ban are rare and valuable crafting gems, and should not be casually expended on things like Potions and Scrolls until after you've taken care of enchantments for your core equipment. Alliria equips the Amulet of Health. More Health is always good for a Blood Mage.
Gladiator's Sword
I go south and then southwest until I reach the cavern at #6. The door at #7 has a brazier to both sides. A Fire Godlike can light the Braziers to open the door. A Flint and Tinder, or a Torch, work just as well.
The problem is that flames engulf the room with the chest at #8. The floor of the cavern at #6 has a panel of six floor buttons. Pressing the top-left, top-right and bottom-left buttons will make the flames go out.
The chest itself has the Gladiator's Sword. Aloth equips it as an interim weapon. The +5 bonus to Deflection will increase his tanking abilities, and increase the mileage of his Wizard's Double spell.
*Evil* Zarathos holds onto it for Mirke.
Tattered Note
I go into Stealth mode, and Mabel switches to her Pistol. I go west along the hallway.
The room at #9 has a LOT of Brine Imps, plus a couple of Crystal-Eater Spiders. The poison of the Spiders can Paralyze. And the spit attacks from the Imps can add up. The point of going into Stealth mode was to get close enough so that Mabel can hit the Gunpowder Barrel with her Pistol, but not too close. The resulting explosion takes out most of the Imps outright, which leaves the rest of the fight a mop up job.
One of the chests in the room has a Fine Dagger, which Eder equips.
A crate in the room has the Tattered Note, which explains that experiments with the Constructs have gone awry.
Journal Entry
I go northeast, and kill a few Brine Imps, Will-O-Wisps and a Crystal-Eater Spider at #11. I go west from there and kill another Will-O-Wisp along the way.
I continue west to #12, and kill a pair of Rusted Copper Constructs and a Wurm there.
I go northeast, and defeat several Essence Anomalies and several Will-O-Wisps led by a Greater Essence Anomaly and an Adra Ooze. It is after this fight that Mabel advances to her 3rd level. I had her take Phantom Foes, which can render multiple foes Flanked, and Draining Whip, which increases the Focus she gets from Weapon Attacks.
There is a Journal Entry on the table at #14, which conveys Oderisi's excitement at the discovery of a potent Adra vein.
To Hunt a God
I go east to #15. I find the ashen corpse of Oderisi. Clicking on him obtains Oderisi's Notes.
It also opens up a connection to Eothas through the Adra pillar. I have three options with respect to the Souls imprisoned inside his Adra body, and each leads to a different power:
*Evil* To Hunt a God
Zarathos chooses to reach out for his own soul instead, and obtains the No Pity for the Lost power instead.
The party now returns to the initial entrance at #1, and returns to the Engwithan Digsite.
*Evil* Engwithan Digsite Souls
The party emerges at #12 on the map of the Engwithan Digsite. Dozens of souls come to Zarathos, wanting him to guide them to the Beyond.
Xoti takes several of them into her Lantern, which progresses her personal Quest, The Lantern of Gaun.
The party leaves the Digsite.
*Evil* Dead Sailor
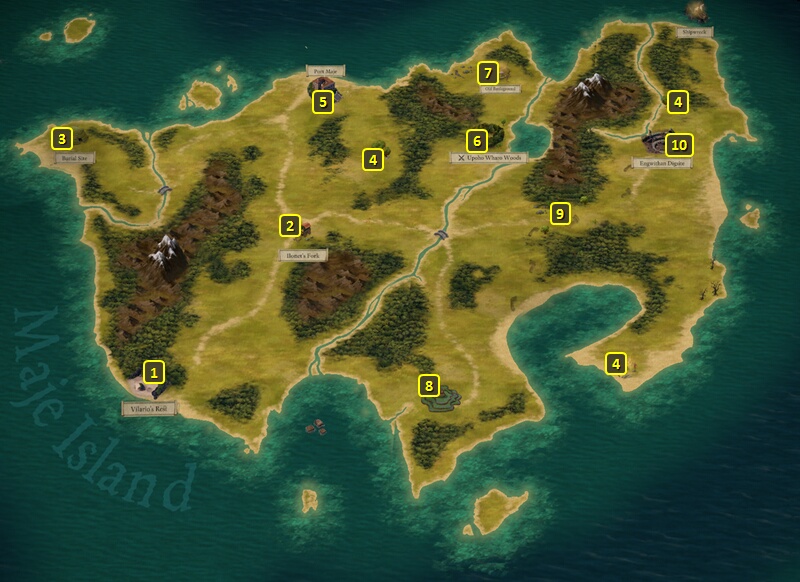
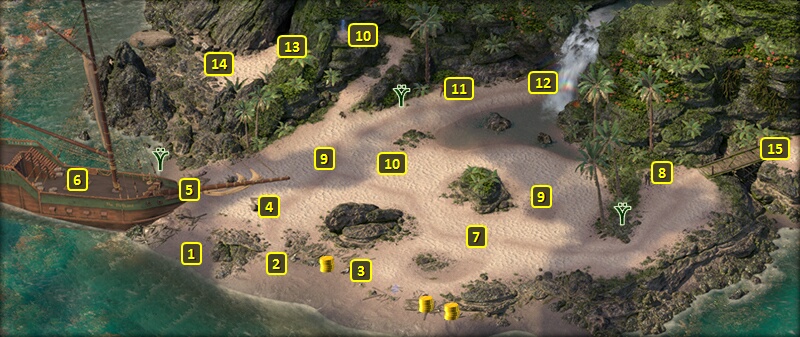
Either the good party or the evil party will return to Vilario's Rest at #1 on the map of Maje Island.
Now I show the reason why I didn't speak to the spirits here earlier. It is only now that I speak to the spirit of the Dead Sailor at #10. Zarathos refuses to let the spirit into his entourage. But Xoti takes him into her Lantern, which progresses her personal Quest, The Lantern of Gaun. Zarathos has a conversation with her afterwards.
The reason for saving this and other spirits for Xoti is that she'll be pretty much ready to complete her Quest by the time I reach Neketaka.
I enter the Sea Cave through the opening at #12.
*Evil* Drowned Pirate
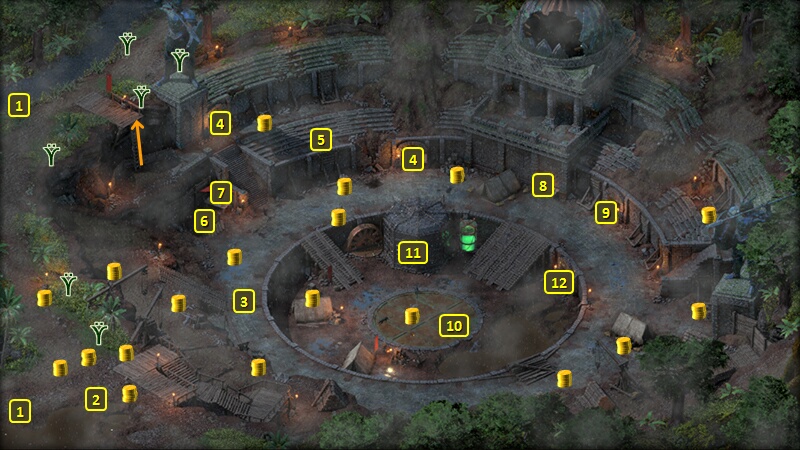
I start off at #1 on the map of the Sea Cave. I go northeast and then northwest to reach #10. I only need to make an Athletics check of 1, once to check for air pockets, and another to swim through the water-filled tunnel to reach #11.
I step through the exit at #12. It brings me back to Vilario's Rest, but this time at #13.
Now I speak with the spirit of a Drowned Pirate at #14. Zarathos won't let her follow him. But Xoti gladly absorbs her into the Lantern to progress her Quest.
Now I go back the way I came and leave Vilario's Rest. I then return to Port Maje at #3 on the map of Maje Island.
Gorecci Street is my next destination.