-

- Forums
- Chatrooms
- Gallery
- Gameplay Videos
- Upload
- Articles
- Mod Reviews
- Shop SP: Games, Movies, Books
|
|
Iron Flail Fort
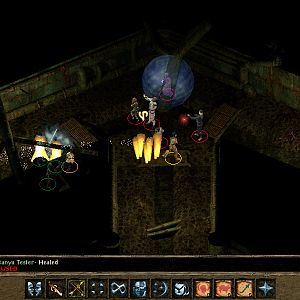
Idle Villager
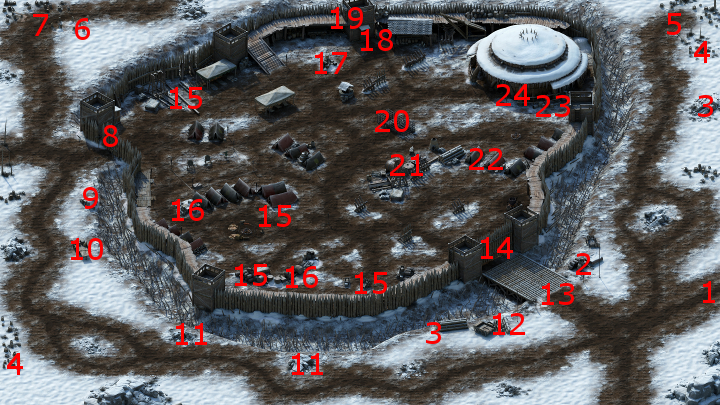
I start off at #1 on the map of the Iron Flail Fort. I go a little north, and then have Kana use a Rite of Walking Shadows he had been saving up. The good party manages to sneak through the soldiers on the east side, although a lot of care is needed. I sometimes have to sit and wait for gaps, and sometimes have to zig zag east and west, to avoid getting spotted. *Note* It is easier to pull it off on the east side, where there's less soldiers, than on the west side. Also, there are far less troops on either side if you come here at night.
I manage to make it to the northwest corner and speak to the Idle Villager and his girlfriend at #6, who provides some background information, especially about the Commander of the Iron Flail Army.
West Gate
I click on the West Gate at #8 to begin a scripted interaction. I use a Rope and Grappling Hook first, and then I send Sagani to unbar the gate from the other side without alerting anybody. Note that I can only pull this off at night.
Now I sneak my way towards the door to the Command Post at #24. The key is to use the rampart on the north side of the fort, but to do so I have start up the stairs to the rampart when neither a patrolling guard or a War Hound are around. It requires a mixture of patient waiting and sometimes retreating before I get the break.
Once I do get to the rampart, I go through the door at #18 to reach the one at #19. After that, I have a clear path to #24.
*Evil* The evil party takes a far bloodier path to reach the Command Post, as described below.
*Evil* Menpwgra and Snow Bear
The evil party begins a campaign of slaughter against the Iron Flail soldiers, starting on the east side perimeter. They also kill a Menpwgra and a Snow Bear at #5. None of these encounters are particularly difficult by now.
*Evil* Front Gate
There will be a few Iron Flail Soldiers that the evil party dispatches with relative ease at #13.
I decide to smash my way through the gate at #14. Unfortunately, I can't use the cannon blasts as I have not yet completed the Ready the Cannons quest. Doing it this way would have spared me any injuries, but no matter.
I grab a log from #12 and use it as an improvised battering ram against the gate. I make a Might check of 18 to avoid injuries from the volley of arrows. I am, however, unable to make the Dexterity check needed to avoid the Severe Burns injuries from the tar pitch. However, the -2 Dexterity penalty and the penalty to Burning Resistance aren't that big a deal, so I don't mind.
I will now have to fight a battle against a large force of Iron Flail soldiers, including Champions, just on the other side of where the gate once stood. Durance initiates a sequence of Devotions for the Faithful, Crowns of the Faithful, Consecrated Ground, Shield of the Faithful, Salvation of Time and Interdiction.
Aloth sets up crowd control with Eldritch Aim, Pull of Eora and Chill Fog. He then follows up with two castings of the Wilting Wind spell.
The warriors hold their ground and attack any who happen to come close.
As the battle progresses, only a few Archers are left. Durance hits them with a Symbol of Magran spell, which will inflict both continuous Burning Damage and Blindness on any enemies caught within its area of effect. It then becomes easy enough for Durance and Aloth to pick off the archers at a distance.
*Evil* Fort Perimeter
The evil party continues their campaign of slaughter by clearing out the perimeter on the south and west sides.
I rest up after that is done, for there will be camping supplies in the crate at #10. I choose the Damage Reduction resting option, since I am facing Kith here, for whom no Accuracy bonuses on resting are available.
*Evil* Fort Interior
The evil party now enters through the gate and continues its campaign. I wipe out several groups of soldiers on the south and west sides of the fort interior. Standard buffs and procedures suffice.
One noticeable item that I found was a Cloak of an Eothasian Priest in a barrel at #22. The barrel at #22 also has a high-tier gem.
*Evil* Icetreaders
There will be groups of Icetreader Paladins and Icetreader Riflemen east of #15. I go forward and come into view of one group of them a little northeast of #15. I briefly send Maneha ahead to get the attention of another group straight east of #15. After that, the warriors hold position and let the spellcasters go to work.
Durance does a buff sequence of Devotions for the Faithful, Crowns of the Faithful, Shields of the Faithful, Consecrated Ground, Salvation of Time and Interdiction.
Aloth starts of with Eldritch Aim and Kalakoth's Minor Blights. A large cluster of Icetreader Riflemen are gathered to the east, so first he puts a Malignant Cloud over them. He then casts two Wilting Wind spells that are carefully positioned to catch the Riflemen as well as the Paladins who have closed in on my warriors, but without hitting any party members. Durance likewise throws in a Storm of Fire spell to help Aloth out. It soon becomes a mop up.
I take out another small group of Iron Flail Soldiers near the barrel at #17. The barrel itself has two sets of Camping Supplies. I rest up and grab one of the Camping Supplies.
*Evil* Houndmaster
I defeat the Houndmaster, several War Dogs, and several Iron Flail Soldiers, around the cage #20. The usual buffs and procedures suffice. The cage itself has the War Pup pet if you're interested.
I rest up again and get the other set of Camping Supplies from the barrel at #17. I am now ready to enter the Command Post.
Adaryc
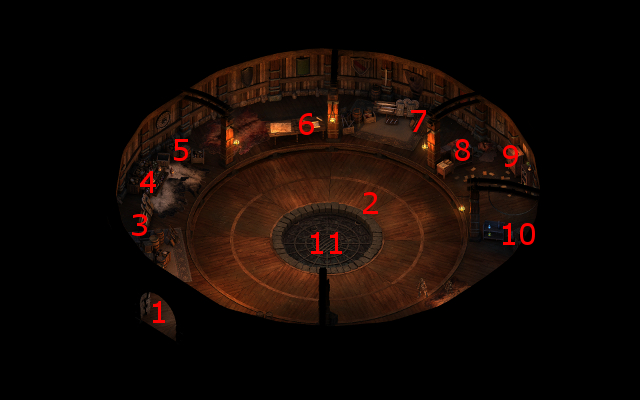
Alliria commences a dialogue with the commander of the Iron Flail Army, Adaryc, as soon as she enters the Command Post. The fact that she snuck her way in without killing any of his men or blowing down his front gates makes it much easier to convince him to stand his army down voluntarily. Had I slaughtered significant numbers of his men, or blown his gates down, him attacking me would have been far more likely the outcome.
He leaves the good party with the Cell Key and the Steadfast sword. The good party has no use for it, so I'll just sell it.
I go around collecting items from the perimeter of the Command Post. One of them has Gauntlets of Swift Action, which I now have Hiravias equip for the rest of the game. The obvious point is to enable him to cast his spells that much faster despite wearing heavy armor.
*Evil* Adaryc
Zakara prefers to attack Adaryc as soon as possible. She begins by tagging Adaryc with Sworn Enemy, activating Sacred Immolation, and then hitting him with Flames of Devotion.
Durance uses an extended sequence of Devotions for the Faithful, Crowns of the Faithful, Shields of the Faithful, Consecrated Ground, Salvation of Time and Interdiction.
The enemies are spread out, so I'm not sure what to do with Aloth just yet. I play a wait and see game by first summoning an Essential Phantom, protecting himself with Llengrath's Safeguard, and then casting Eldritch Aim. Some of the enemies close in around the party, so now I realize I can take advantage of the situation by rendering them Prone with a Call to Slumber spell.
The close up enemies are soon wiped out. The archers and Warlock hanging back are soon taken care of as well.
*Evil* Steadfast
The evil party loots random items from the containers along the walls of the Command Post. Adaryc himself can be looted for a few items. One is the Blackwarden's Breast, which I have no use for. Note that if you want this armor, you'll have to kill him for it.
Another is the Cell Key, which I'll use to free the Delegates shortly.
Another item is the Soulbound sword called Steadfast. I bind it to Durance. Benefits of the sword will include a +1 bonus to Resolve that stacks and thus help Durance in his role as off-tank, as well as immunity to the Afraid and Terrified afflictions. A benefit specific to Priests will be a 15% chance of casting Sunlance on the target upon a successful hit. Another key benefit specific to Durance is that his Weapon Focus (Soldier) and Inspired Flame talents together allow him to wield the blade with a whopping +16 bonus to Accuracy.
Delegates
I use the Cell Key to open the grate at #11 on the map of the Command Post. One of the delegates commits suicide with a nearby dagger. However, the Watcher is able to use her powers to read the delegate's soul, and reveal that a cult of Ondra had been trying to manipulate the confict. The Watcher is also able to learn the location of an Abbey dedicated to the worship of Ondra.
*Good* Either the good party or the evil party will earn reputation increase upon the release of the Delegates, but it won't be as much for the good party because they didn't wipe out the Iron Flail Army.
The video concludes with loud thunderous noises outside the Command Post, suggesting yet another attack.
The Iron Flail
I have to fight three very large Constructs called Eyeless once I step outside the Command Post. Kana and Devil of Caroc hold up two them. The others gang up on the to the right flank, and repeat the process for the next two. Grieving Mother often uses Disintegrate to speed along their demise.
Alliria speaks with Commander Adaryc again, before returning to Stalwart Village. The defeat of the Eyeless in the Fort both concludes The Iron Flail quest and triggers The Rising Tide quest.
*Evil* The Iron Flail
The evil party handles this battle somewhat differently. The warriors adjust their positions to put themselves in front of the spellcasters.
Durance initiates a sequence of Devotions for the Faithful, Crowns of the Faithful, Shields of the Faithful, Consecrated Ground, Salvation of Time and Interdiction. He also at some point uses a Dire Blessing spell as well, to increase the probability of his comrades landing Critical Hits.
Zakara, once she has taken position, summons Concelhaut's Shade. Concelhaut tags the Eyeless near Zakara and Maneha with Concelhaut's Crushing Doom in order to keep it Prone and vulnerable to melee attacks. Zakara and Maneha go to work.
Aloth first protects himself with Bulwark Against the Elements and Llengrath's Safeguard. He follows up with Eldritch Aim. He himself uses a Crushing Doom on the Eyeless near Eder and Zahua, allowing them to take it out fairly quickly.
Soon only the last one is left. Aloth tags it with a Crushing Doom as well, making it easy prey for the party.
*Evil* 16th Level
Everyone now has enough experience to advance to their 16th levels.
Zakara gets the Intense Flames talent, which will increase the Burning Damage from her use of Flames of Devotion.
Eder acquires Bonus Knock Down. He still uses Knock Down sometimes, but this is admittedly a filler talent at this point.
Maneha acquires Stalwart Defiance. This talent enhances Savage Defiance so that it not only regenerates Endurance, but also raises all Defenses by +10. If Maneha plays it right, she rarely needs to use Savage Defiance, so this talent could wait.
Zahua acquires the Primal Bane talent, which will increase his damage against monsters like Oozes and Vithracks and such.
Durance selects the Brilliant Radiance talent. The Holy Radiance power will now not only replenish Endurance for party members, but will also inflict a small amount of Burning Damage on all enemies within the radius. Vessels will take a substantial amount of damage from the power now.
Aloth acquires the Dangerous Implements talent. It is a modal ability whereby Aloth will increase his damage with either his scepter, or his Minor Blights, by 25%. The drawback is having to take 3 Raw Damage each attack.
He also learns Kalakoth's Freezing Rake, which will inflict plenty of Freezing Damage plus Weakened and Hobbled on all targets within a very large area.
The video concludes with the party leaving the Fort and making their way back to Stalwart Village.
Either the good party or the evil party will now seek out Mowrghek Ien.