-

- Forums
- Chatrooms
- Gallery
- Gameplay Videos
- Upload
- Articles
- Mod Reviews
- Shop SP: Games, Movies, Books
|
|
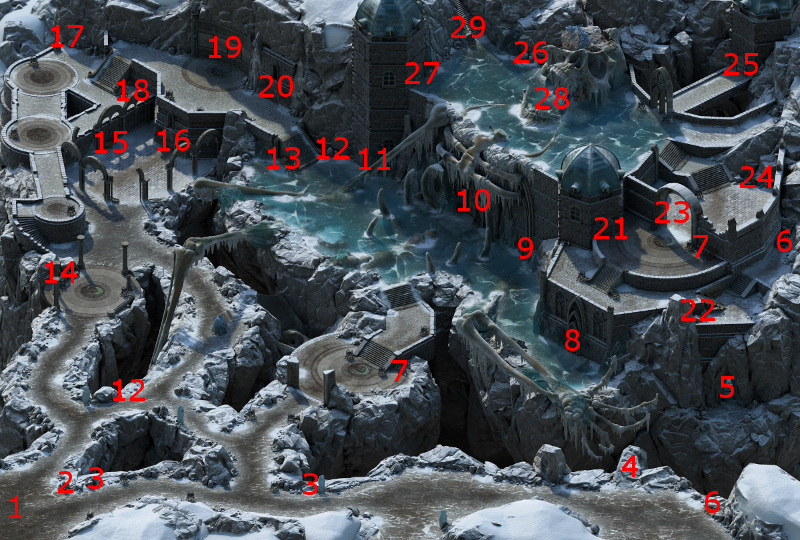
Abbey of the Fallen Moon
Long Bosc
I speak to Long Bosc at #3, who is willing to provide background information.
*Evil* Grimoire of the Tides
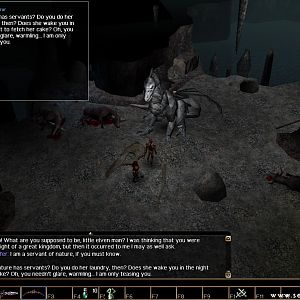
The good party chooses to infiltrate the temple (see below). The evil party chooses a fundamentally different path, to slaughter everything in sight from the outset.
The evil party also has to conduct these fights in rather different fashion compared to what it has been used to. The fight against the odd Ondrite or two is easy enough. But I can no longer manage large groups through standard crowd-control methods. The reason is that Ondrites will include in their ranks numerous Tidalfists. Tidalfists are high-level Monks who can use The Flagellant's Path to get past the tank wall (i.e. Eder and Maneha) to reach the spellcasters behind. So when it comes to fights against numerous Ondrites, I have to treat them as though I'm going to get swarmed from all sides.
Aloth, first and foremost, will protect himself at the start of a major fight with Llengrath's Safeguard. He next initiates Merciless Gaze and Kalakoth's Minor Blights and then bombards away. He may, depending on if things get intense enough around the party, use Call to Slumber or Death's Ring if he has enough spells to spare until when next the party finds Camping Supplies.
Durance still does his usual sequence of Devotions for the Faithful, Consecrated Ground, Circle of Protection and Interdiction. However, he will also use a Symbol of Magran spell if things get intense enough around the party, with the point of inflicting both Burning Damage and Blindness on the enemies.
Zakara for her part is perfectly willing to whip out Sacred Immolation when the party gets surrounded.
The party fights its way to the chest at #9. It has the Grimoire of Tides, but Aloth already has his own grimoire fully developed.
*Evil* Abbey Precipice
The evil party backtracks to the south edge, and then heads east. They continue to slaughter the fanatics of Ondra with the same methods.
I could get across the precipice at #4 by using a Rope and Grappling Hook, and thereby enter the Halls of Silence at #16. But I decline to do so.
I now rest up with the Damage Reduction bonus, and grab the Camping Supplies from the log at #6. The video concludes with the party making its way back towards the southwestern corner.
*Evil* Girdle of Mortal Protection
The evil party goes north along the pathway on the western edge. They run into another group of Ondrites, and kill them off in the same fashion.
A Girdle of Mortal Protection is in the crate at #14, but nobody in the party has any use for it.
*Evil* Abbey Mural
There will be two more large groups of Ondrites. One is north, up the stairs on the left hand side. The other group will be near the door at #16. Attacking one group is likely to get the notice of the other, so it helps to come up with a plan to take on both groups at once.
I send Eder up the stairs to the left. Zakara goes northeast. Each advances just enough to get the attention of each group, and then hustle back to the party. Zakara will also use her Sacred Immolation power once she gets back to the party.
Aloth starts off with Eldritch Aim and Essential Phantom. He then makes generous use of spells like Death Ring and Call to Slumber.
Durance begins with a sequence of Devotions for the Faithful, Consecrated Ground, Circle of Protection, and Interdiction. He then uses a carefully placed Symbol of Magran once enough enemies have closed in, which is an advantage of fighting both groups at the same time. He also tosses in Spark the Souls of the Righteous for good measure, for that little extra kick. I eventually wear the enemies down until it becomes a mop up affair.
There will be a few more enemies towards the northwest corner, but they're dealt with easily enough.
I click on the mural at #19 to read it. It will give me a name that I need, as well as a proper ordering concerning a similar image, both of which are clues that I need to make progress.
Abbey of the Fallen Moon
The good party infiltrates the Temple. If you prefer the latter, you will need to first pass yourself off as a member of the Temple the first time you encounter any Ondrites, and then make one of a Lore check of 6, a Perception check of 13, or a Resolve check of 14. Once you do that, you'll have free run of the entire compound.
The good party then goes around getting the same items without any opposition, and learning the clues from the mural.
The good party enters the Halls of Presence through the door at #10, while the evil party does so through the door at #19.