-

- Forums
- Chatrooms
- Gallery
- Gameplay Videos
- Upload
- Articles
- Mod Reviews
- Shop SP: Games, Movies, Books
|
|
Halls of Presence
*Evil* Ondrite Quarters' Key
Zakara and her companions continue their campaign of slaughter against the Ondrites. Their numbers will now include Priests and Wizards, which makes the next series of battles more dangerous and requires yet more adjustments to my tactics.
The battles tend to be longer, so now Aloth tends to set up with Merciless Gaze, Kalakoth's Minor Blights and Essential Phantom, subjecting his enemies to continual bombardment. He will still cast protective spells (e.g. Llengrath's Displaced Image) on himself if any enemies get too close.
Also, if he can, he will sometimes place a Malignant Cloud if he can catch enough enemy spellcasters with it. He will also bombard them with his Blights if he's close enough for it.
Durance still does his usual buffing and debuffing, and a Symbol of Magran if enough enemies close in on the party. However, he also now exhibits a tendency to hit enemy spellcasters hard with his Arquebus to bring them down faster.
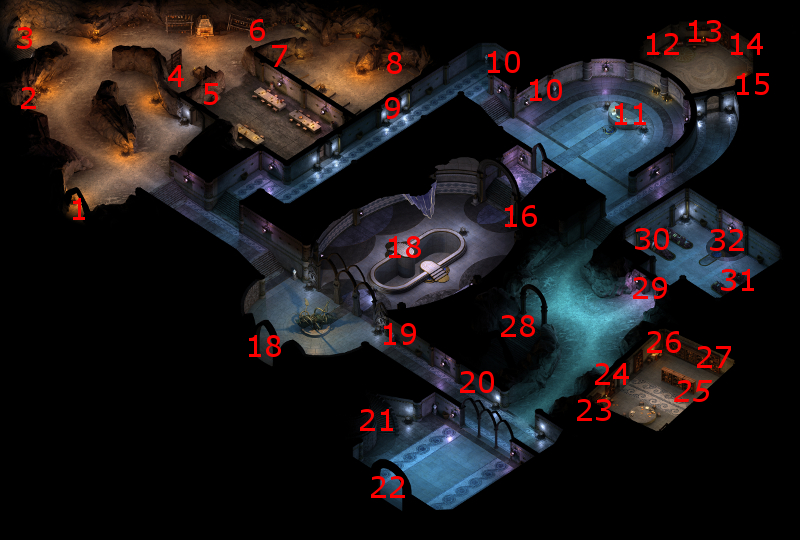
There will be Camping Supplies in the crates at #2 and #8. I don't need them just yet, but I keep note of them for when I will.
A vase on the table at #8 has the Ondrite Quarters' Key, which can open the door at #9.
*Good* The party pretty much acquires the same items, just without having to slaughter everyone in sight.
High Abbott Kaoto
The good party at this point next speaks with High Abbott Kaoto at #11. He wants me to perform a ritual called the Recitation, and to do that, I'll need to glean information from a mural outside (already did that), a nearby Giftbearer, and the Library in the Halls of Presence.
He also willingly gives the Steel-Banded Key to Alliria.
*Note* Don't loot the vase on the table in front of him if you don't want all of Ondra's faithful to turn hostile against you.
*Evil* Giftbearer Beasca
The evil party at this point continues south from the door at #9, and then east as the hallway turns in that direction. They easily kill a few more Ondrites.
Giftbearer Beasca will be in the central room at #17, and she'll be protected by a massive force of Ondrites while she herself is a fairly powerful Priest. I pull out every stop for this one.
Durance starts with his usual buffs and debuffs. He also uses Symbol of Magran once enough enemies close in, and also Spark the Souls of the Righteous to facilitate the process.
Aloth continues to bombard away with his Blights after setting up, but also makes generous use of spells like Call to Slumber and Death Ring once the horde closes in on the party.
Zakara uses Sacred Immolation and even summons Concelhaut's Shade. Concelhaut in turn now uses Concelhaut's Crushing Doom on Beasca to neutralize her. Zakara herself, however, is taking a beating. I therefore have Durance use Withdraw on her. I eventually manage to wipe out the entire horde.
Now I return to the crate at #2. I rest up, and replenish my Camping Supplies from the crate.
Giftbearer Beasca
The good party now goes and speaks to Giftbearer Beasca, after she makes a gem seemingly disappear. I am careful to avoid Passionate replies, which could provoke her and her guards into attacking. The clue she provides is that all is gifted to Ondra and Ondra causes the forgetfulness of all.
*Evil* The Giftbearer's Pilgrimage
The evil party continues east, collecting gems or other items from the urns. They then turn north, and have to defeat another group of Ondrites with buffs and spells.
I enter the library through the door at #24, and have to defeat another group of Ondrites. This group includes several spellcasters, so Aloth starts by putting a Malignant Cloud over them right away. He also hits one of the Wizards with Concelhaut's Crushing Doom and hits all of them with offensive spells of his own. I manage to outlast them.
The library itself has several books. The one noteworthy volume is The Giftbearer's Pilgrimage, which is in a bookcase at #27. It provides clues to making progress through the temple.
*Good* The good party likewise does the equivalent, but without having to kill everyone in sight.
*Evil* The Burden of Memory
The evil party unlocks the door at #29 to open the way to the vault. The Salt Well that Maneha seeks is at #32. I have a choice between letting her go through with it, or talking her out it.
The former choice is the easier to pull off, with the result that Maneha acquires the Clean Conscience talent that gives her a +2 bonus to Dexterity. That is not my preference for her though, as I'm using her as a tank.
The latter choice is more difficult, because only a couple of dialogue choices (at around 1:30 of the video) open up that possibility. One is the "Memory is a penance option ..." and the other is the "What if your memory ..." option. I go with the second option, followed by admonishing her that the memory may be teaching her restraint. As a result, she does not go through with it and instead gets the Satisfied Mind talent, which gives her a +2 bonus to Resolve. That talent is more in line with her being a tank.
The choice, one way or the other, marks the conclusion of her personal quest, The Burden of Memory.
A Legendary companion adventure, A Solitary Adventure, now becomes available. I assign Devil of Caroc to it.
*Evil* Vault of Forgotten Thoughts
The door at #29 can be opened with the Steel-Banded Key.
The locked chest at #30 has St. Wygelt's Cudgel. I have no use for it so I'll just sell it.
The chest at #31 has a Ring of Unshackling and another ring called Gwyn's Band of Union. Maneha gets the latter ring. The +4 bonus to Intellect is the key point, since it will enlarge Carnage's area of effect. It will also increase the duration of the Fatigue effect from Captain Viccilo's Anger and the Daze effect from her Glittering Gauntlets. The ability to use Blessing once per encounter is also a nice perk.
Vault of Forgotten Thoughts
And of course the good party doesn't have to kill anyone to loot the Vault. It is Hiravias who gets Gwyn's Band of Union in the good party. The +4 bonus to Intellect will significantly boost the area of effect and duration of spells like Moonwell, Venombloom, Form of the Delemgan and Relentless Storm, and others. It will also increase the area of effect of passive auras emanating from some of his items like the Executioner's Hood and Redshield. The ability to use Blessing once per Encounter, normally unavailable to the good party with the absence of any Priest, is also a significant perk.
Journal of the High Abbot
The chest at #13 has a high-level trap, so Devil of Caroc switches over to her Gloves of Manipulation in order to be able to find it and disarm it.
The chest itself has the Journal of the High Abbot. Reading it provides instructions on how to perform a hand sign that is needed to make progress, and without having to kill High Abbott Kaoto just yet.
*Evil* High Abbot Kaoto
It is now that the evil party seeks out High Abbot Kaoto at #11, along with numerous minions that include Monks, Barbarians, Paladins, and Ciphers. Zakara tags the High Abbot right away with Sworn Enemy. The warriors hold position and await the onslaught, attacking only once the enemy closes in.
This will be a particularly intense fight, so Aloth first protects himself with Llengrath's Safeguard and then Minoletta's Piercing Sigil. He then sets up with Merciless Gaze and Kalakoth's Minor Blights.
Durance initiates a sequence of Devotions for the Faithful, Shields of the Faithful, Crowns of the Faithful, Consecrated Ground and Salvation of Time.
Numerous enemies have closed in around the party, so Aloth and Durance react accordingly. Aloth initiates a sequence of Eldritch Aim and Call to Slumber to knock several enemies Prone. He follows up with a Death Ring spell to inflict damage on most of them.
Durance catches as many enemies as he can with a well-placed Symbol of Magran to inflict both Burning Damage over time and inflict Blindness. He follows up with Interdiction. I soon wipe out the mass of enemies in moments.
Zakara clicks on the High Abbot's soul, which is another way to learn the hand sign needed to make progress, although that had already been accomplished through the Journal of the High Abbot.
Items that the High Abbott himself leaves behind include:
The Recitation
I return to High Abbott Kaoto to perform the recitation. The proper answers are: