-

- Forums
- Chatrooms
- Gallery
- Gameplay Videos
- Upload
- Articles
- Mod Reviews
- Shop SP: Games, Movies, Books
|
|
Caed Nua
Phantoms and Shadows
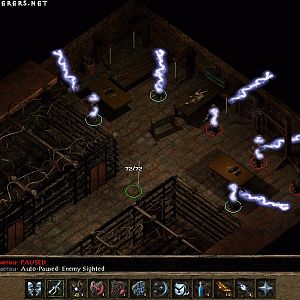
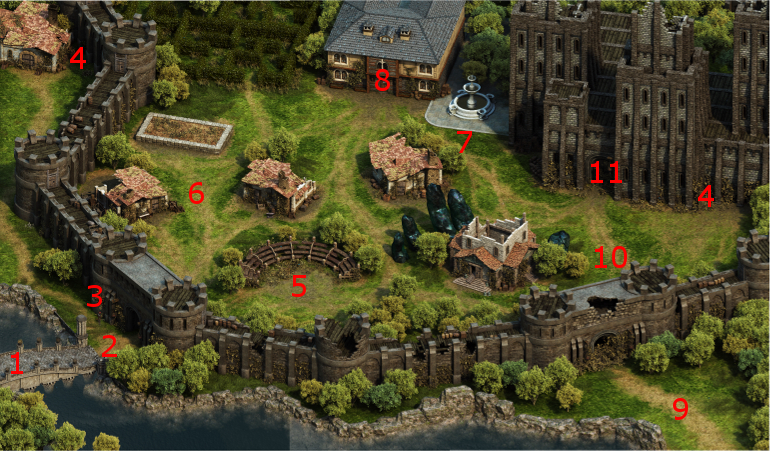
I start off at #1 on the map of Caed Nua. There will be a group of Shadows and Phantoms at #5. I keep the party tightly clustered together. The reason is that if I tried to leave Aloth well back, the spirits could teleport past the warriors and go for Aloth. Keeping the party tight together means any spirits that go after Aloth will be in easy reach of warriors who are well-positioned to protect him.
There will be another group of Shadows and Phantoms at #6. This time they are helped along by the odd Will-O-Wisp or two, who can complicate things by inflicting Confusion on their targets. Kana leads off with a Fan of Flames scroll that he had found earlier. I otherwise manage to obliterate these ones as well.
Small Earth Blights
I sweep the north side for the odd Will-O-Wisp. At #7 will be a few Phantoms, Shadows and Lesser Earth Blights, but they're easily dealt with.
Flame Blights
I easily kill off a Flame Blight and Smaller Flame Blight at #10.
I briefly speak with the spirit of a Villager near the door at #11 for background information. The door itself is an entrance to the Great Hall.
*Evil* 5th Level
Everyone in the evil party now has enough experience to advance to their 5th level. One highlight is that Zakara obtains the Sworn Enemy power. It allows a Paladin to inflict +20% damage and attack with +15 Accuracy against a single-enemy. It can be used once every Encounter, and will last the entire battle or until its target dies. Those two factors make this a fabulous ability to use against the most powerful enemy in any and every battle, especially against bosses.
Eder obtains the Vigorous Defense power. It is a once per Encounter power that allows Eder to increase all Defenses by +20 for 15 sec. I have Eder use the Hold Ground AI script, so he'll activate this each fight the moment he's in close quarter combat with two or more enemies.
Aloth learns two new spells. One is Kalakoth's Minor Blights. This spell creates a Wand-type weapon that lasts for 60 seconds. Each time you use it, it inflicts damage of a random type (e.g. Burning, Freezing) over a small area of effect. However, it is also a magical implement for purposes of the Blast talent. That means each enemy caught in the initial area of effect will in turn set off a Blast that inflicts damage over more areas of effect centred around each target struck by the initial attack. That can lead to a kind of ripple-effect whereby the damage can really add up for enemies caught in the heart of the initial area of effect. This is one of the key spells for Aloth.
The other spell is Llengrath's Displaced Image. It adds +25 Deflection, +25 Reflexes, and turns 50% of all incoming Hits into Grazes, for 45 seconds. This is one of the key defensive resources for Aloth should he get caught by any enemies that happen to get around the party tanks. It also makes the Arcane Veil talent unnecessary in my opinion.
Whispers of Yenwood
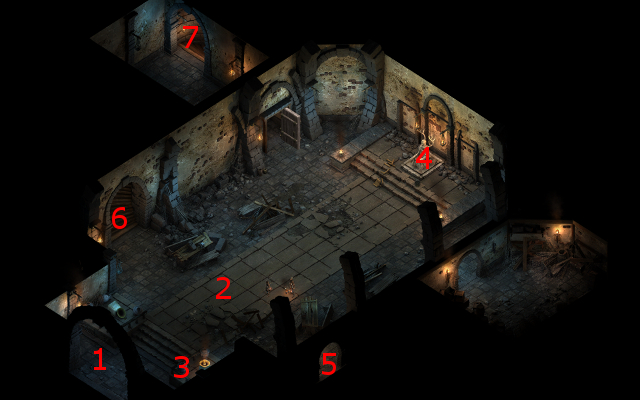
I start off at #1 on the map of the Great Hall. A large number of Phantoms and Shadows will be at #2. I tuck my more vulnerable party members into a niche just to the right of the door. Alliria, Eder and Kana form a wall in front of the others. Eder goes on ahead to get the attention of the spirits and leads them back. The trio then cuts them down rather routinely.
An Urn at #3 has a Sword called Whispers of Yenwood. Alliria equips it in her main-hand, and transfers her Fine Sword to her off-hand. The +3 Constitution bonus is certainly welcome, as is the damage bonus against Spirits.
*Evil* Zakara gets the sword as well, for similar reasons.
The Steward
I speak with the Steward at #4, who explains somewhat of both Maerwald and Caed Nua's past.
I also speak with the spirit of a Mother at #7, who speaks of a past conflict with the Glanfathans. The stairs at #7 lead to the Dungeons.
Spiders in the Dungeons
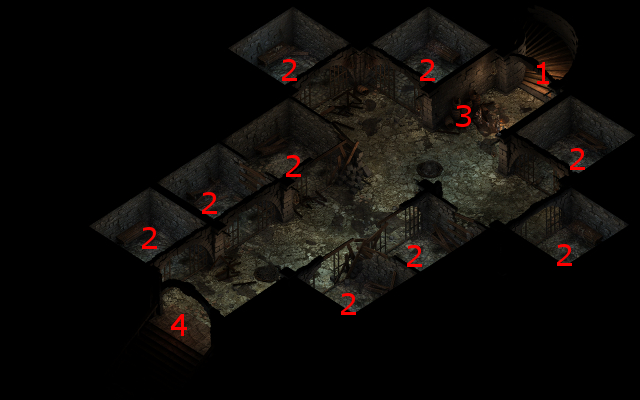
I start off at #1 on the map of the Dungeons. Groups of Ivory Spiders and Spear Spiders will be points labelled #2 throughout the Dungeons. I take out the first bunch around the north end through standard tactics.
I then show a different theme. Eder leads a couple on the south end back to the party for easy killing. He then leads a large group at the south end back to the party. He takes some lumps, but once he gets back, Kana unleashes White Worms Writhed in the Bellies of the Dead over both the dead corpses of the previously killed Spiders and the oncoming new wave of Spiders. The result is instant annihilation of the second horde. This is a theme that you may want to make use of, build up a pile of corpses at the same spot, lead other enemies over the pile, and then unleash White Worms Writhed in the Bellies of the Dead.
The entrance to the first level of Endless Paths is at #3. But first, I speak briefly with the spirit of a Lieutenant near the stairs.