-

- Forums
- Chatrooms
- Gallery
- Gameplay Videos
- Upload
- Articles
- Mod Reviews
- Shop SP: Games, Movies, Books
|
|
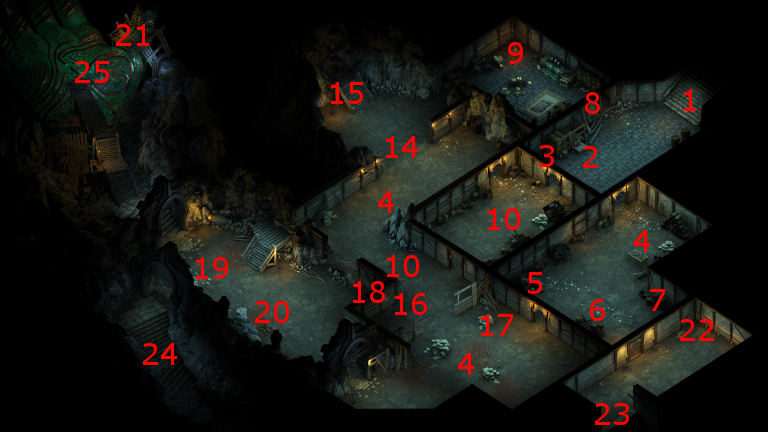
Endless Paths - Level 1
Beetles and Spiders
First, I rest up. Then I go around slaughtering the groups of Spear and Ivory Spiders at spots marked #4, and groups of Wood Beetles at spots marked #10. It isn't difficult with standard tactics.
Goldpact Knight and Looters
Several Looters led by a Goldpact Knight will be at #14. They're fairly tough, but I still manage to outlast them with the usual tactics. There is not much loot to be had here, either from the Looters' corpses or the other dead body at #15.
*Evil* Oidhreacht
I show this part from the perspective of the evil party. At #20 will be a few Widowmakers and Ivory Spiders led by a Spider Queen.
I approach from the archway to the south. I have Zakara, Eder and Kana form a wall, with Durance and Aloth behind. Eder gets the Spiders' attention and leads them back to the rest of the party.
Zakara uses Sworn Enemy on the Spider Queen. Durance uses a sequence of Blessing, Consecrated Ground and Interdiction. Aloth casts Eldritch Aim, and then sets up a Chill Fog in front of the party. The result is that they can only come at me one or two at a time while Blinded and taking Freezing Damage.
Once only the Spider Queen is left, Zakara finishes it off with both of her Flames of Devotion.
The Queen leaves behind a Stiletto called Oidhreacht. I save it for Zahua, since I always like having an Endurance-recouping weapon for a Monk.
*Good* The good party just sells it, as it can't really fit into even any of my interim plans.
5th Level
Everyone in the good party now has enough experience to advance to their 5th level. Alliria obtains the Sworn Enemy power, the reasons being the same as for Zakara.
Kana selects the Chant called One Dozen Stood Against the Power of the Saint. It provides Defense bonuses vs. Frightened and Terrified which can come in handy vs. certain enemies, including certain undead, as well as Dragons and Drakes. He now sets up a separate chant that starts off with this and the Come, Come Soft Winds of Death chant in anticipation of such battles.
Eder, Aloth and Durance make similar (even if not exactly the same) selections as they would in the evil party.
Heavy Iron Key
Now I go off and kill a group of Xaurips led by a Xaurip High Priest at #6. Alliria kills the Priest outright with a Flames of Devotion. The Priest leaves behind the Heavy Iron Key, which I'll be using very soon.
The crate at #6 has an item from the "Endless Paths - 1st Old Watcher - Spider Room Close to East Entrance" section of the random drop list. It happens to be the 11th day of the month. That also happens to be fortuitous, since I couldn't force the day that I may have wanted with limited Camping Supplies, at least not without returning to Gilded Vale. I get a Blunting Belt from the crate. I'll save it for Grieving Mother. Her combat style is more reliant on Damage Reduction instead of Deflection, so this item makes perfect sense.
*Evil* The Old Watcher
I show this part from the perspective of the evil party. I use the Heavy Iron Key to open the door at #8. The party is immediately brought within the presence of the Watcher named Maerwald at #9. Zakara engages in a prolonged conversation with him, with the point that she learns that she has to investigate a mysterious group known as the Leaden Key in the city of Defiance Bay.
It doesn't matter what you can say, a fight with Maerwald and a Flame Blight is inevitable. Zakara starts by tagging him with Sworn Enemy, while Eder rushes up to hold up the Blight.
Durance uses a sequence of Blessing, Consecrated Ground and Interdiction. Aloth sets himself up with Merciless Gaze and Kalakoth's Minor Blights.
Once I'm set up, I have everyone gang up and take out the Blight first and foremost.
Maerwald is next after that. Zakara brings him down quickly with a Flames of Devotion.
There's not much to be had in the way of loot, but what is of particular interest to the evil party is Maerwald's Grimoire. Aloth takes it and learns another spell from it, Bulwark against the Elements. There are some battles where, while he's at a safe distance from melee, he may still need to protect himself against long-range attacks that inflict elemental damage.
Zakara chooses to bind Maerwald's soul to the keep, with the intention of adding +2 Security to her stronghold.
Alliria chooses to free Maerwald's soul to let it pass on from the physical world, and thereby earns +2 Prestige for her stronghold. *Note* A third option is to obtain knowledge from Maerwald's soul, with the result that the party can find a magical sabre. But that would not be until much later, when the party has gone much further down into the depths of Endless Paths.
Whatever choices you make, your battle with Maerwald and your decision as to what to do with his soul marks the conclusion of The Old Watcher quest, and the start of the Never Far From the Queen quest.
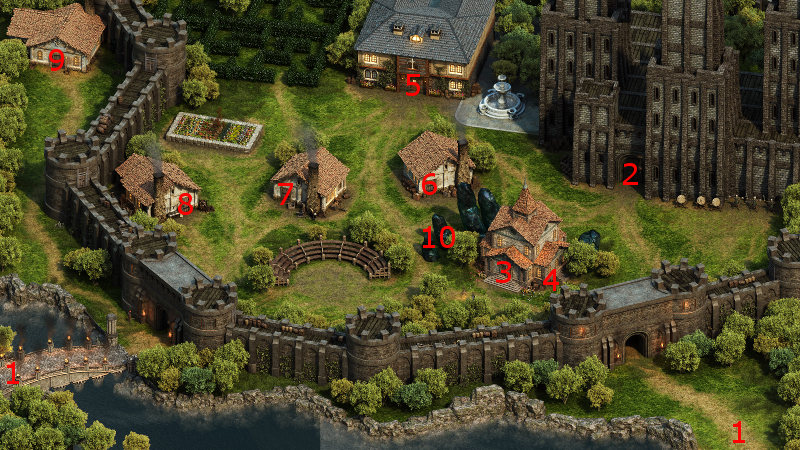
The New Master
The party now goes west and leaves Caed Nua through the stairs in the northwest corner at #21.
That brings me to the trapdoor at #4 on the map of the new Caed Nua. Leaving by this route means that I can now directly access the first level of the Endless Paths through the trapdoor instead of going through the Great Hall and Dungeons. But for now, I make my way to the door at #2, which is the entrance to the Great Hall.
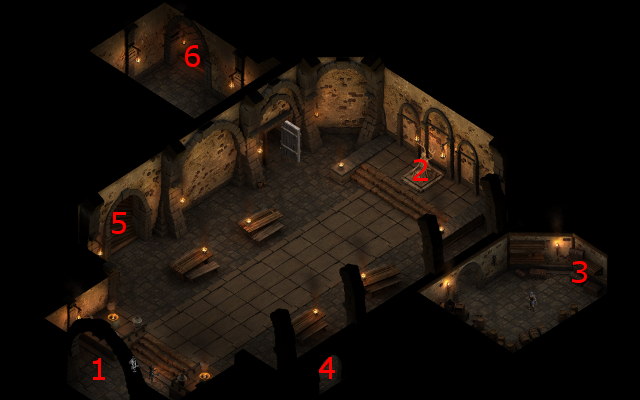
I start off at #1 on the map of the new Great Hall. Alliria speaks at length with the Steward at #2, and becomes the new master of Caed Nua. The conversation also triggers The Master Below quest.
The video concludes with me instructing the Steward to rebuild the Eastern Barbican so that I can travel to areas east of Caed Nua.
*Evil* Fragments of a Scattered Faith
I leave the Great Hall, and it becomes obvious that Eder wants to talk. He expresses a desire to find out more about what happened to his brother, and indicates that answers may be found in archives in the city of Defiance Bay. This event sets in motion his personal quest, Fragments of a Scattered Faith.
I return to Gilded Vale, and I speak more at length with Eder about his personal history and Eothas.
*Evil* Aloth on Maerwald
It turns out that Aloth also wants to speak with Zakara as well. But first, I go to the Black Hound Inn to sell off excess goods, replenish my Camping Supplies, and rest up. Aloth reflects briefly on both Maerwald and Zakara having multiple lives Awakened at once.
*Evil* Leaden Key Attack
I have been informed of a pending attack by Agents of the Leaden Key, so now I return to Caed Nua. The warriors position themselves in between the spellcasters and the oncoming enemies. Durance starts off with Blessing followed by Consecrated Ground.
Aloth begins with a couple of carefully placed Fireballs that will catch the distant Leaden Key Wizards, and as many of the other enemies as well. He then protects himself with Mirrored Image. After that, he positions himself so that he can catch as many foes as possible, including the Leaden Key Wizards, with Ghost Blades spells. The battle is soon won.
Speaking with Kana
The good party also returns to Gilded Vale to rest up, sell off loot, and replenish Camping Supplies. Kana apparently wants to speak with Alliria, and it turns out he's a bit thoughtful about what he witnessed on account of Maerwald.
I afterwards have them speak to each other at length, whereby Kana reveals a great deal about his past and his motivations.
My next destination is the Woodend Plains.