-

- Forums
- Chatrooms
- Gallery
- Gameplay Videos
- Upload
- Articles
- Mod Reviews
- Shop SP: Games, Movies, Books
|
|
Stalwart Mines
*NOTE* I get asked whether I want higher-level encounters when I arrive here for the first time after finishing Part 1 in the Foundry, or whether to keep it standard. I elected to go with higher-level encounters.
*Evil* The evil party stops by, but only long enough to experience the cutscene with Deryan (see just below). They immediately thereafter go to the Iron Flail Fort first and foremost. The reason being they want to obtain a Soulbound Sword for Durance as quickly as possible.
Deryan
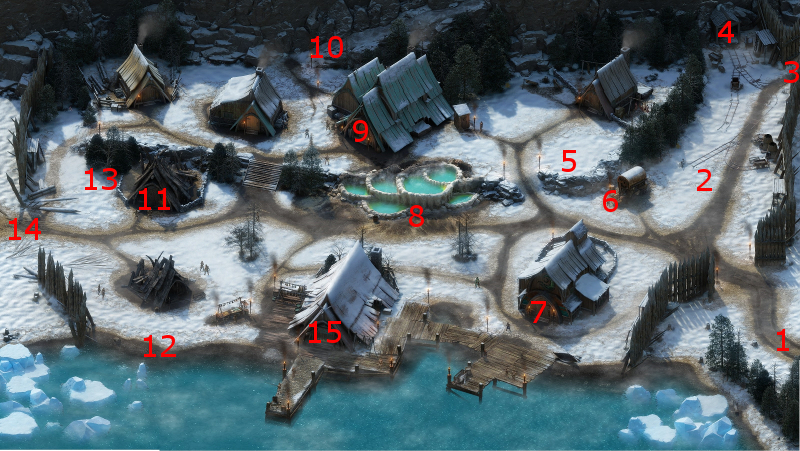
I start off at #1 on the Part 2 version of the map of Stalwart Village. Going forward even a little brings the party near #5, and prompts a cutscene of an angry mob demanding answers from somebody named Deryan. The cutscene establishes that a Readceran army calling themselves the Iron Flail has set up a fort near Stalwart Village, and is demanding the White Forge.
I thereafter go to the entrance to the Mines, which is at #4.
Gamel
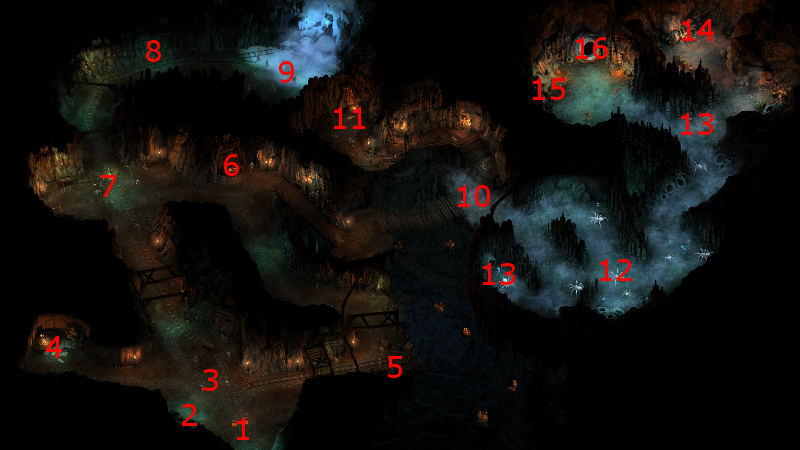
I start off at #1 on the map of the Stalwart Mines. I go ahead a little and witness a Miner named Gamel being placed under arrest for the murder of another Miner named Sameth. I then speak to Foreman Imsey, who requests my help in finding out what's troubling the Miners. The arrest and conversation trigger the Whispers in the Dark quest.
I then speak to Gamel at #4, who has a rather poor memory as it concerns Sameth's death.
Xaurips and Earth Blight
Several Xaurips and a Greater Earth Blight will be at #7. I defeat them easily enough.
Sameth's Body
I examine Sameth's Body at #6. The key clue is that his body appears to be stained with a yellow powder.
Confused Miner
The party encounters a Confused Miner at #8, who makes a vague reference to a crystal that may be at the root of the troubles.
Teryc
Now I speak to Teryc at #9 and question him at length. One important point is that the yellow powder is sulfur, and lately it seems to have been messing with the heads of the Miners.
The other key point is that somebody named Cillan uses Constructs as both Miners and as Guards, and she can be found in the east part of the Mines. I head for the bridge east of Sameth's body.
Xaurip Trollmasters
I travel east towards #10. The next battle consists an Ice Troll that rushes forward, several Xaurips led by a Xaurip Trollmaster who can cast Priest spells on the other (east) side of the bridge, and several Xaurip Archers led by another Trollmaster on a gangway north and across a chasm from the Bridge. The last group is the most numerous and the hardest to reach.
I rush forward to get across as much of the bridge as possible before having to fight the Troll. Hiravias casts Moonwell and Woodskin as the battle is initially joined. Alliria uses Reinforcing Exhortation on Kana and Devil of Caroc, before using Sworn Enemy on the Troll. Grieving Mother begins with a Siren's Scream on the Troll itself.
The key theme here is to take out the Troll as quickly as possible to clear the way across the bridge and make my way to the rest of the foes. Most of my party members do that, although Sagani and Grieving Mother use missile fire on the Xaurips on the north gangway.
It becomes a matter of wiping out the east group and then the north group with some patience.
Miner's Note
A dead body at #11 has the Miner's Note, which provides a clue for making it through to the next area. A nearby crate has a Hammer and Chisel, which can be helpful shortly.
Crystal Eaters and Moon Spiders
There will be plenty of Crystal Eaters and Moon Spiders throughout the southeast caverns of the Mines, but I clear them out easily enough.
Contract for Sale
A crate at #14 has a Contract for Sale, which indicates that it was Galvino who sold the Constructs to Cillan.
Cillan
At #15 will be Cillan and several Flesh Constructs. It doesn't matter what you say, a fight becomes inevitable. I use the usual tactics against the Constructs, and with some effort train Sagani and Ituumak on Cillan.
The one distinctive item she leaves behind is a belt called the Looped Rope. It may be an interesting option for some fights since it provides a hefty +20 Defense bonus against pretty much any affliction that could afflict its wearer's mobility or mind. But it won't become a mainstay item for any of my party members. I hold onto it just in case it becomes useful for certain fights.
Mine Tunnels
At #16 is the entrance to the Luminescent Caves. Getting fully through the tunnels requires navigating them during a scripted interaction. If you have a Torch, you can follow the breeze according to a sequence of: