-

- Forums
- Chatrooms
- Gallery
- Gameplay Videos
- Upload
- Articles
- Mod Reviews
- Shop SP: Games, Movies, Books
|
|
West Tower
Wengra
First, I sell my excess loot and rest up at Gref's Rest. Then I travel to Durgan's Battery.
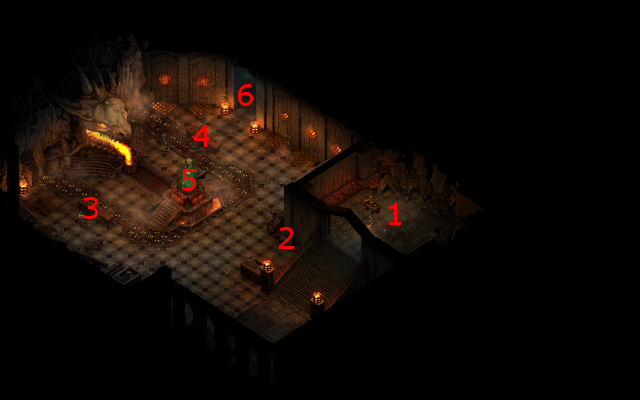
I start off at #1 on the map of the Battery, the one near the stairs towards the southeast corner. I speak at length with Wengra at around #2. She would like me to clear out the creatures of the West Tower, so that Stalwart Village can make use of the large cannons at the top of the tower. This conversation triggers the Ready the Cannons quest.
I click on the gate at #4 and select the Great Hall as my destination.
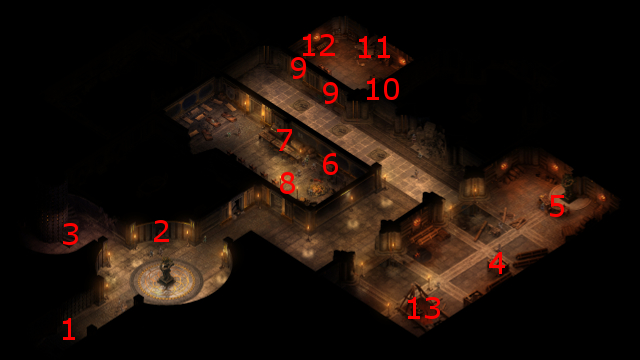
Main Hall
I start off at #1 on the map of the Main Hall. A chest at #7 has the Old Guard's Key, which can be used to open the doors at points marked #9, and a few other items.
There is a merchant at #8 who has several armors, weapons plus some other odds and ends, for sale. The one item of interest that I purchase is the White Crest Helm, which Kana wears for the rest of the game. The obvious point is to expand both the duration and the range of his Chants and Invocations. Indeed, his Chants will linger just a little longer, leading to more potent Phrase combinations than before.
The chest at #10 has Camping Supplies and a Durgan Iron Ingot.
The tunnel at #13 can be used to reach the Foundry. However, I go up the stairs at #3, which brings me to the upper ramparts at #5 on the map of Durgan's Battery. After that, I go up the stairs at #6 to enter the West Tower.
*Evil* Main Hall
The key difference here is that it's Eder who gets the White Crest Helm. Higher Intellect will expand the debuff aura of his Redshield and the duration of his Prone attacks while he has Overbearing Guard active.
Artillery Notice
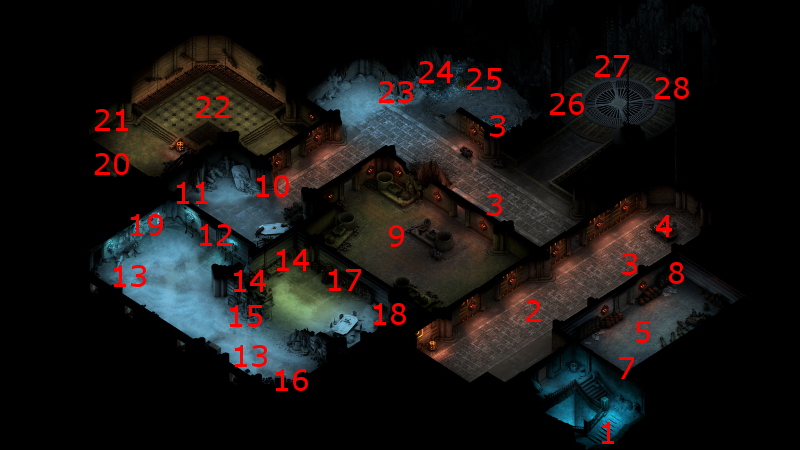
I start off at #1 on the map of the Lower West Tower. I easily kill off groups of Skuldraks in the adjoining hallway.
The table at #4 has the Artillery Lift Notice, which hints at other items I'll need.
Cannon Forge Key
I easily defeat the Crystal Eaters and Moon Spiders east of the hallway. The bookcase at #8 has a page called On the Treatment and Preservation of Cannons. The corpse at #7 has the Cannon Forge Key.
Forge Guardians and Flame Blights
I defeat a few Forge Guardians, Flame Blights and Magma Blights in the room at #9. One of the Guardians leaves behind a couple of Durgan Iron Ingots.
Dwarven Lever
A garbage pile at #10 will have a note called the Lever Request. The trapped chest at #11 has the Dwarven Lever, which is needed to make progress.
Vent Pick
I use the Cannon Forge Key to open the door at #12. After that, I battle my way through hordes of Skuldraks, Crystal Eaters and Moon Spiders.
A trapped chest at #16 has a Stiletto called Vent Pick. Its key point is that it has a chance of triggering the equivalent of a Paladin's Flames of Devotion with each strike, but I'll just sell it since it doesn't fit into the long term plans of either the good party or the evil party. *Note* The Flames of Devotion power of the weapon will NOT trigger any Paladin-unique talents like The Sword and the Shepherd. It only adds the extra Burning Damage on its attacks.
Pargrun Rust-Dissolver
I kill off a lone Crystal Eater in a room to the northeast. There will bookcases in the corner at #17, holding Arden's Notes and Pargrun Rust-Dissolver. The latter item is necessary to make progress.
Patinated Cog
I click on the tunnel opening at #19 to begin a scripted interaction, which provides an opportunity to drain away the poisonous gas in the room at #22.
The first part of the interaction involves clearing away an outer wall by a ledge. It can be cleared out by the character you select either making a Might check of 22, which results in the Wrenched Shoulder injury (-25% Might, -25% Attack Speed), or expending a Hammer & Chisel, which results in exhaustion (-10 Accuracy, -10% Endurance). Alliria elects the Might check to avoid expending a Hammer & Chisel unnecessarily.
The next part of the scripted interaction involves avoiding the gas once it escapes the newly made breach in the wall. It requires a Constitution check of 16, which Alliria makes.
I wind up at #20. A garbage pile at #21 has the Patinated Cog, which is needed to make progress.
I now kill the Disease Puddings in the room at #22 without having to worry about the gas. Once that is done, I rest up with most characters selecting the Accuracy vs. Wilders option. It serves to get rid of Alliria's injury and provide combat bonuses against the numerous Skuldraks I will continue to battle.
I afterwards go out the door to the east and into the adjoining hallway.
*Evil* Patinated Cog
I send Eder onto the ledge. He can make both the Might and the Constitution attacks, and I rely on him as more of a tank then a dedicated attacker to begin with.
Mantle of the Excavator
I slaughter the numerous Skuldraks in the north hallways. A trash pile at #25 has a cloak called the Mantle of the Excavator, which Alliria wears for the rest of the game. The +4 bonus to Perception will obviously help her land her potent melee attacks. The +2 bonus to Survival helps expand her combat options upon resting. The bonus against poison attacks is sugar on top.
*Evil* Mantle of the Excavator
Zakara gets the Mantle of the Excavator in the evil party. As with Alliria, the +4 bonus to Perception and the +2 bonus to Survival (and therefore improved Resting bonuses) are key benefits. With Zakara there is the additional point that the +25 bonus to defense vs. poison will offset the penalties to the same that come from wielding the Bittercut sabre.
Artillery Lift
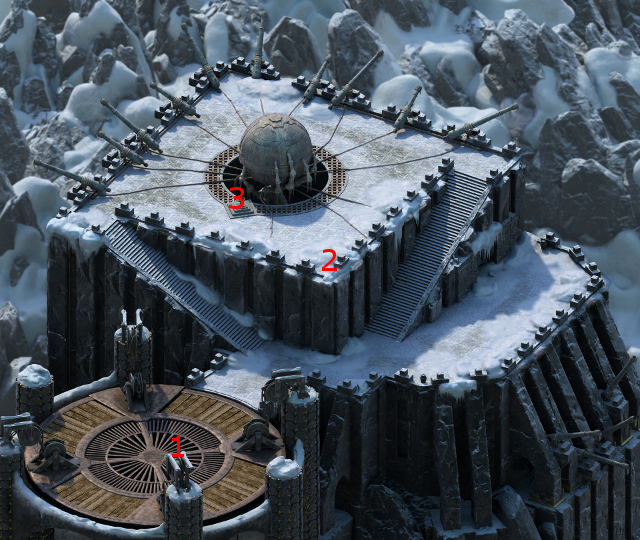
I use the Pargrun Rust-Dissolver to restore the chain at #26, the Patinated Cog to restore the gearbox at #27, and the Dwarven Lever to restore the switch at #28.
Once all three components are restored, you can then hit the switch here to lift the party up to the Upper West Tower. Problem is, you will potentially face ambush from several Skuldraks. There are at least three ways to address the situation during a scripted interaction:
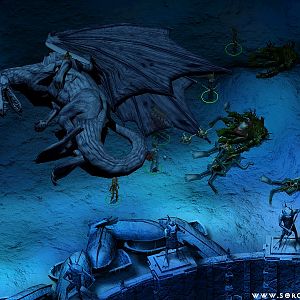
*Evil* Elder Skuldrak
I show this part from the perspective of the evil party, which starts off at #1 on the map of the Upper West Tower. I approach from the east stairs instead of the south stairs. The monsters are closer to the latter instead of the former, so going up the east stairs will make it easier to set up crowd-control.
I keep my party just a little west of the top of the stairs. I send Zakara ahead to get the attention of the monsters, which includes a lot of Skuldraks and Moon Spiders led by the Elder Skuldrak. She regroups once they start to charge.
I have the warriors hold the line in front of the spellcasters. Durance initiates a sequence of Devotions for the Faithful, Shields of the Faithful, Crowns of the Faithful, Consecrated Ground, Salvation of Time, and Interdiction.
Aloth sets up a crowd-control zone just east of the large orb in the middle of the platform. His sequence is Eldritch Aim, Pull of Eora, Chill Fog, Malignant Cloud and Ninaguath's Shadowflame. He then blasts the monsters with a couple of Wilting Wind spells. Only one Skuldrak made it through the crowd-control, and it got cut down very quickly.
The Elder Skuldrak leaves behind the Dragon's Maw Shield. I have Maneha equip it and bind it to her. The +1 Engagement is certainly helpful for her tank role. The extra Savage Defiance use may be helpful during particularly long and intense battles. The Dragon's Breath power is not a big deal. The real benefit for having a Barbarian use this shield is that the Bash ability benefits from Carnage. And that in turn means multiple chances to trigger the Taste of the Hunt power when she uses Bash. Once a Taste of the Hunt triggers, she'll recoup Endurance when next she strikes her target with her Hatchet.
I didn't have Eder use it. The reason being that the Fear aura of the shield would have been redundant with Zakara's Black Path power. It is much better in the hands of the Barbarian.
Cog Wheel
I click on the cog wheel at #3 to get the cannons working again, and also receive visions of a monstrosity which I come to know as The Eyeless.
I click on the switch at #1, and select the front gates of Durgan's Battery as my destination.
Ready the Cannons
I inform Wengra of my restoration of the Cannons to get an xp reward, and to conclude the Ready the Cannons quest. She also rewards the party with two Durgan Iron Ingots.
I click on the stairs at #4 and select the White Forge as my destination.
The Foundry
The good party starts off at #1 on the map of Durgan's Forge. They recoup their Camping Supplies from the chest at #2.
I have 8 Durgan Iron Ingots. I then click on the White Forge at #5 to convert 6 of them into 2 Refined Durgan Iron Ingots.
I use one of them to enhance Devil of Caroc'sSura's Supper Plate. The key point is to increase even further the speed with which she attacks with her Rimecutter.
I use the other to enhance Hiravias' Coat of Ill Payment. The key point there is to increase the speed with which he can cast his spells even while wearing heavy armor.
I click on the stairs to go back to the front gates of Durgan's Battery. From there I travel back to Caed Nua.
*Evil* The Foundry
I Durganize Durance's Little Savior shield. Part of the intention is the defensive benefits, the 10% chance of reflecting missile attacks back on enemy archers and the 15% chance to reduce a Hit to a Graze. The other intention is so that he can attack more often with his Steadfast sword.
River Reed Wand
*Evil* The evil party makes its way to the Longwatch Falls, which it hasn't explored yet. Things are a bit more involved for the good party at this point.
The good party stops off at Caed Nua, and obtains the River Reed Wand as a reward for the companion adventure called A Whistling in the Reeds. I just sell it along with the rest of my excess loot.
After that, I have every character equip an item that provides a Stealth bonus. I also rest three times with the Hedge Maze bonus (+2 Stealth). The intention is that I will arrive with my party enjoying increased Stealth scores, and made more effective by my arriving at my next destination when it is nighttime (hence resting three times in this case). My objective is to handle the Iron Flail Fort with a minimum of casualties.