-

- Forums
- Chatrooms
- Gallery
- Gameplay Videos
- Upload
- Articles
- Mod Reviews
- Shop SP: Games, Movies, Books
|
|
Russetwood
Reyfald
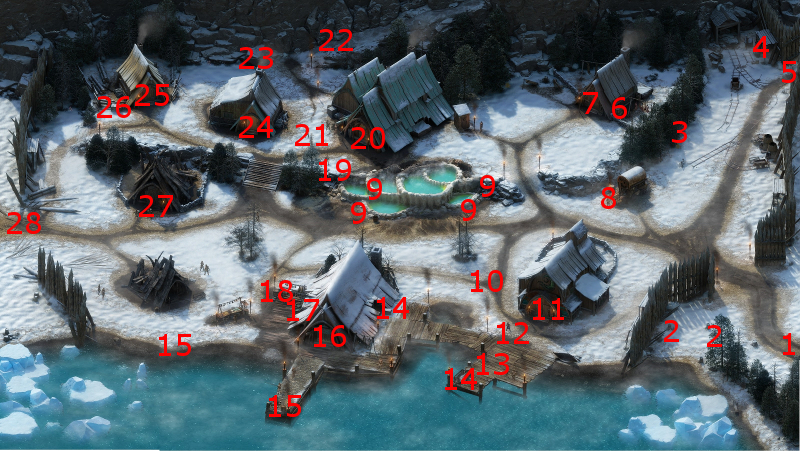
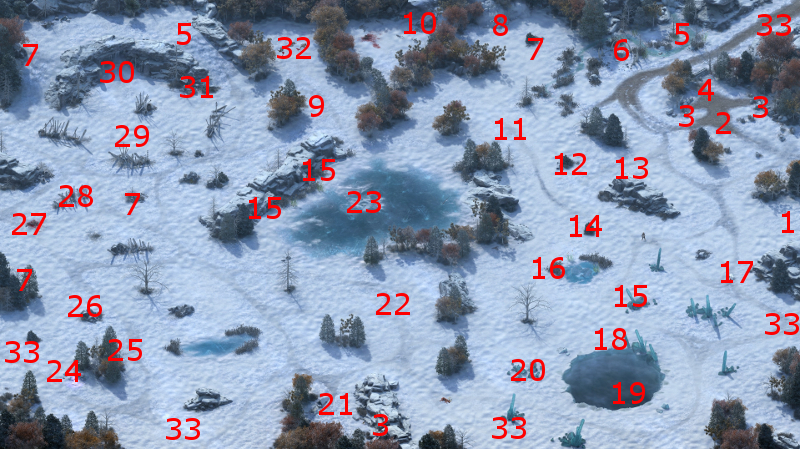
I start off at #1 on the map of Stalwart Village. Rayfald is at #19, just outside the entrance to Gref's Rest. I speak to him for a bit, and he requests that I steal a bottle of Fennlan Liquor from Gref's Rest for him. This conversation triggers the quest called A Lovely Drop. The entrance to Gref's Rest is at #20.
Fenlann Liquor
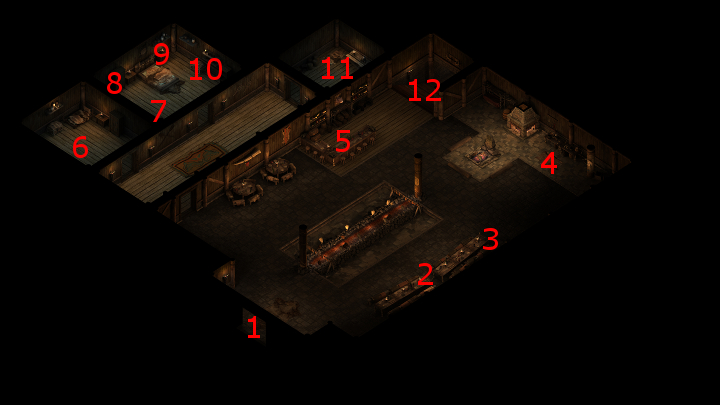
I start off at #1 on the main floor of Gref's Rest. I speak to Haeferic at #5 to rest up, and then head down the stairs at #12.
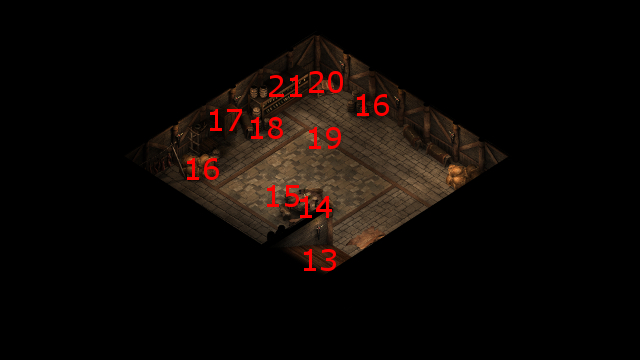
I am now at #13 on the map of the second floor of Gref's Rest. I have Devil of Caroc go into scouting mode in order to find the traps in the corner around #19 and disarm them.
One of the containers on the rack at #21 has the Fenlann Liquor. I leave Gref's Rest once I have it.
Spiked Liquor
I give the Fenlann Liquor to Reyfald. But it turns out that Haeferic has spiked it with something to give Reyfald a nasty reaction. The latter pleads with me to find an antidote for him.
Haeferic's Cure
I go back inside Gref's Rest and speak to Haeferic. He indicates that he can put together an antidote for Reyfard, but he'll need a River Reed and the heart of an Ice Troll for it.
The party leaves Gref's Rest, and then uses the World Map Exit at the west gate to travel to Russetwood.
The One That Got Away
At #2 is Harmke, the guy that the Devil of Caroc is looking for, along with several Wood Cutters. Verbally questioning him won't get him to admit his role in the murder of Devil of Caroc's family. But using your Watcher abilities will look into his memories and confirm it.
Now it's up to you whether or not you reveal the truth to Devil of Caroc or hide it from her. The choice has implications for the Devil of Caroc's epilogue, but neither turns out particularly well for her.
Alliria chooses to reveal the truth to the Devil of Caroc, and a fight with the Woodcutters naturally ensues. It is easily won. Whether you slaughter Harmke and his fellows, or hid the truth from the Devil of Caroc and let him go free, either choice leads to the conclusion of the Devil of Caroc's personal quest, The One That Got Away.
Devil of Caroc's Origins
Alliria and Devil of Caroc now speak with each other at length, whereby the latter explains her memories of Galvino forcing her soul into her current construct body.
Ice Beetles
There will be some Ice Beetles at #14, who by now are very easily killed.
Vamrel
I confront Vamrel and his Slavers, plus their captive Crag Ogre, now at #11, and much later than the evil party did. They're decidedly easier to defeat, especially since I sent Ituumak ahead and Grieving Mother uses him to focus an Amplified Wave that renders all of my enemies prone.
Vamrel leaves behind the Bittercut Sabre, but the good party has different emphases and setups than with the evil party, so I'll just sell it.
Ice Troll Heart
The Ice Troll will be at #5 towards the northeast corner. I kill it easily and collect the Ice Troll Heart.
There will also be a few River Reeds nearby. I return to Stalwart Village.
Bubbling Antidote
I bring the ingredients to Haeferic in Gref's Rest. He then provides me with the Bubbling Antidote.
A Lovely Drop
Alliria gives the Bubbling Antidote to Reyfald, who is then relieved of his condition. Doing so concludes the quest called A Lovely Drop.
Reyfald rewards Alliria with a pair of bracers called Pilferer's Grip. The penalty to Attack Speed far exceeds whatever benefits can be derived from a +1 bonus to Dexterity, so I'll just sell it. The good party returns to Caed Nua.
Crossed Patch
The good party returns to the rewards chest in the Great Hall. Waiting inside will be the Crossed Patch, which is a reward for The Crossed Eye companion adventure. It doesn't fit into my plans though, so I just sell it to the merchant along with the rest of my excess loot.
I rest up and return to Stalwart Village.
*Evil* Swaddling Sheet
The evil also returns to the rewards chest in the Great Hall. Waiting inside will be The Looking-Inward Chime, which is a reward for the companion adventure called What the Well Holds. I have no use for it though.
Thyrsc
The house of Thyrsc, a Dwarven hunter, is at #7 on the map of Stalwart Village. I speak to him, and he requests that I seek out and kill a monstrous Wolf that has been terrorizing the Russetwood. He can't, as his last encounter with the beast has left him too injured to try again for the time being. This conversation triggers The Hunter's Favor quest. I next travel to Russetwood.
*Evil* Silver Arrow
*Evil* Zakara only comes to the wounded Winter Wolf now, much later than Alliria. She decides to make a Might check of 16 to put it out of its misery. She obtains the arrow, which completes the Stormcaller bow, but, as she has no use for it, she will simply sell it.
Shrine of Galawain
At #6 is a Shrine of Galawain. Touching it will prompt a Watcher vision that reveals that someone was transformed into a beast as a result of something having been taken from the Shrine.
Landslide
At #8 will be a frozen corpse partially buried in a landslide. I loot it for Boots of Speed and a few other miscellaneous items.
Greyjaw
At #32 will be three dead bodies. An enormous Bear called Greyjaw attacks me once I get close enough, but I kill it easily enough.
The corpses themselves leave behind a Coil of Resourcefulness, Camping Supplies, and a few other items. The Coil can be useful for character builds or parties that rely heavily on setting traps, but that isn't really an issue for me.
Menpwgra and Winter Wolves
Towards #10 will be several Winter Wolves led by a Menpwgra. They're defeated easily enough. #10 marks the entrance to the Wolf Cave.
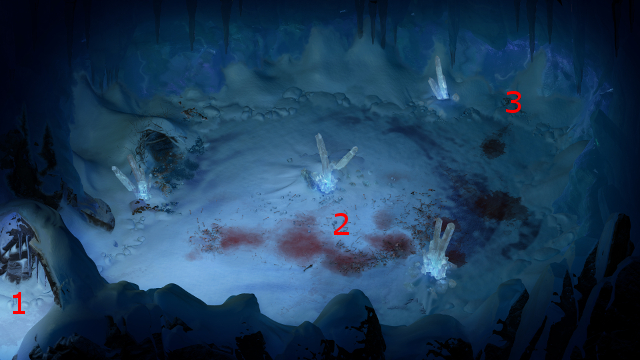
Wolves' Cave
Inside the Wolf Cave itself will be a pair of wounded Hunters, several Winter Wolves, and a Druid Wolf in their midst. Alliria uses her Watcher abilities to ascertain that the Druid Wolf is in fact Suldrun, Thyrsc's son. He was transformed into a near-mindless beast as a curse for taking something sacred from Galawain's Shrine.
She chooses to back away and leave the Cave, with the hope of finding a cure for the curse. Remember the Winter Wolf that I removed the Silver Arrow from earlier? It now guards the two Hunters against the rest of the pack. *NOTE* Had I not helped that Winter Wolf earlier, it would have died, and leaving the cave now without killing the rest of the Winter Wolves would amount to condemning the Hunters to death.
*Evil* Wolves' Cave
Zakara prefers to slaughter the Druid and the Wolves at the outset, which certainly makes for a swifter resolution of the quest.
Hunter's Totem
The party heads south until they reach an abandoned camp at #21. A hidden log has the Hunter's Totem.
I return it to the Shrine of Galawain at #6, and then make my way back to the Wolf Cave.
Suldrun
I enter the cave. Suldrun has been restored as a Dwarf with the curse lifted. Both the Winter Wolves and Hunters left alive. He rewards me with the Ancestor's Pendant, but I'll just sell it. *Evil* He also dropped it for looting after I killed him.
Benevolent and Diplomatic responses will convince him to go back to his father, Thyrsc. Passionate and Rational replies will convince him to exile himself from Stalwart Village in shame. Alliria chooses the former course.
At the back of the cave is an interesting Wand called Curoc's Brand. What it has going for it is the chance to trigger Combusting Wounds from its target on a Hit or Critical Hit. However, the 10% chance is too infrequent for me to think of it as a mainstay weapon. I'll sell it. The good party returns to Stalwart Village.
The Hunter's Favor
Now it's time to speak with Thyrsc again. It doesn't matter how things turned out for Suldrun, or the Hunters, or the Wolves, Thyrsc will still reward you with xp, a moderate gain to reputation with Stalwart Village, and the Cloak of the Frozen Hunt. That concludes The Hunter's Favor quest. I have no use for the cloak, so I'll just sell it.
Greater Ice Blights
I've already encountered Urthal at Durgan's Battery, so there's no point in going to the Temple of Ondra. I travel back to Russetwood.
There will be several Greater Ice Blights at #18. I kill them easily enough.
Feral Druids and Winter Wolves
There will be a few Winter Wolves, led by a couple of Feral Druids, at #20. I defeat them easily as well.
Pwgras and Spotted Stelgaers
I go north a little to #22, and take out a pack of Spotted Stelgaers led by three Pwgras and a Menpwgra. Hiravias uses Plague of Insects to minimize enemy spells.
Giftbearer Chest
At #24 is a hole in the frozen lake. A Perception check of 17 will confirm that there are objects at the bottom of the lake. One way to get what's at the bottom is to defeat Urthal and his mercenary band at #12 on the map of Durgan's Battery map. One of the items Urthal will leave behind is the Giftbearer Notebook. Click on the lake hole to begin the scripted interaction. You can use the Giftbearer Notebook during the scripted interaction with the Russetwood lake by using its three phrases in the order that they appear, "Notoc Tlocotl", "Cualla Mirna", and "Xitlac Cualla". The effect is to summon a Lagufaeth, which will then retrieve the Giftbearer Chest for you. Whether or not you feed the Lagufaeth a Fish out of gratitude is up to you.
Other ways are to have either a character with a Constitution of 16 dive to the bottom, or to first use the Bulwark Against the Elements spell cast on the diving character before proceeding with the dive. Sagani is able to use the Bulwark Against the Elements power from her Stormcaller bow on Alliria, who then dives to the bottom to retrieve the Giftbearer Chest.
*Note* Had I not confronted Urthal earlier, and had visited the Temple of Ondra instead, I would have pulled out an Empty Giftbearer Chest instead. That in turn could lead to possible confrontations with the Priests of Ondra instead, on account of them fraudulently claiming the gifts to Ondra for themselves.
*Evil* It was also easy enough to have Aloth cast Bulwark Against the Elements beforehand so that anybody can reach the bottom of the lake without a hitch. I send Eder down, but he could even have done it by making a Constitution check of 16 without the aid of the spell. Either party now returns to Stalwart Village
Regrets Worth Trading
I now return the Giftbearer Chest to Okrun. He rewards me with 1,200cp, and lets me keep the White Crest Armor as rewards. I have no use for the armor, so I'll sell it. Okrun regaining his Medallion, however that is accomplished, marks the completion of the Regrets Worth Trading quest.
A major companion adventure now becomes available, but I don't care which one. It happens to be The Unworn Path. I assign Pallegina to it. I make for Gref's Rest afterwards.
*NOTE* Had I entered the Temple of Ondra first and spoke to Lafda, before confronting Urthal, I would have brought back the Empty Giftbearer Chest to Okrun instead. Okrun will now be hot for retribution, since the clear implication is that the Priests of Ondra have been hoarding the sacrificial items for themselves instead of giving them over to Ondra. He'll want to join you inside the Temple itself. However, a Resolve check of 16 or an Intellect check of 12 can convince him to remain outside.
Once you're inside, there is more than one way to handle things:
*Evil* Regrets Worth Trading
Zakara gives the Giftbearer Chest to Okrun while he's still outside the Temple of Ondra.
She also chooses the Cruel dialogue option that insists on a reward, and thereby gets the White Crest Armor, as well as 1,600cp.
*Evil* Temple of Ondra
It is at this point that Zakara decides to force-attack and slaughter the Priests of Ondra, which by now is quite easy. I collect the loot and leave.
Ailef
I speak to Haeferic at #5, sell off my excess loot, and rest up. I now broach the subject of the Orlan he wants out of his Inn. He reiterates that he believes the Orlan's presence will only mean trouble for the inn itself, and would like me to get rid of him without physically hurting him. This conversation starts the quest called Overstaying His Welcome.
Now I speak to the Orlan named Ailef at #11. It turns out that he's an escaped Slave, and has a Slaver named Defala on his back. He would appreciate my getting rid of her. I travel back to the Russetwood.
Defala
I go to #22, where I find the Slaver who's after Ailef, Defala, along with several Readceran Mercanaries. Alliria chooses the response based on having a Slave background to start a fight. The Slavers are very easy to kill, since none of them have any magic. I return to Stalwart Village.
*Note* An alternative way to get the same result is to initially fall in with Defala's offer and head back to Ailef. He's willing to explain that he didn't want to kill the master's son, but his son caught him sneaking out and he felt he could not leave behind any witnesses. You can kill him then and there, although he only leaves a few coins behind. If you have built the Dungeon for your stronghold then you will also have the option to have him serve a sentence of imprisonment for the murder.
If you go back to Defala after killing or imprisoning Ailef, she will become upset because she can't complete her tracking job. The fight will ensue, just as with the second option described above.
*Evil* Defala
Zakara instead falls in with Defala's request to lure Ailef into the slaver's trap.
Overstaying His Welcome
I enter Gref's Rest and bring the good news to Ailef. He rewards me with the Durgan Copper Bracelet and a Ring of Unshackling before skipping out of town.
I then inform Haeferic of Ailef's departure, and receive xp, a small increase in positive reputation with Stalwart Village, and an Opal as rewards. That concludes the quest called Overstaying His Welcome. The video concludes with me returning to Russetwood.
*Evil* Overstaying His Welcome
Zakara returns to Ailef in Gref's Rest, and uses a Deceptive option to get him to walk into Defala's trap.
She then goes back to Defala in the Russetwood, and collects a 1,000cp reward for facilitating the capture of Ailef.
The video concludes with me informing Haeferic of Ailef's departure, and getting a small reputation increase with Stalwart Village. I then rest up and return to the Russetwood.
Lagufaeth Broodmother
There will be a few Lagufaeth and Ice Trolls, led by a Lagufaeth Broodmother, at #25. Defeating them becomes easier once I put a Plague of Insects over them to start combat.
*Evil* Tattered Map
I show this part from the perspective of the evil party. I go to the camp at #25 on the Russetwood.
I click on the orb of purple light in the camp. Zakara then has a vision of the archmage named Ninagauth killing his apprentice for stealing his grimoire.
I next find a hidden cache in the camp. It has the Tattered Map. Looking at the map provides a hint as to where a certain grimoire will be found later on.
Falisa
Kana switches to his Phrase modal that includes They Shielded Their Eyes 'Gainst the Fampyr's Gaze. There will be a large group of Darguls and Fampyrs led by a Fampyr named Falisa at #27. A fight is inevitable.
Hiravias peels off a sequence of Relentless Storm, Moonwell and Form of the Delemgan. Alliria uses Reinforcing Exhortation on both Kana and Devil of Caroc, and then activates Sacred Immolation. The fight pretty much takes care of itself afterwards. Note now a pulse of Sacred Immolation finished off Falisa herself outright, which in turn triggered Strange Mercy.
I rest up. Note that there's a hidden cache in between the River Reeds at spots marked #15 just west of #23. I replenish my Camping Supplies from the cache. Kana switches back to his fire-based Phrase modal.
Crag Ogres in Russetwood
There will be several Crag Ogres at around #29, but they're fairly easy to beat. I rest up, and grab the Camping Supplies from one of the dead bodies near where I fought Greyjaw at #32.
The entrance to the Flames-That-Whisper Caverns is at #30.