-

- Forums
- Chatrooms
- Gallery
- Gameplay Videos
- Upload
- Articles
- Mod Reviews
- Shop SP: Games, Movies, Books
|
|
Cragholdt Bluffs
Arrival at the Cragholdt Bluffs
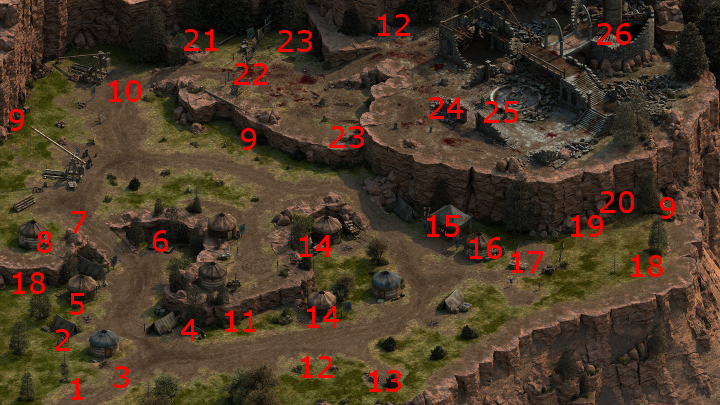
I arrive at #1 on the map of the Cragholdt Bluffs. This area is truly meant for only high-level parties. You'll start off fighting plenty of high-level mercenaries, with many of them using advanced abilities. For example, Mercenary Berserkers will frequently use Dragon Leap to try and reach spellcasters, while Mercenary Fighters will use Clear Out to try and knock multiple party members Prone.
It doesn't matter what you say to the pair of Guards at #3, a fight is inevitable. I kill a few more nearby Mercenaries.
Drunken Orlan
There will be a chest with a very high-level lock at #4. It can be unlocked with the Orlan's Key, which is carried by the nearby Drunken Orlan.
If you can get the key without waking up the Orlan, then you can loot the chest at leisure. There are numerous ways to go about it. One is to have your Stealth character go into scouting mode and then sneak up on the Orlan to either pickpocket the key with a Dexterity check of 17, or kill him swiftly with a Might check of 17.
If you fail the Stealth check at night, the Orlan will simply fall back asleep.
If you fail the Stealth check during the day, there's a real risk that the Orlan will alert nearby guards, although that may be what you want anyway. If you want to render him unconscious quickly before alerting any nearby guards, the Wizard's Call to Slumber and the Cipher's Puppet Master power will work. If you want to kill him quickly, the Barbarian's Wild Sprint, the Monk's Long Stride, or any Hunting Bow will work.
It can be advantageous to kill the Orlan instantly if you can, since he's actually a powerful Monk once he's on is feet, and can use high-level abilities like The Dichotomous Soul. I do it by having Alliria lend her Pensiavi Mes Resi ring to Sagani, having Kana use a Rite of Walking Shadows scroll to raise Sagani's Stealth to 12, and then having Sagani make the Stealth check and then the Might check of 17 to kill the Orlan instantly.
After that, I wait for a Mercenary Gunslinger and then a Mercenary Fighter to each come forward so I can kill them each piecemeal one by one.
The chest itself will have Camping Supplies and some gold coins, but I leave both the key and the chest for later.
*Evil* Drunken Orlan
Zahua for the evil party fails his Stealth check, but the Drunken Orlan falls back to sleep since it is night time. Zahua then makes the Might check of 17 to kill the Orlan instantly.
Mercenary Pyromancer
I continue east and kill a few more Mercenaries, led by a Mercenary Pyromancer. Some of them keep their distance, as they are either Battlemages, War Priests or Gunslingers. Note how I sent Ituumak ahead, and that allowed Grieving Mother to use him as the focus for an Amplified Wave.
Crothar
A large force of Mercenaries will be at around #7, led by an Ogre named Crothar. Alliria tags him with Sworn Enemy, and then uses Reinforcing Exhortation on both Kana and Devil of Caroc.
Hiravias uses Moonwell followed by Relentless Storm.
I send Ituumak forward so that he and Sagani can go to work on enemy spellcasters. It allows Grieving Mother to use him as a focus for Amplified Waves whenever she has at least 60 Focus.
Luckily, Crother brought himself within hands-reach from the outset, so the warriors go all out for him. Alliria tags him with both Flames of Devotion in order to bring him down as quickly as possible. Once he falls, the battle more or less takes care of itself.
I can't disarm the trap on the chest at #8, so I leave it for later.
Mercenary Sergeant
Another force of Bannermen led by a Mercenary Sergeant will be a little to the northeast. The theme of using a charging Ituumak as the focus for Amplified Waves works here as well.
*Evil* Commander Baelorin
Here I show the perspective of the evil party. I keep the party on the narrow path between #6 and #7. Aloth sets a Malignant Cloud Trap at the north end of the path.
I send Zakara ahead to speak to Commander Baelorin. The dialogue leads to an inevitable battle. Zakara hustles back to the rest of the party, with her enemies on her heels.
Durance, just as Zakara comes within his sight, begins an extended sequence of: Devotions for the Faithful, Shields of the Faithful, Consecrated Ground, Interdiction, and then a Storm of Holy Fire over where the enemies will be.
Aloth at the same time uses a sequence of Eldritch Aim, Pull of Eora, Chill Fog, Malignant Cloud, Merciless Gaze and then Kalakoth's Minor Blights. He then bombards enemies that are clustered together.
The rest of the party hangs back, and simply attacks any enemies that happen to break through the crowd control. The battle is soon won.
One of the Mercenary Warmages left behind a Cape of Withdrawal, but I have no use for it.
Commander Baelorin himself leaves behind two items. One of them is The Golden Scales, which Zahua equips as a decent interim armor.
The other is the Small Bronze Key, which I'll use soon.
Unsigned Letter
There will be a group a little south and east that consists entirely of Mercenary Pyromancers and Mercenary Warmages. Together they can do a lot of harm. First, I have Grieving Mother and Hiravias switch over to missile weapons. I then sneak south to get as close to them as I can. Kana hits them with a Twin Stones scroll once battle starts. Alliria and Devil of Caroc rush the foremost Pyromancer. Hiravias, Grieving Mother and Sagani aim missile fire at different spellcasters. Grieving Mother gets at least 60 Focus on her first hit, so I immediately thereafter have her unleash an Amplified Wave to knock all of my enemies to the ground. I thereby manage to win the battle quickly with minimal damage.
The chest at #15 has an Unsigned Letter, which provides background for the conflict surrounding Cragholdt.
Sentinel's Girdle
Now I go around finishing off the remainder of the Mercenaries towards the southeast corner.
At #16 is a trapped and locked chest. The Small Bronze Key is used to open the chest. The trap is of such strength that Devil of Caroc can't disarm it, even with the aid of Gloves of Manipulation. But I can safely trip it anyway, since it involves a single-target spell that misses its target.
Waiting inside is the Sentinel's Girdle, which Devil of Caroc wears for the rest of the game. The +3 bonus to Might obviously helps increase the damage of her melee attacks. The ability to use Watchful Presence once per rest provides an ability that can be useful in some fights, and would otherwise be unavailable to the good party. The bonus Defense vs. Push attacks will also help her maintain tank position.
She also transfers her Girdle of Eoten Constitution to Kana, who now wears it for the rest of the game. The bonus to Constitution will add to his resiliency as the main tank of the party. The good party now makes its way back to where they fought Commander Baelorin.
*Evil* Sentinel's Girdle
*Evil* Maneha gets the Sentinel's Girdle in the evil party. The obvious benefit is that it increases not only the damage against the enemy that she strikes directly, but also the Carnage damage against any nearby enemies as well. The defensive bonus vs. push attacks will help her hold her tank position. The Watchful Presence is possibly a worthwhile option for a non-spellcaster if Durance can't cast it in the right situation.
Alguls and Tripwire
There is a tripwire at #22, with a couple of undead called Alguls nearby. It's easy enough to lead the Alguls away west, kill them, and then disarm the trap.
Ancient Death Guards and Alguls
The upper plateau of the northeast corner will have a few Alguls and Ancient Death Knights sprinkled about it. Ancient Death Knights can be really tough. Their melee attacks hit for massive damage. They can use a single-target spell that causes instant death. They can cast Fireball. They can also use the Fighters' Clear Out to knock multiple party members Prone.
My approach was to send a lone party member forward until he got the attention of a Death Knights, and lead it (or at most no more than two) back to the party and gang up on it. I'm not bothered if any Alguls join in. I eventually clear out all the enemies through this attrition approach.
Orlan's Key and Chest
First, I go back to the trapped chest at #8. I have Alliria go by herself and ahead of the rest of the party to trip the trap and absorb its damage. I can do this since I have now cleared all enemies out of the area, and I am about to rest up.
I return to #4 and loot the Orlan's Key from the Drunk Orlan's dead body. Now I rest up, use the key to open the chest, and grab the Camping Supplies.
Now I make my way to the stairs at #26 to enter Cragholdt itself.