-

- Forums
- Chatrooms
- Gallery
- Gameplay Videos
- Upload
- Articles
- Mod Reviews
- Shop SP: Games, Movies, Books
|
|
Cragholdt
*Evil* Thrall Assassin
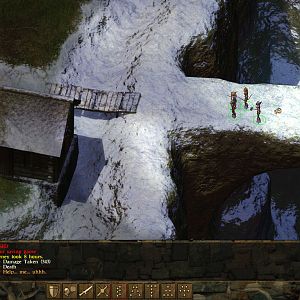
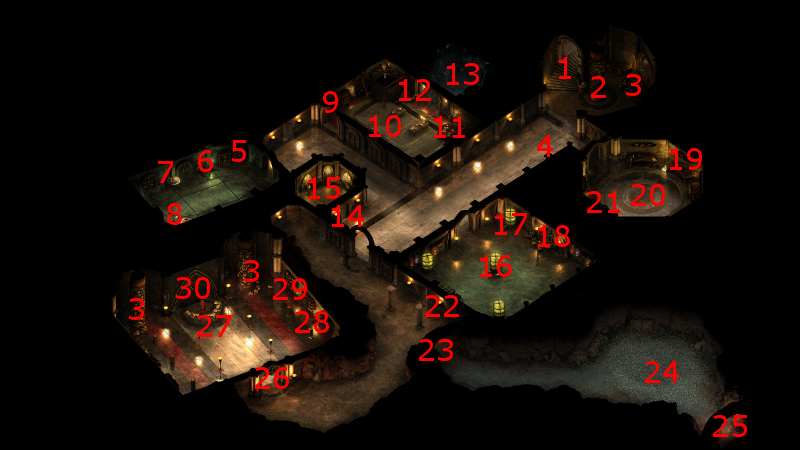
Here I show the evil party entering Cragholdt itself at #1. A grand companion adventure becomes available, although I don't care which one. It happens to be the one called A Place of Great Silence. I assign Grieving Mother to it.
At #2 is a cylindrical bookcase from which I can obtain a random item. At #3 is a table from which I can get a random item and a random book.
The video concludes with a Thrall Assassin at #4 telling me that somebody named Tanoss wants to see me.
Bargain with Tanoss
I head west to #8 to speak with a Vithrack Wizard named Tanoss. He wants me to kill the rest of Concelhaut's apprentices, and in exchange he'll provide me with information needed to reach Concelhaut himself. I keep the offer open for now.
Bargain with Uariki
I go east and speak to an Aumaua Wizard named Uariki at #19. She offers the same kind of deal as Tanoss, and I accept.
Pelden
I enter the room to the south and speak to an Elven Wizard named Pelden at #16. I position Devil of Caroc and Ituumak close to him before speaking to him, which inevitably leads to battle no matter what I say. Since Devil of Caroc starts inflicting damage right away, and Ituumak uses Take Down on him, I can take him out almost right away leaving only the several Alguls that were his minions. But then Grieving Mother simply begins a cycle of attacking to build up her Focus to at least 60, and then using Amplified Wave to keep them knocked Prone. Victory follows as a matter of course.
The items Pelden leaves behind include:
Tanoss
Now I go back to Tanoss. I position everyone so that Devil of Caroc and Ituumak are right on top of Tanoss, and everyone else forms a tank wall around Sagani at the same time. I then pick a fight with Tanoss. Ituumak's Take Down and Devil of Caroc's attacks pretty much take him out almost instantly, leaving only his Thralls behind. And again, Grieving Mother leaves them locked down with her Amplified Wave cycle.
The items Tanoss leaves behind include:
Sabel
Now I approach the room east of Tanoss. I take a different approach to reflect that a lot of my next set of enemies will be spellcasters. I position the party south of the door, and have Devil of Caroc plant a Malignant Cloud trap at the door. Alliria opens the door and speaks briefly with the Dwarven Mage, Sabel. It doesn't matter what I say, she and her Steelspine Mages will attack. Alliria leads them out the door, towards the party, and with the result of tripping the trap.
Kana hits them a Twin Stones scroll, while Grieving Mother hits the nearest one with Detonate.
Hiravias sets up a Venombloom at the door. Between that and the trap, that means plenty of Raw Damage chipping down my enemies round after round. He follows up with a Relentless Storm and a Nature's Mark.
Ituumak jumps ahead and towards the farthest enemies. That in turn allows Grieving Mother to set up an Ectopsychic Echo. Victory soon follows.
The items Sabel leaves behind include:
Uariki
I then go back to Uariki and inform her that I've killed off the rest of the Apprentices. She gives me Uariki's Note. Having and reading all four notes becomes progress for purposes of the Siege of Cragholdt quest. She also rewards me with three Potions of Major Endurance and a Scroll of Valor.
I decide to attack Uariki now, since I want the treasures in the room. I saved her for last because she's the relatively toughest of the Apprentice battles. The reason being that the numerous animated weapons in the room can connect conjoining damaging rays together, and the damage to party members can really add up in a hurry.
Devil of Caroc, Alliria, Sagani and Ituumak team up to take out Uariki as quickly as possible. Alliria then activates her Sacred Immolation with the hope of bringing the animated weapons down as quickly as possible.
Hiravias leads off with Venombloom to sustain Raw Damage on the weapons, and then follows up with Relentless Storm to minimize their danger.
Kana activates a Scroll of Moonwell, and then a Scroll of Defense, to maintain the party's resiliency.
Grieving Mother uses her Amplified Wave once she gets a chance. The net result is that I manage to win the battle relatively unscathed.
The items Uariki leaves behind include:
Void Seers
I start off by crafting a couple of Scrolls of Prayer Against Imprisonment. Kana equips them and a Scroll of Hail Storm in his quick-item slots.
I go southeast and hit the switch at #22, which opens the door at #23. Waiting at #24 will be a few of a new kind of monster, Void Seers, which are basically flaming skulls capable of casting Wizard spells. They are accompanied by several Steelspine Magi, and led by an Ancient Death Guard.
Kana starts with using a Scroll of Prayer Against Imprisonment (which protects against paralysis and petrification), and then hits the oncoming enemies with the Scroll of Hail Storm.
Hiravias starts off with a Hail Storm spell, followed by Venom Bloom, and then Relentless Storm once the enemies have closed in. After that, he throws in a Moonwell for good measure.
Alliria uses Reinforcing Exhortation on both Kana and Devil of Caroc, and then Sworn Enemy on the Death Guard. She also uses both her Flames of Devotion on the Death Guard.
Grieving Mother levels everyone with Amplified Wave once she gets the chance. I saved the toughest fight for last, and came out of it with some damage but so much that I can't win the next one and get Camping Supplies.
The Last Tower
I approach the door at #14, which is locked and trapped. Devil of Caroc is able to unlock it, and therefore doesn't bother trying to find it. She just opens the door and trips the trap. The trap ends up missing her in any event.
You may have noticed that there have been a couple of Void Seers floating about the hallways. I now take the opportunity to force-attack them and get rid of them. Otherwise, they will join in on the last fight against me.
The room at #15 has plenty of treasure chest. One of them has the Iridescent Spider Figurine, which I already have, and a Large Shield called The Last Tower. I have no use for the latter, so I'll just sell it.
The very large chest in the room is both locked and trapped. Devil of Caroc disarms it, but after that I lead the party out of the room. After that, I sent Kana in, the party member with the most Health, to trip and absorb the trap relatively safely. The chest itself has several high-tier gems like Diamonds and Rubies and Sapphires.
Human Skeletons
Now I go to the room at #13, where I easily kill off several Human Skeletons. I rest up, with those party members that I count on for melee attacks (instead of spellcasting or tanking) selecting the Accuracy bonus vs. Vessels option. I then grab Camping Supplies from one of the dead bodies in the room.
Concelhaut's Door
Now I make my way to the door at #26. I kill off the Void Seers waiting at the door to avoid them participating in the last battle.
I click on the door to use the clues I've found. The correct answers in order are:
Concelhaut
Concelhaut will be waiting for me at #27. He's accompanied by a few Alguls, and a pair each of Ancient Death Guards, Steelspine Magi and Void Seers. It doesn't matter what I say, combat is inevitable.
Devil of Caroc, Sagani and Grieving Mother use their figurines to set up a meat shield wall in front of them in order to hold up the oncoming enemies, and buy the rest of their party members time to set up.
Kana begins to churn out the scrolls, a Scroll of Prayer Against Imprisonment (to protect against Paralysis), a Scroll of Defense (+20 to all Defenses), and a Scroll of Valor (+15 Accuracy).
Alliria uses Reinforcing Exhortation on both Devil of Caroc and Kana. She then activates her Sacred Immolation.
Hiravias begins with Form of the Delemgan in order to raise Damage Reduction against both physical attacks and elemental spells. He follows up with Moonwell to keep the party's Endurance regenerating. Once the enemies close in, he uses Relentless Storm followed by Venom Bloom.
Once everyone's been buffed up, Grieving Mother zeroes in on the nearest Algul, which will be susceptible to Slashing Damage. She then begins her cycle of building her Focus up to 60 and then using Amplified Wave in order to knock the enemies Prone.
At some point, there's only a few enemies left, so she now shows a new trick. She temporarily takes Concelhaut out of the battle by using Stasis Shell on him, leaving the remaining few minions at the mercy of the party. They soon fall.
That leaves Concelhaut once he comes out of the Stasis Shell. Hiravias casts another Moonwell. Alliria uses Sworn Enemy on him once he's out. It then becomes a matter of ganging up on him and finishing him off.
Distinctive items that he leaves behind include:
*Evil* Concelhaut
The video begins with Aloth planting a Chain Lightning trap at the door. I go ahead and speak with Concelhaut before the inevitable combat begins.
My initial plan was to run out the door and to the right, and hit my enemies with crowd-control and other spells as they come through the door. And I partially succeeded with getting out the door.
Problem was that Eder got knocked down right at the door. My initial inclination was to reload, but then it occurred to me that Eder is survivable even when knocked down Prone and surrounded, and he's in his natural tanking position. So I changed plans.
The new plan begins with Zakara and Maneha joining Eder on the front lines, thereby forming a wall that keeps Aloth and Durance from harm. Zahua prepares to attack at a distance with his Greenstone Staff.
Durance begins a buff sequence of Devotions for the Faithful, Shields of the Faithful, Crowns of the Faithful, Consecrated Ground and Salvation of Time.
Aloth first protects himself with Bulwark Against the Elements and Llengrath's Safeguard. He then prepares for bombardment with Merciless Gaze and Kalakoth's Minor Blights.
Zakara, about halfway through the battle once she's no longer stunned, tags Concelhaut with Sworn Enemy and then uses her Sacred Immolation power.
I throw offensive spells into the mix as well. Aloth hits several enemies with Chain Lightning. Durance casts a Storm of Holy Fire over the room. He also aims a Cleansing Flame at Concelhaut with the intention of stripping away Concelhaut's buffs, but I'm not sure if he got it off before Concehault got him with a Concelhaut's Crushing Doom spell.
Be that as it may, the mixture of offensive spells and Sacred Immolation sufficed to thin out the numbers, leaving a nearly dead Concelhaut by himself with an equally almost dead Death Guard. Victory comes shortly thereafter.
*Evil* The Ironclasped and Concelhaut's Skull
There are two items of interest he leaves behind that are of distinct interest to the evil party. One is Concelhaut's Skull, which Zakara accepts as her new pet. Unlike other pets, this one has a combat use. It can be used to summon his shade. It can cast spells, and therefore provides a real option of having a second Wizard fighting for the evil party. The tradeoff is that the shade will inflict small amounts of Raw damage on the main character over the duration of the summoning.
*Good* Alliria also takes the Skull, but leaves it in her inventory without making it her pet. The intention for the good party is to bargain with Llengrath later on.
The other item of interest is Concelhaut's grimoire, The Ironclasped. Aloth takes it and uses it to inscribe what is the key spell of interest for him, Concelhaut's Crushing Doom. This is arguably the best-single target spell for singularly powerful enemies in the game, since it provides multiple chances of knocking its target Prone. Crushing damage over the duration is a plus.
Sky Dragon Eye
The table at #30 has several Blight essences, as well as a Sky Dragon Eye. I also have another Sky Dragon Eye from the Temple of Hylea. So I use them to add the Superb Quality enchantment to Hiravias' Pliambo per Casitas.
I also add the Shocking Lash and Beast Slaying enchantments. The former is rather thematic for Hiravias, while the latter will make the weapon especially handy for dealing with Dragons, against whom an Accuracy bonus can be really welcome. I leave Cragholdt and return to Caed Nua.
*Evil* Sky Dragon Eye
I have not only this Sky Dragon Eye, but the remaining one from the Temple of Hylea as well. I use them to raise the quality of Durance's Pliambo per Casitas to Superb.
*Evil* The Looking-Inward Chime
The evil party returns to the rewards chest at #3 in the Great Hall. Waiting inside will be The Looking-Inward Chime, which is a reward for the companion adventure called A Place of Great Silence. I have no use for it though.
15th Level
Everyone now has enough experience to advance to their 15th levels.
Alliria gets Healing Chain. It provides another healing option if the battle is intense enough to warrant it.
Kana selects the Phrase called Mercy and Kindness Followed Whe'er She Walked. It doubles the amount of Endurance received from any healing effect, and I include it in the same Phrase modal as Aefylleth Ues Mith Fyr and The Dragon Thrashed, The Dragon Wailed as part of my large crowd clearing modal. The idea is that powers like Strange Mercy, Healing Chain, The Sword and the Shepherd, and Moonwell become especially potent if they activate while this Phrase is running.
Devil of Caroc acquires Adept Evasion. I pretty much have everything I want for her in terms of being both a Damage Dealer and an Off-Tank, so now I simply add a passive ability that increases her Reflex Defense against area-of-effect attacks.
Hiravias selects Moonwell as his mastered 4th-level spell. Being able to add a constant Endurance boost round after round and a bonus to Deflection every fight is pretty hefty.
Grieving Mother selects two Powers. One is Defensive Mindweb. There's a well known trick to make this Power extremely effective. A character needs to equip both a shield and another item, each of which provides +50 bonuses to all Defenses, when the character is either knocked Prone or Stunned. The bonuses will stack together since one of the items is a shield. Now you need to inflict a self-stun on that character. The Priest's Withdrawal spell is one example. The example I use in my party is for Hiravias to use a Beetle Shell spell on Kana, who has the needed items equipped. Once that's in place, Grieving Mother casts Defensive Mindweb on Kana to put everyone's Defenses through the roof for at least 30 seconds. Can be really useful in boss fights against Dragons and other tough bosses.
The other is Reaping Knives. If I have a battle where I'm wanting to use a LOT of Powers in rapid succession, or want to recoup Focus very quickly after using Powers, I can use this on Alliria so that she effectively becomes a Focus-generating battery for Grieving Mother. Another plus is that the blades themselves inflict Raw Damage.
Sagani acquires Defensive Bond. It provides a Reflex Dense bonus against area-of-effect attacks for both Ituumak and herself.
The good party now begins White March Part 2 by exploring the Mines of Stalwart Village. *Evil* The evil party instead enter the 15th level of Endless Paths for unfinished business with the Adra Dragon.