Pillars of Eternity logo


Pillars of Eternity Online Walkthrough by David Milward


INTRODUCTION & ABOUT  |  WORLD MAP  |  WHITE MARCH MAP
General:  
Quests  |  Tasks  |  Bounties  |  Items  |  Characters
Areas:  
Act 1 Areas  |  Act 2 Areas  |  Act 3 Areas  |  Act 4 Areas  |  Caed Nua  |  White March - Part 1  |  White March - Part 2  | 
Disable all ads!

Quests:   Main Quests  |  Act 1 Side Quests  |  Act 2 Side Quests  |  Caed Nua Side Quests  |  Act 3 Side Quests  |  White March Part 1 Quests  |  White March Part 2 Quests  |  Companion Quests  | 

White March Part 1 Main Quests:   Durgan's Battery  |  The Ogre Matron  |  The Recluse of the White March  |  The White Forge  | 
White March Part 1 Optional Quests:   His Better Half  |  The Grey Sleeper  |  A Lovely Drop  |  Overstaying His Welcome  |  Regrets Worth Trading  |  The Hunter's Favor  |  A Good Haul  |  Siege of Cragholdt  | 

Siege of Cragholdt

  1. Triggering this quest requires that you return to Caed Nua for the first time after having previously completed the Never Far from the Queen quest, and speaking with the Steward in the Great Hall.

  2. There will be quite a prolonged conversation, and one of the subjects that the Steward will bring up is a growing conflict between a mercenary group called the Torn Bannerman and an Archmage named Concelhaut. This conversation will then make the Cragholdt Bluffs accessible on your World Map.

  3. Cragholdt Bluffs

  4. The party will start off at #1 on the Cragholdt Bluffs map. This area is truly only for high-level parties. There will be mercenaries of pretty much every class spread throughout the camp, and in bunches. Tread carefully and try to take on as few as possible at any given point of time. The mercenaries pretty much leave behind multiple instances of every imaginable armor, weapon or shield of Fine or Exceptional quality

  5. A couple of Mercenary Guards will be stationed at #3. It doesn't matter what you say, a fight is inevitable.

  6. Commander Baelorin
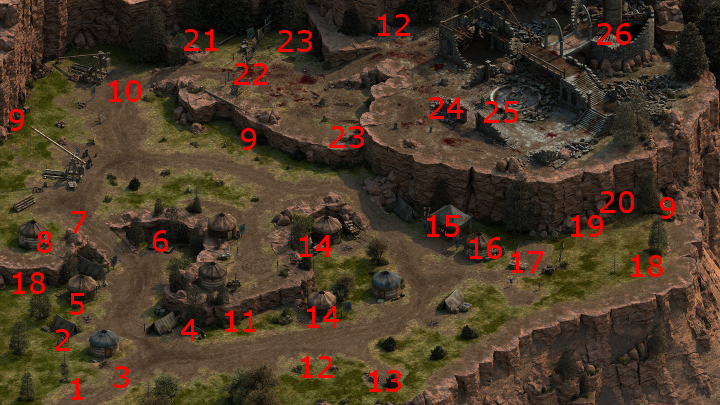
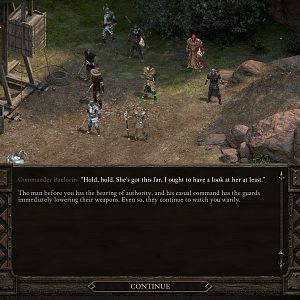
You'll encounter Commander Baelorin, and several of his Mercenary bodyguards, at #10. He'll end up attacking you no matter what you say, although Clever and Diplomatic options are available early the conversation. You can also learn a lot about why the siege is taking place, since he is willing to indulge questions in that regard. Three unique items that he or his cohorts drop include:
    The Key is used to open the chest at #16.

  7. The table at #15 will have the Unsigned Letter. It will provide background on the agreement that led to the siege.

  8. There are two ways to get inside Cragholdt. The easier way will be the cave opening at #20, which leads to Cragholdt at #25.

  9. The harder way will be the stairs at #26, since you have to fight your way through a large and dangerous horde of undead.

    There will be a few undead called Alguls at #22, along with a tripwire trap. It is best to lure the Alguls away from the trap, and then disarm the trap afterwards. The Alguls leave behind Vessel Flesh when killed.

    There will be several Ancient Death Guards around #24. They are capable of a Fireball once each encounter, as well as a power that can blow back party members and knock them prone, again once each encounter. Spells that raise your defenses are recommended. Also, try to deal with as few as possible as you can at any given time. All of them will leave behind Vessel Bones when killed, and the odd one may occasionally drop a Fine Sword as well.

    The stairs at #26 lead to Cragholdt at #1.

  10. Cragholdt

  11. You start off at the stairs at #1 on the Cragholdt map if you took the stairs at #26 on the Cragholdt Bluffs map..

  12. A Thrall Assassin at #4 will announce that somebody named Thanoss would like to see you.

  13. A Vithrack Wizard named Thanoss will be here, along with several of his Thralls. He offers a chance to aid you in the quest by offering his notes that reveal the way to Concelhaut. He will want you to kill the rest of Concelhaut's apprentices. You could refuse him and attack him and his Thralls. If you do, go all out for Thanoss himself first to minimize his spellcasting. You will need Thanoss' Note for the quest, whether you help Thanoss or kill him to obtain it.

  14. A Dwarven Wizard named Sabel will be at #10, along with several undead monstrosities called Steelspine Magi. There is no possibility of an alliance, and she will pretty much always attack you on sight, although there is a Diplomatic option at the outset. The Steelpine Magi will leave behind Vessel Bones when killed. You will need Sabel's Note for the quest.

  15. You will find an Elven Wizard named Pelden at #16, along with several Alguls. There is likewise no possibility of an alliance with Pelden as well. Pelden is relatively more conversational than Sabel, but will eventually lose patience and attack. Aggressive and Clever options are possible early in the conversation, as is a Perception check of 11 that reveals that the Alguls in the room are more stable and docile. The Alguls will leave behind Vessel Flesh when killed. You will need Pelden's Note for the quest.

  16. You will find an Aumaua Wizard named Uariki at #19, along with several animated weapons. She, like Thanoss, is willing to offer an alliance to get rid of her rivals. The offer is available even if you previously accepted Thanoss' offer, and vice versa. If you kill the other apprentices at her behest, then she'll not only give you Uariki's Note but also 3 Potions of Major Endurance and a Scroll of Valor.

    If you decide to kill Uariki, be advised that this is probably the toughest of the Apprentice battles here. So much so that you may find it preferable to fall in with her request to kill the other apprentices. The weapons project conjoining rays that connect with each other, and can add up to massive damage for party members caught in their path. One approach is to peel off as many highly-level offensive spells that damage enemies only in a wide radius with the hope of taking them out as quickly as possible. Death Ring is an example of such a spell. Another approach is to try to put your defenses through the roof. An example is casting either Withdrawn or Beetle Shell on a party member that is equipped with both a shield and another item that grants +50 to all defenses while stunned, and then having a Cipher activate Defensive Mindweb so that everyone gets a +100 boost to all defenses. If you emerge victorious, the weapons leave behind several gems, 10 Binding Coppers, 3 Fine Pollaxes, 3 Fine Spears, and 4 Fine Wands.

    You will need Uariki's Note for the quest.

  17. The door at #26 requires four correct answers to open. You must read the Notes from the four apprentices in order for the correct answers to appear as selectable dialogue options. The correct answers in order are as follows:

    • Warded Mind
    • Pride
    • Malleability
    • Mortality

    Provide all four answers and the door will open.

  18. Concelhaut
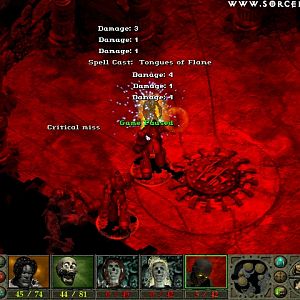
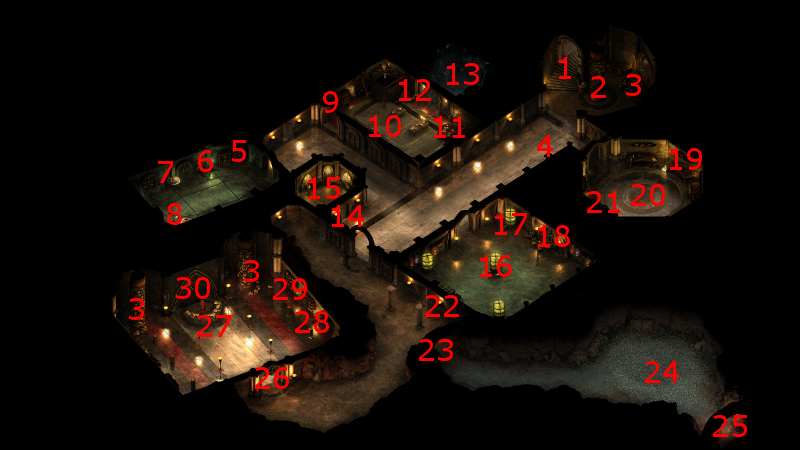
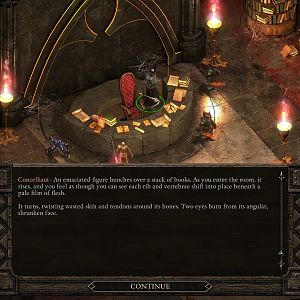
At last at #27 you'll find Concelhaut. It is possible to engage in prolonged conversation with him, but combat will be inevitable. If your main character is a Wizard, you'll be able to learn precisely why Concelhaut values taking the soul of a Watcher for his plans. A Lore check of 6 will also reveal that he is now an undead Lich.

    He will be aided by a few Ancient Death Guards, a few Alguls, a few Steelspine Magi, a couple of Void Seers, and an Animated Wand. This battle can be really tough. Retreat out the door is possible, but in my experience unlikely to be fruitful. It again seems adviseable to try to oliberate everything en masse as quickly as possible, or find a way to put your defenses through the roof (i.e. the Defensive Mindweb trick). All of the undead will leave behind either Vessel Bones or Vessel Flesh. The Animated Wand leaves behind a Fine Wand.

    Concelhaut himself leaves behind:
    The grimoire is one of the best in the game if you have a Wizard in your party. He'll also leave behind his Skull, which can be used as a pet. *Note* That skull can be useful if you want to want to bargain with Llengrath during The Phylactery's Promise quest. Defeating him marks the completion of this quest.

  19. Note that if you completed the bargain with Thanoss, and then speak with Thanoss again after killing Concelhaut, he and his minions will now attack you.

  20. There is an alternative way to leave Cragholdt. The lever at #22 opens the door at #23. The room will have several Steelspine Magi, led by an Ancient Death Guard. They will also be accompanied by a few Void Seers. Void Seers are basically floating skulls that are capable of casting high-level Wizard spells. This battle can also be quite tough, and again the best approach consists of either obliterating them as quickly as possible with spells of your own or putting your own defenses through the roof to ride the storm. All of the undead will leave behind Vessel Bones when killed. The door at #25 leads back out to the Cragholdt Bluffs at #20.


Amazon.com
Amazon.ca
Amazon.co.uk
Sorcerer's Place is a project run entirely by fans and for fans. Maintaining Sorcerer's Place and a stable environment for all our hosted sites requires a substantial amount of our time and funds on a regular basis, so please consider supporting us to keep the site up & running smoothly. Thank you!

Disable all ads!