Pillars of Eternity Online Walkthrough by David Milward
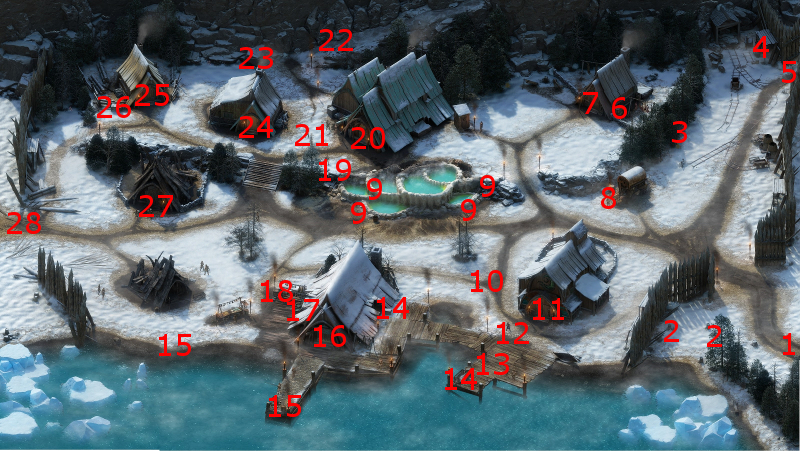
*Note* This map only shows content that is specific to Part 1 of the White March expansion. Follow this link for content that gets added to Stalwart Village during Part 2.
Stalwart Village
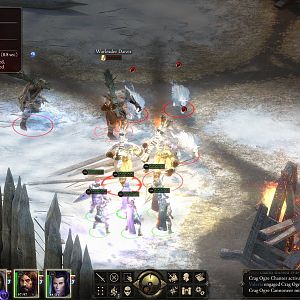 The first time you come here, the village will be under attack by a lot of Crag Ogres throughout the whole map. In fact, there will be three in immediate view. They hit for a lot of damage, and their front line warriors can basically do an exaggerated version of the Barbarian's Carnage ability that can also knock characters Prone. Any Crag Ogre will leave behind Ogre Blood when killed. They have a lot of Endurance, and yet weak Deflection and Will and Reflex Defenses. Therefore, ganging up on them one at a time, and using spells that target those defenses will prove effective.
They will also be helped out by the odd Winter Wolf or two. Much like their D&D equivalents, these wolves can use a breath attack that can inflict cold damage on multiple party members. Any Winter Wolf will leave behind a Wolf Hide when killed.
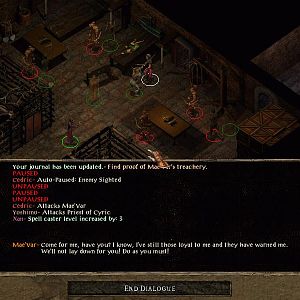
There are only one of two ways to end the assault on Stalwart Village. One is to take out their leader, Warleader Darzir, who is near the west gate at #28. If you succeed at that, any remaining Crag Ogres and Winter Wolves still alive will flee the village. The other way is to wipe out every single Crag Ogre and Winter Wolf in the village, Darzir included. Keep in mind that you cannot camp in the village or rest in the local tavern while the village is under attack.
A low-level party simply will not have the resources to wipe out everything off the map and still have enough for Darzir. However, a relatively unscathed lower-level party can defeat Darzir and his bodyguards with some effective strategy (and a little luck). And remember that there is no extra xp for killing everything, and therefore no real incentive to do things the hard way. My advice after the first fight is to make your way south and west along the shoreline where you should run into at most two or three enemies at a time, and hopefully keep everyone close to full health and enough resources to manage Darzir. Save your best and your most, healing and offensive and buff spells, for the battle against Darzir. Darzir himself will leave behind the Ring of Changing Heart afterwards.
- Here is where the party will arrive for the first time. It also provides an access to the White March Map, and also access to the World Map.
- You will find Tyn Hats at these locations.
- You will find Ryngr Berries at these locations.
- There will be a Hammer and Chisel in this barrel.
- Here is an exit that provides access to the White March Map. If you exit through here, you can also travel to the Longwatch Falls.
- The barrel will have have a random food item or two.
- This is the entrance to Thyrsc's House. There will be three chests in the room. One of them will have food items. The other two will have random items such as scrolls, potions, gems, and coins. There will also be camping supplies in the chests. Looting the chests will make Thyrsc turn hostile unless you can use the Mechanics and Stealth skills to pilfer them without him noticing.
Benevolent and Aggressive responses are also possible if you want to engage in an extended conversation with him. He offers The Hunter's Favor quest.
- Here is a Dwarf named Yduran, who operates as the local merchant. His more distinctive items include:
He also sells plenty of plants, scrolls and traps.
He'll also offer a discount on his goods if you eliminated the Flames-That-Whisper clan of Crag Ogres in the course of The Ogre Matron quest.
- There will be Berath's Bells at these locations.
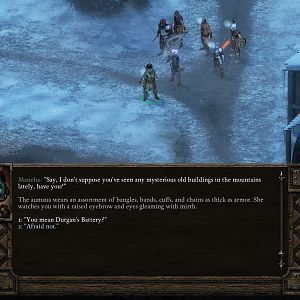 Here is where you can find the Aumaua Barbarian named Maneha. First, you need Part 2 of the White March expansion installed. Next, you need to have cleared the Crag Ogres out of the village. After that, you need to go to a different area that is accessible through the White March Map, and then return. Once those conditions are met, that is when Maneha will be here and is willing to join your party with very little effort on your part.
- Here is the entrance to the Temple of Ondra. Several servants of Ondra reside within, led by Lafda and Qexetl. One of the chests within has a few Pearls, while another has some coins.
A very large chest in the room has a medallion which is the subject of the Regrets Worth Trading quest.
- When you first approach the Temple of Ondra, a Dwarf named Okrun will make threatening gestures towads the Temple's residents. He will then pace about this spot.
Cruel, Diplomatic and Rational responses are possible early in a conversation with him. At some point, he lets on that he would like a medallion that he considers his recovered from the Temple of Ondra. Cruel, Diplomatic and Passionate responses are available in response to this desire. Agreeing to recover it for him triggers the Regrets Worth Trading quest.
- Here is a Dwarven woman named Ista. If you're willing, you can take on the Sacred Instruments task for her, which involes testing her ore-detecting device for her.
- You'll find Fish in these crates.
- You will find random food or plant items in these barrels.
- Here is the entrance to the Fishery.
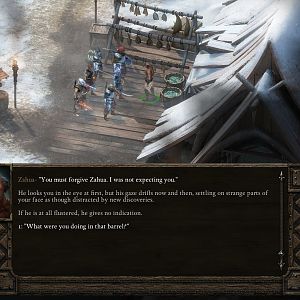 A man will run screaming as you approach the west side of the fishery. Clicking on the barrel leads to the Monk named Zahua emerging from the fish piled within. It is possible to choose Rational, Stoic, Clever or Honest responses when he explains what he was doing in the barrel. He also becomes a joinable companion.
- This barrel will have several pieces of Speckleback Jerky.
- Here is Reyfald, who offers the quest called A Lovely Drop.
- Here is the entrance to Gref's Rest.
- Tealdor will be here after speaking to Haeferic in Gref's Rest. You can make Clever, Deceptive or Diplomatic responses to him during the initial stage of the conversation. He also gives you a task to retrieve The Thermal Pearl for him.
He also offers two bounties to the party. One is for Metzla, and the other is for Ulmar.
If you collect on those two bounties, he'll offer two more. One is for Firedorn, and the other is for Laenric.
- Here is an exit that provides access to the White March Map. If you exit through here, you can also travel to Durgan's Battery.
- You will find a Brintwyn Ban here.
- Here is the entrance to Renengild's House. She will be present, along with Uldric. There will be three chests in the house itself. One has random food items. The large one in the northeast corner is locked, and will have a random armor or weapon, often of exceptional quality, as well as another random item or two. Another chest will have two books, Daily Affirmation of Focus and Efficiency, and Selected Correspondences of Giftbringer Iden.
When you first speak with Renengild, Benevolent, Clever, Diplomatic, Passionate and Rational responses will be available early in the conversation. Renengild will want you to find a way into Durgan's Battery, as she sees it as a way to advance the fortunes of Stalwart Village. This dialogue will advance the Durgan's Battery quest. She and Uldric will argue about the need for the excursion, which may make a Perception (14) or Intellect (14) check available at that point in the conversation. A successful check only affects the semantics of the dialogue, but otherwise doesn't have any real consequence.
During that same conversation, she will also view a nearby hermit named Galvino as a possible source of info for how to get into the Battery itself. It is this particular branch of the conversation that triggers the quest called The Recluse of the White March.
Further along the conversation she also views a nearby clan of Crag Ogres as being a threat. She also lets on that she may see taking out their Matron, Beregan, as a solution. This particular branch of the conversation triggers The Ogre Matron quest. Uldric will object as to whether killing the Matron is truly necessary. It is at that point that Aggressive, Benevolent or Cruel responses become available.
- Here is Taena's House. She is potentially relevant to The Recluse of the White March quest.
The containers in her house will have random items of various sorts.
- You will find Camping Supplies in this crate.
- Here is Keydy's House. It will be in the process of burning to the ground once the Crag Ogres have been driven out. If you wish to do so, you will have limited time following the Crag Ogre attack with which to save both her and/or a guard named Lurgolder. It involves a scripted interaction that proceeds in stages. You need to select either your main character or one of your companions to handle the entirety of the scripted interaction:
The first stage of the scripted interaction is to safely gain entry into the house without smoke inhalation. You need a Survival check of 5 and a Constitution check of 16 to avoid inhaling any smoke. A Survival check of 5 and and making a Constitution check of 12 will result in inhaling only a little smoke.
The next stage is to deal with a wooden beam that crashes on whichever character you send in. The possibilities are:
- Perception check of 14 to avoid the beam altogether
- Dexterity check of 10 to dodge the beam
- Might check of 14 to keep the beam propped up
- Might check of 10 to push the beam off if it fell on the character
You can save either of or both Keydy or Lurgolder, in whichever order you choose. Freeing Keydy requires either a Might check of 10 or a Prybar. You can also steal the ring called Frigid Claim off her while she is still unconconscious if the character participating in the scripted interaction can notice it.
Saving Lurgolder requires one of three abilities:
- The Chanter's Rime and Frost Followed The Footsteps of Karth
- The Druid's Winter Wind spell
- The Wizard's Chill Fog spell
Using any of those abilities involves putting out the fire that surrounds Lurgholder so that he can simply run out of the house on his own. If you saved Keydry first, that means you'll be carrying her unconscious while now trying to save Lurgolder, and that requires in addition to any of the three abilities mentioned above a Resolve check of 15. It may therefore be preferable to save Lurgholder first so that he leaves out on his own, and then see to rescuing Keydy.
Now it's a matter of leaving the house. You will need the following:
- Dexterity of 10 to avoid the beam if you did not previously prop it up
- Constitution of 12 to avoid smoke inhalation
- Athletics of 2 to avoid the debris
Note that if you inhale too much smoke, either because you took too long (i.e. too many turns during the scripted interaction) or failed your Constitution checks, or you otherwise fail to make it out of the building safely, then you will pass out. One of the other party members will have pulled the character out safely. However, at least Keydy will be dead, and Lurgolder as well if you had not previously cleared the way for him.
Keep in mind that once you select a character to participate in the scripted interaction, you commit that character and no one else to the scripted interaction. That means the character you select has to be able to make several different checks through the different stages of the interaction to be able to pull off the rescues.
Amongst your party members, Aloth, Hiravias and Kana are good candidates. Each of them has one of the spell-like abilities needed to rescue Lurgolder. Hiravias in particular has well-rounded stats that allow him to make pretty much any of the checks, although you may still want a Constitution boost for him to minimize his chances of smoke inhalation. Kana has a good Might score that can minimize any concerns over his Dexterity score. Aloth has a good Dexterity score and an ok Might score, but his Constitution is a potential point of concern. Whomever you will select, choosing the Constitution and Athletics resting bonus in Brighthollow before you come to Stalwart Village for the first time is also a solid way to improve your chances.
If you rescue only one of Keydy or Lurgolder, you will get a slight reputation increase with Stalwart Village. The reputation increase becomes a moderate one if you manage to save both.
- Here is an exit that provides access to the White March Map. If you exit through here, you can also travel to the Russetwood.
| Sorcerer's
Place is a project run entirely by fans and for fans. Maintaining
Sorcerer's Place and a stable environment for all our hosted sites requires a substantial amount of our time and funds on a regular basis, so please consider supporting us to keep the site up & running smoothly. Thank you! |