Pillars of Eternity logo


Pillars of Eternity Online Walkthrough by David Milward


INTRODUCTION & ABOUT  |  WORLD MAP  |  WHITE MARCH MAP
General:  
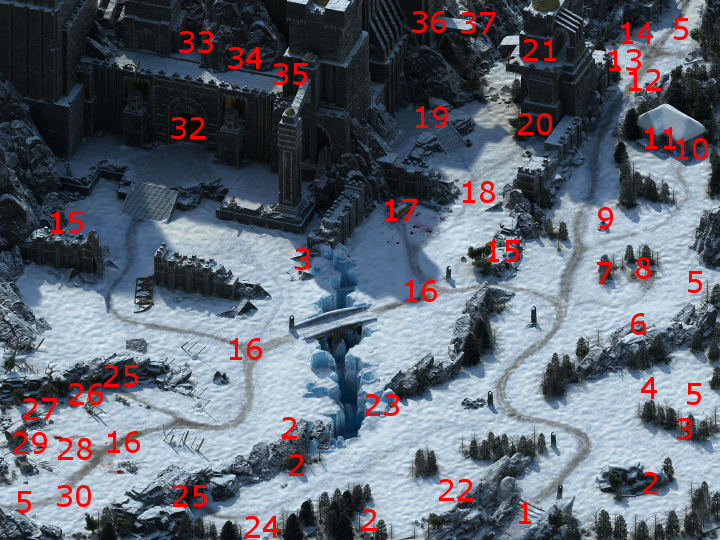
Quests  |  Tasks  |  Bounties  |  Items  |  Characters
Areas:  
Act 1 Areas  |  Act 2 Areas  |  Act 3 Areas  |  Act 4 Areas  |  Caed Nua  |  White March - Part 1  |  White March - Part 2  | 
Disable all ads!

White March - Part I Areas:   Stalwart Village  |  Longwatch Falls  |  Russetwood  |  Flames-That-Whisper Caves  |  Durgan's Battery  |  Galvino's Workshop  |  Durgan's Battery - Great Hall  |  Durgan's Battery - Mines  |  Durgan's Battery - Foundry  |  Cragholdt Bluffs  |  Cragholdt

Durgan's Battery

*Note* This map only shows content that is specific to Part 1 of the White March expansion. Follow this link for content that gets added to Durgan's Battery during Part 2.

Durgan's Battery

  1. Here is where the party will arrive for the first time. It also provides an access to the White March Map.

  2. You will find Ryngr Berries here.

  3. There will be Brintwyn Bans at these locations.

  4. There will be a few Stags and a couple of Elder Stags here. They form a protective ring around several smaller deer, much like Musk Oxen. They won't attack unless you get too close. If they do, their attacks will inflict extra Corrosive damage. They will leave behind Stag Hides and Stag Horns when killed.

  5. Here are exits that provide access to the White March Map.

  6. There will be a merchant here named Taragaer. He sells armors and weapons of Exceptional quality.

  7. A barrel here will have a random potion and a random food item or two.

  8. A barrel here will have a random potion, plus a random Primal elemental component (e.g. Primal Air) or two.

  9. There will be a hidden cache here. There are two prerequisites to being able to loot it. First, you must have acquired the Tattered Map from #24 on the Russetwood map. Second, you must be in scouting mode when you approach this spot.

    If you find it, you'll acquire Ninagauth's Black Pages. The Black Pages have a lot of spells. In fact, the spells that begin with "Ninagauth's ..." in their names cannot be learned through Wizard level-ups, and can only be learned through the Black Pages.

  10. Here is the entrance to Galvino's Workshop.

  11. The barrel here will have a Prybar and Camping Supplies.

  12. Urthal
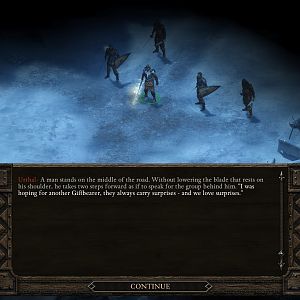
Here is the mercenary band led by Urthal. It doesn't matter what you say, he and the others will attack. Keep in mind that he and some of the others will make a b-line for your spellcasters whenever possible, so be prepared for some crowd control. One idea is to send a long party member ahead to start the fight, and regroup with the rest of the party waiting at the narrow pathway leading northwards. If you emerge victorious, the loot will include:


    The last item is a quest item for the Regrets Worth Trading quest.

  13. There will be a hidden cache here that offers a couple of items, armors or weapons, of Exceptional quality, as well as Camping Supplies.

  14. There will be some coins in this bedroll.

  15. There will be Tyn Hats at these locations.

  16. These spots will have several Lagufeath, led by a Lagufaeth Redfin and a Lagufaeth Druid. A few Ice Blights will attack as well. The key danger they present is their paralytic missile weapons, which can keep a whole party still and helpless. The recommended lead off is any spells that will increase Fortitude defenses (e.g. Circle of Protection, Moonwell). They leave behind Lagufaeth Stilettoes, Lagufaeth Spears and Lagufaeth Livers. The Ice Blights leave behind both Primal Winds and Primal Waters.

  17. Here you is where you will find Meztla and the rest of her Slaked Skull Mercenaries if you are pursuing the bounty on her.

  18. There will be a few Ice Trolls and a few Ice Beetles here. The Ice Beetles themselves aren't particularly dangerous, but they can always passively cause characters to go Prone in a small radius around them. That makes them particularly dangerous when they are in the company of Ice Trolls that will hit hard. Again, leading off with any spells that will raise defenses is recommended. The Trolls will leave behind Troll Skins while the Beetles will leave behind Beetle Shells.

  19. The urn here will have an amulet called the Talisman of the Unconquerable, which is an ideal neck item for a Cipher.

  20. The stairs here lead to the top of the tower at #20.

  21. The top of the tower is here. Just a little to the right will be a soulbound Hunting Bow called Stormcaller.

  22. There will be a few Ice Oozes and Bitter Spirits here.

  23. There will be a trapped villager here in this ice crevice. You will need to spend a Rope and Grappling Hook if you want to save the villager. After that, there will be various stages:

    • You will need an Athletics score of 7 or a Might score of 14 to make your initial descent.
    • Quickly rappelling down is the best option for the next stage. A Perception check of 15 will confirm that by revealing that the ice is weakened and thinner, and therefore not ideal for careful climbing.
    • The next stage involves cold fierce winds blowing. Either waiting it out or your character of choice having the Bulwark against the Elements spell suffices to get to the next stage.
    • The last stage is to bring the villager back up out of the crevice. Calling on another party member to help you out is sufficient.


    The villager will reward you with 300cp if you manage to get him out alive.

  24. Here you'll come upon several Crag Ogres who have just recently killed a few Lagufaeth. They'll attack you on sight as well.

  25. Here are the entrances to the Ice Cave. Several Lagufaeth will attack, and they'll leave behind the usual items when killed.

    There will also be three niches in the Cave. One holds a random scroll. Another holds a random armor or weapon, usually of Exceptional quality. The third, in the northwest corner, holds the White Adra Gems, which are the focus of the Sacred Instruments task.

  26. There will be two containers here. One will have a random armor or weapon, usually of Fine quality, along with high tier gems (e.g. Diamonds, Pearls). The other will have a random weapon and several packs of Meat.

  27. The chest here has a rapier called Spelltongue, and Bracers of Deflection +9.

  28. A corpse here can be looted for a random armor or weapon, usually of Exceptional quality, plus the Ring of Unshackling.

  29. A container here has the Battered Shipment, which is the focus of the quest called A Good Haul.

  30. This container will have several packs of Poultry.

  31. This container will have a few random armors and weapons, usually of Fine quality.

  32. Here is the door that leads to the entrance to interior of Durgan's Battery. You need the Battery Relief Tile from completing Ogre Matron quest. You also need a password phrase called a cantec from completing The Recluse of the White March quest.

    Once you have the two prerequisites, you can click on the door to start a scripted interaction. The proper sequence is:

    • Place the anvil in the door
    • Recite the part of the cantec that starts with "Hammers of Durgan ..."
    • Strike the anvil relief
    • Recite the part of the cantec that starts with "Wall of the Battery ..."
    • Push the relief
    • Recite the part of the cantec that starts with "Abydon's Faithful ..."
    • Examine the mouth
    • Ignite the door, either by the protagonist being a Fire Godlike, pressing the Dragon's Tongue, or using a Torch.

    Completing the sequence will open the door, allowing the party to enter the Great Hall at #1.

  33. These stairs lead down to the Great Hall at #3.

  34. The urn here will have Minor Gauntlets of Accuracy and some coins.

  35. The urn here will have a random potion and some coins.

  36. These stairs lead down to the Foundry at #36.

  37. This spot leads to a scripted interaction whereby you can jump across the chasm to the dilapidated tower on the other side.


Amazon.com
Amazon.ca
Amazon.co.uk
Sorcerer's Place is a project run entirely by fans and for fans. Maintaining Sorcerer's Place and a stable environment for all our hosted sites requires a substantial amount of our time and funds on a regular basis, so please consider supporting us to keep the site up & running smoothly. Thank you!

Disable all ads!