Pillars of Eternity logo


Pillars of Eternity Online Walkthrough by David Milward


INTRODUCTION & ABOUT  |  WORLD MAP  |  WHITE MARCH MAP
General:  
Quests  |  Tasks  |  Bounties  |  Items  |  Characters
Areas:  
Act 1 Areas  |  Act 2 Areas  |  Act 3 Areas  |  Act 4 Areas  |  Caed Nua  |  White March - Part 1  |  White March - Part 2  | 
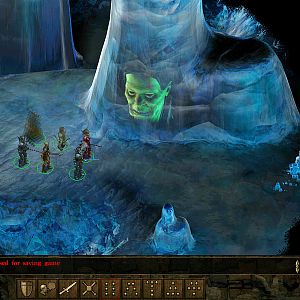
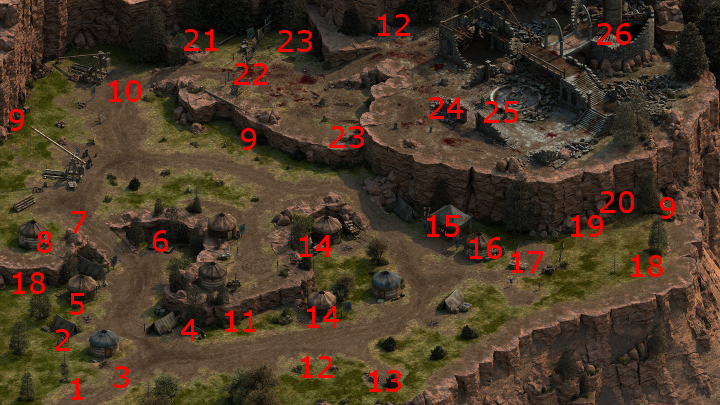
Disable all ads!

White March - Part I Areas:   Stalwart Village  |  Longwatch Falls  |  Russetwood  |  Flames-That-Whisper Caves  |  Durgan's Battery  |  Galvino's Workshop  |  Durgan's Battery - Great Hall  |  Durgan's Battery - Mines  |  Durgan's Battery - Foundry  |  Cragholdt Bluffs  |  Cragholdt

Cragholdt Bluffs

Cragholdt Bluffs

This area is truly only for high-level parties. There will be mercenaries of pretty much every class spread throughout the camp, and in bunches. Tread carefully and try to take on as few as possible at any given point of time. The mercenaries pretty much leave behind multiple instances of every imaginable armor, weapon or shield of Fine or Exceptional quality.

  1. Here is where the party will arrive for the first time from the World Map.

  2. You will find a random armor in this rack, often of Fine of Exceptional quality.

  3. A couple of Mercenary Guards will be stationed here. It doesn't matter what you say, a fight is inevitable. They leave behind a Nasal Helm, a Fine Mail Armor, a Fine Breastplate, a Fine Large Shield, a Fine Sword, and an Exceptional Pike when killed.

  4. There will be a chest with a very high-level lock here. It can be unlocked with the Orlan's Key, which is carried by the nearby Drunken Orlan.

    If you can get the key without waking up the Orlan, then you loot the chest at leisure. There are numerous ways to go about it. One is to have your Stealth character go into scouting mode and then sneak up on the Orlan to either pickpocket the key with a Dexterity check of 17, or kill him swiftly with a Might check of 17.

    If you fail the Stealth check at night, the Orlan will simply fall back asleep.

    If you fail the Stealth check during the day, there's a real risk that the Orlan will alert nearby guards, although that may be what you want anyway. If you want to render him unconscious quickly before alerting any nearby guards, the Wizard's Call to Slumber and the Cipher's Puppet Master power will work. If you want to kill him quickly, the Barbarian's Wild Sprint, the Monk's Long Stride, or any Hunting Bow will work.

    The chest itself will have Camping Supplies and some gold coins.

  5. The barrel here will have random food items.

  6. There will be two corpses here. One will have a random minor item. The other will have a copy of Berathian Scriptures.

  7. There will be a very large force of Mercenaries here, led by a Mercenary Chanter. The Mercenary Chanter leaves behind a Footpad's Hood.

  8. The chest here is protected by a very high-level trap. It will have a random magic item, plus a couple of high-tier gems (e.g. Sapphires).

  9. You'll find Settler's Arrows at these spots.

  10. Commander Baelorin
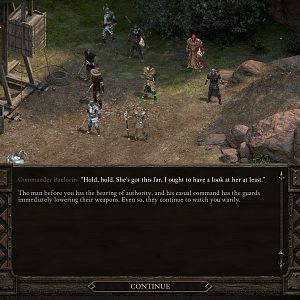
Here you'll encounter Commander Baelorin, and several of his Mercenary bodyguards. He'll end up attacking you no matter what you say, although Clever and Diplomatic options are available early the conversation. Three unique items that he or his cohorts drop include:
    The Key is used to open the chest at #16.

  11. You will a Berath's Bell here.

  12. You will find Blood Moss at these spots.

  13. You will find a Burned Lady here.

  14. You will find coins in these containers.

  15. This table will have the Unsigned Letter.

  16. This chest will require the Small Bronze Key to open. It is also has a trap that you need to go into scouting mode to detect. The chest itself will have the Sentinel's Girdle, plus a random scroll and some coins.

  17. This rack will have a random armor item.

  18. You will find Admeth's Wyrts at these spots.

  19. You will find a Pilgrim's Crown here.

  20. This cave opening leads to Cragholdt at #25.

  21. You will find a Skaenbone here.

  22. There will be a few undead called Alguls around here, along with a tripwire trap. It is best to lure the Alguls away from the trap, and then disarm the trap afterwards. The Alguls leave behind Vessel Flesh when killed.

  23. You will find St. Gyran's Horns at these spots.

  24. You find a few Ancient Death Guards around here. They are capable of a Fireball once each encounter, as well as a power that can blow back party members and knock them prone, again once each encounter. Spells that raise your defenses are recommended. Also, try to deal with as few a possible as you can at any given time. All of them will leave behind Vessel Bones when killed, and the odd one may occasionally drop a Fine Sword as well.

  25. There will be a coprse at the side of the pool here. It can be looted for a random potion and some coins.

  26. These stairs lead to Cragholdt at #1.


Amazon.com
Amazon.ca
Amazon.co.uk
Sorcerer's Place is a project run entirely by fans and for fans. Maintaining Sorcerer's Place and a stable environment for all our hosted sites requires a substantial amount of our time and funds on a regular basis, so please consider supporting us to keep the site up & running smoothly. Thank you!

Disable all ads!