Pillars of Eternity logo


Pillars of Eternity Online Walkthrough by David Milward


INTRODUCTION & ABOUT  |  WORLD MAP  |  WHITE MARCH MAP
General:  
Quests  |  Tasks  |  Bounties  |  Items  |  Characters
Areas:  
Act 1 Areas  |  Act 2 Areas  |  Act 3 Areas  |  Act 4 Areas  |  Caed Nua  |  White March - Part 1  |  White March - Part 2  | 
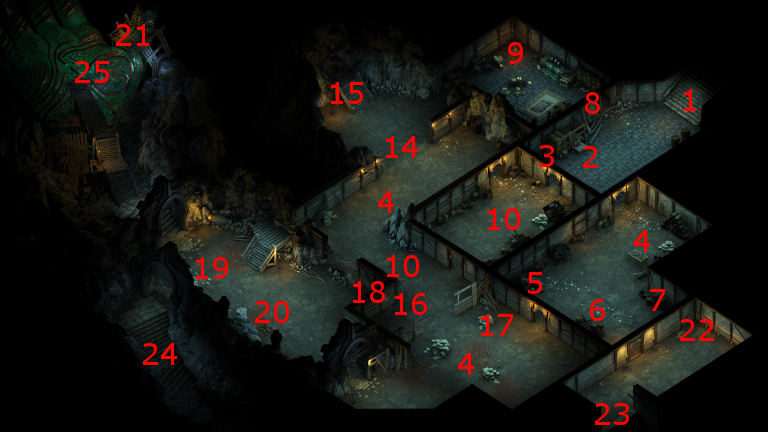
Disable all ads!

Quests:   Main Quests  |  Act 1 Side Quests  |  Act 2 Side Quests  |  Caed Nua Side Quests  |  Act 3 Side Quests  |  White March Part 1 Quests  |  White March Part 2 Quests  |  Companion Quests  | 

Caed Nua Quests:   The Master Below  |  The Master's Tools  | 

The Master Below

  1. The quest begins after you have completed The Old Watcher quest. The Steward will explain that the Master Below will always send monsters to attack your keep until you somehow get around to dealing with the Master in a permanent fashion.

  2. The quest itself requires that you make it all the way down to the fiftheenth and last level of the Endless Paths dungeons. There are two signficant points of progress in the form of the Seals of the Endless Paths task and The Master's Tools quest.

  3. Endless Paths, Level 13

  4. The door at #20 on the map of the thirteenth level can only be opened after conversing with the spirits at #3, #8, #15 and #17. Speaking with those spirits in turn requires that you previously completed the Undying Heritage quest. Speaking with those spirits and exhauting all dialogue options will allow you to select the dialogue option that starts with "I am an enemy ..." during the scripted interaction so as to open the door.

  5. You'll encounter the Guardian of Od Nua at #21, which is actually a very large version of an Adra Animat. It will be helped by several Adra Animats, a couple of Cean Gwlas, and a couple of Adragans.

    The Adragans will leave behind Awakened Adras when killed. The Guardian will leave behind a unique Battle Axe called the Edge of Reason. The stairs at #22 lead down to the fourteenth level of Endless Paths.
  6. Endless Paths, Level 14

  7. You next find yourself at #1 on the fourteenth level map. Once you near the adra formation at #5, the Spirit of Od Nua will appear. A Clever option appears early in the conversation. Diplomatic and Rational replies will also become available during the dialogue. An Intellect check of 17 and a Resolve check of 20 can provide additional insight into how the Spirit brought its curse upon itself, but otherwise has no consequence beyond that.

    Dialogue options that display a lack of sympathy for its plight or regrets, or dialogue options that elect to attack the Spirit (some of them earn Passionate disposition), will provoke a fight with the Spirit. It will summon several Cean Gwlas to its aid. Spells that provide defenses or immunity against paralysis and fear are recommended. If you win, the Spirit and the Cean Gwlas will all leave behind Spirit Residues when killed.

    Benevolent dialogue options will tend to convince the Spirit to let go and depart willingly. Whichever course you take, the Spirit will leave behind the Shroud of Mourning.

    The stairs at #7 lead down to the fifteenth level of Endless Paths.
  8. Endless Paths, Level 15

  9. You start off at #1 on the fifteenth level map. You can use the rockslide at #4 during a scripted interaction to go southeast onto the other side. The lower the Athletics scores of your party members, the more likely they are to sustain injuries during the trek down.

  10. Adra Dragon
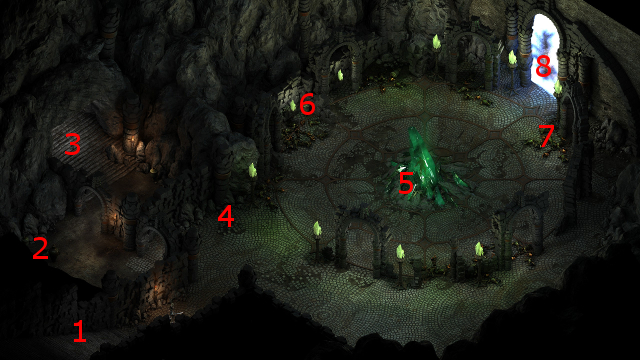
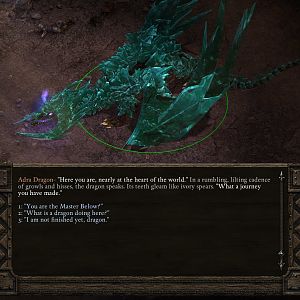
The Adra Dragon will be at #5. Pretty much the full gamut of disposition increases are available during the conversation. It is possible to complete this quest in a way that involves freeing her from the Endless Paths and without you fighting each other. This possiblity requires choosing very specific responses during the dialogue as follows:

    • The Passionate reply that is available at the beginning of the conversation.
    • "You are bound?"
    • Asking her what she will do when the Adra is all gone.
    • Pointing out to her that there's not much Adra left.
    • The Benevolent dialogue option that becomes available that offers to free her.

    If you both reach an agreement, she'll give you The Dragon's Amuuet with the intention that you give it to a dragon hunter named Falanroed. If you reach the agreement, her nearby servants such as the Adragans and the Xuarips will remain neutral until you either force attack them or go for her treasure hoard at #6.

  11. Endless Paths, Level 1

  12. If you have reached an agreement with the Dragon, then you can bring The Dragon's Amulet to the adra palm at #25 on the map of the first level of Endless Paths. Doing so will absorb the Dragon's soul into the amulet.

  13. Black Meadow

  14. You can now find Falanroed at #14 on the Black Meadow map. You can either use a Deceptive dialogue option, or throw The Dragon's Amulet at her, to get it on her. She will summon a few Greater Rain Blights and attack you. She shouldn't be difficult to overcome. The Blights will leave behind Primal Waters when killed. Once it's over, the Dragon will take over Falanroed's body and heap plenty of thanks upon you. She'll also allow you her treasure hoard at the bottom of Endless Paths.

  15. Alternatively, you could also inform Falanroed of the Dragon's plans instead. This causes The Dragon's Amulet to shatter, signifying the end of your previous alliance. Falanroed will reward your main character with the Scale-Breaker talent, which once per Rest can be used to lower the defenses of any Dragon or Drake. Note that if you do this, the Adra Dragon will attack you on sight should you go back to her.

  16. If you are going to fight the Dragon, keep in mind that it is arguably the toughest fight in the game. The Dragon itself can obliterate multiple party members with its breath weapon, and has high damage resistance to pretty much everything. It will helped out by a few Adragans northeast of it, as well as several Xuarips southeast of it. The ideal way to begin the fight is to initially agree to the Dragon's request, but then position your warriors close to the Adragans. Once you're in position, try to take out as many of the Adragans as you can through 'force-attacking'.

    As for the Dragon herself, there are a few approaches. One is to use the trick of equipping both a shield and another item that both provides +50 to all defenses on Prone or Stun on a character, casting Withdraw or Beetle Shell on that character, and then having the Cipher use Defensive Mindweb to put everyone's defenses through the roof. Another approach that I've read, although I haven't tested it myself, is to cast Wall of Force where the Dragon will be. The idea is that the Dragon, due to its huge size, will take constant damage and get tied down and Hobbled.

    Also, given its resistances, single-target attacks that inflict Raw damage are highly recommended. Examples include the Cipher's Detonation power, as well as the Wizard's Ninagauth's Killing Bolt.

    Also, keep your characters spread out to avoid all of them getting caught by the Dragon's acidic breath weapons.

    It is of course adviseable to have your tanks on the Dragon from the word go, while other characters come in after the initial engagement, but keep in mind that the tanks themselves may be in real danger over the long haul. So it may be recommended to keep them stocked up on Potions of Major Endurance and the like.

    Should you win, the Adragans will leave behind Awakened Adras while the Dragon herself will leave behind 4 Dragon Eggs and 2 Adra Dragon Scales.

  17. At #6 is the Adra Dragon's treasure hoard. If you had previously reached an agreement with the Dragon, the Dragon will still attack you if you approach the hoard before completing the favor. Gaining access to the hoard's treasures requires either successfullyu giving The Dragon's Amulet to Falanroed, or slaying the Dragon. The hoard itself contains the following items:


Amazon.com
Amazon.ca
Amazon.co.uk
Sorcerer's Place is a project run entirely by fans and for fans. Maintaining Sorcerer's Place and a stable environment for all our hosted sites requires a substantial amount of our time and funds on a regular basis, so please consider supporting us to keep the site up & running smoothly. Thank you!

Disable all ads!