-

- Forums
- Chatrooms
- Gallery
- Gameplay Videos
- Upload
- Articles
- Mod Reviews
- Shop SP: Games, Movies, Books
|
|
Mines
Battery Defenders in the Mines
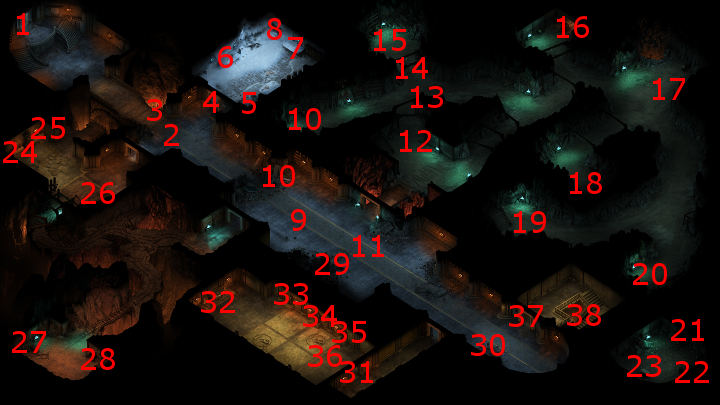
The party starts off at #1 on the map of the Mines. They go eastwards, and will have to fight two large groups of Battery Defenders. The first group will include a Battery Siren (which can use Silent Scream) and a few Battery Archers across a chasm to the south. I have Sagani, Grieving Mother and Hiravias line up against the south side of the bridge so that they can take down the Siren and Archers with their own missile weapons.
The second group further east becomes a straight slaughter.
Sigil of the Helm
I find the Sigil of the Helm at #12. I will need it later on.
Glanfathan Stalking Boots
I continue northwest and kill a couple of Bitter Spirits at #13. I keep going and kill a few Ice Beetles and Frost Oozes at #14.
There will be a pair of Glanfathan Stalking Boots on the corpse at #15.
Sigil of the Shield
I make my way to the cart at #16. Clicking on it begins a scripted interaction. I get into the cart and take it down the tracks. Getting where I want to go begins with looking around, which means I notice another lever.
If I pull on it without making any checks, or making only an Athletics check of 5, the result will be an injury to the character who pulled the lever. The only way to avoid any injury is for the character pulling the lever to both make an Athletics check of 5 and a Dexterity check of 16. Grieving Mother pulls it off for me.
I am brought to the tunnel entrance at #21. The chest at #23 has a couple of Durgan Iron Ingots and the Sigil of the Shield.
The video concludes with the party taking the cart back to #16.
Workshop Key
I grab a Prybar and a couple of other items from the corpse at #18.
I then go to the corpse at #19. Alliria uses her Watcher abilities to gain access to memories of the Pargrunen Dwarves getting slaughtered by overpowering foes. She also takes the Workshop Key, which causes the nearby Dwarven spirits to turn into hostile Wraiths and Battery Sirens. It takes take a little effort, but I do manage to outlast them.
Girdle of Eoten Constitution
I fight my way through another Wraith and a couple more Bitter Spirits. A corpse at #20 has a Girdle of Eoten Constitution, but I'll just sell it.
Erazmur's Letter
There will be a very large number of spirits gathered in the cave towards the northeast corner. Standards tactics still suffice to wear them down. A corpse at #17 has Erazmur's Letter, which shows that the Pargrunen Dwarves feared the worst as their enemies closed in on them. I then make my way back to the main tunnel.
Sigil of the Sword
I go over to the door at #4 and open it with the Workshop Key. There will be a few Ice Trolls and Winter Wolves on the other side of the door, but I kill them off easily.
A table at #6 has a Stone Dial. A hidden niche at #7 has the Sigil of the Sword. I'll need both items fairly soon to make progress.
The chest at #8 has a Tempered Helm, a Workshop Key, and some Camping Supplies. *NOTE* Were it not for the fact that both Alliria or Zakara were unable to wear helmets on account of being Godlikes, this would have been my choice of helm for either of them since it provides a number of on-kill benefits. Be that as it may, I ended up selling it since I had other helms in mind for the other characters.
I rest up, take the Camping Supplies, and return to the main tunnel.
Rune-engraved Copper Key
I continue east along the main tunnel, and have to kill off some more Wraiths and Battery Sirens. A corpse at #30 has the Rune-engraved Copper Key.
Hall of Remembrance
I use the Rune-engraved Copper Key to open the door at #31. On the other side will be the Hall of Remembrance.
I place the Sigil of the Helm in the receptacle at #35, the Sigil of the Shield in the receptacle at #34, and the Sigil of the Sword in the receptacle at #33.
The significance of doing so is to disarm numerous traps that will appear throughout the room once I take a soulbound weapon that I will take from the Hall very shortly. I would otherwise be willing to disarm the traps, but the problem is that an intense battle will also follow once I take the weapon. Dealing with both at the same time can be a little too much to handle.
Nightshroud
I take a soulbound Mace called Nightshroud from the altar at #32. It is an intriguing possibility for a Rogue, with the key features being a small chance to Blind its targets, an even smaller chance to inflict a Finishing Blows on each hit, and an extra Shadowing Beyond per rest. However, I prefer Devil of Caroc to maximize her damage by attacking as often as possible with her Rimecutter.
A large group of Battery Defenders, led by a pair of Fragments of Pargrunen (Wizards) and the Fragment of Exandru (a Priest) will now be #36. Hiravias begins a sequence of Weather the Storm, Relentless Storm and Moonwell. Grieving Mother uses Phantom Foes on the Defenders, and then Pain Link on Devil of Caroc. Alliria uses Reinforcing Exhortation on Kana and Devil of Caroc, and then activates her Sacred Immolation. Sagani uses Combusting Wounds on a few Defenders surrounding Devil of Caroc. She and Ituumak then go to work on the spellcasters. The battle takes care of itself at that point.
Bracers in the Mines
I make my way back west along the main tunnel. The chest at #24 is likely to have random bracers of one sort or another. It happened to be Bracers of Spiritual Power, which Hiravias already has.
Diamonds and Durgan Iron Ingots
I start towards the caverns in the southwest corner. I first get rid of a few Ice Beetles and Bitter Spirits. As I progress further, I fight a large group of Frost Oozes in the southwest corner cave. Hiravias lets loose with spells like Relentless Storm and Moonwell, since I am close to resting anyway.
The mining crate at #27 has a few Diamonds, as well as 8 Durgan Iron Ingots.
I rest up and grab the Camping Supplies from the crate at #28. I then return to the main tunnel.
Stone Dial
I go east and then click on the door at #37 to begin a scripted interaction. The clues for the scripted interaction are on the runes that surround the door on either side and can be clicked on so as to be read. The clues are: