-

- Forums
- Chatrooms
- Gallery
- Gameplay Videos
- Upload
- Articles
- Mod Reviews
- Shop SP: Games, Movies, Books
|
|
Flames-That-Whisper Caverns
Golden Gaze
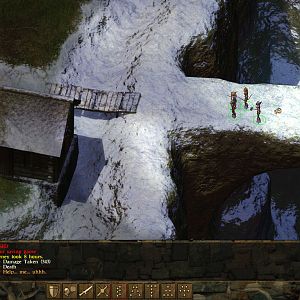
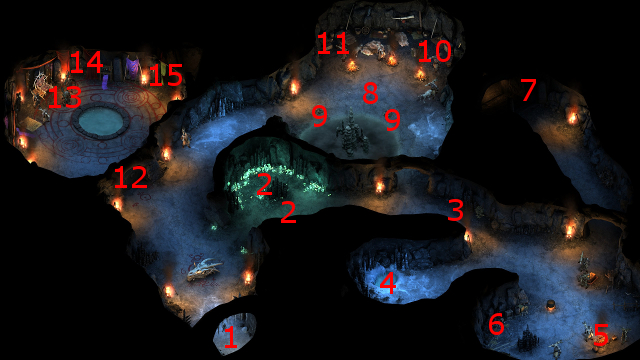
The good party is determined to make its way to the Matron, but without killing any of the Crag Ogres within the Caves themselves. The reason is that I am determined to make the Ogres my long-term allies. I begin by going into stealth mode, going north a little, starting down the tunnel eastwards, disarming a couple of traps along the way, and then sneaking the rest of the way to the chute at #4.
I click on the chute to begin a scripted interaction. Making my way down the chute requires spending a Rope and Grappling Hook in order to rappel my way down.
I notice a ledge halfway down the chute, and decide to see what's on it. However, doing so causes strain on the rope. The safe option is to simply go down the rope without attempting to see through the attempt to get on the ledge. Persisting with getting on the ledge involves the real risk of the rope breaking free of the stalagmite, with the consequence of the party members plummeting to the bottom and sustaining injuries. The only way to get to the ledge safety without the rope giving way is for a party member (your choice) to make a Dexterity check of 16 in order to secure the rope and hook. Grieving Mother makes the check and secures the rope.
The ledge itself has a Rod called the Golden Gaze. And interesting item that can inflict Vulnerability Hex on its targets, but it doesn't fit into any of my plans. I'll sell it.
The good party ends up at #31 on the map of the lower level of the Caves (see below). Nearby will be a Trollhide Belt, but I have no use for it. *Evil* The evil party takes a rather more protracted course, described during the next few entries below.
*Evil* Crag Ogres' Sleeping Quarters
The evil party decides at the outset to wipe out the entire Ogre clan. But first, Aloth disarms the traps at points labelled #2.
They make a start with the Crag Ogres and Winter Wolves at #8. This kind of battle is easy enough for the party now that they've gone up quite a few levels since having first arrived in Stalwart Village. So much so once Durance gets his per encounter buff spells up.
There will be a couple of Skaenbones around, as well as the odd armor or weapon of Exceptional quality.
*Evil* Golden Gaze
*Evil* The evil party obtains Golden Gaze after slaughtering the Ogres in the Sleeping Quarters. It's Aloth who makes the Dexterity check of 16, although he sustains a shoulder injury that gives him penalties to Might and Attack Speed.
Unlike the good party, the evil party climbs back up afterwards to continue their campaign of slaughter.
*Evil* Crag Ogres' Eating Room
The evil party casually slays groups of Crag Ogres in the room at #5. The containers within have various miscellaneous items in them.
The video concludes with the party making its way to the stairs at #7, which leads to the lower level of the Caverns at #16.
Scrying Chamber Key
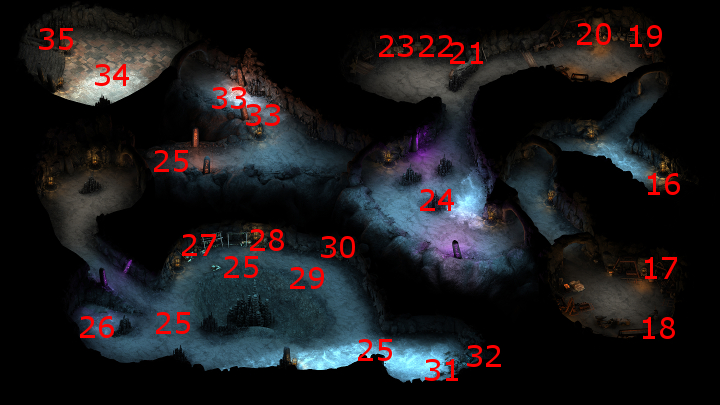
I describe the path of the good party first, who are starting off at #32 of the lower level. There will be groups of Lagufaeth at various points around the cavern lake, but I handle them easily enough. A corpse at #29 has the Scrying Chamber Key, which presents a possible way of reaching the Ogre Matron, although it proved ultimately unnecessary for the good party.
Wayfarer's Hide
I continue west and slaughter some more Lagufaeth. A hidden corpse at #26 has the Wayfarer's Hide armor, but I'll just sell it. I rest up, and then grab the Camping Supplies from the crate at #27.
Cold Tunnel
I continue north and east along the tunnel. Devil of Caroc disarms a few cold traps along the way. I also kill a few Ice Blights at #34.
14th Level
Everyone now has enough experience to advance to their 14th levels.
Alliria gets Intense Flames. It increases the Burning Damage of Flames of Devotion by 25%. I'm at the point where I have a lot of what I planned for, so add ons this late in the game amount to tweaks.
Kana selects the Invocation called Their Champion Braved the Horde Alone. It at once provides bonuses to both Attack Speed and Damage Reduction, so it can really amp up both his physical attacks and his durability as a tank during particularly intense battles.
He also selects the Bear's Fortitude talent for similar reasons as for Bull's Will. It will also generally help him resisting things like poisoning and disease and such when he's fighting on the front lines as a tank.
Devil of Caroc acquires Hold the Line. Her attacks pack real punch, so this talent helps her lock down more than one foe in place as an off-tank.
Hiravias selects Weapon Focus: Soldier, to increase his Accuracy with his Godansthunyr hammer.
Grieving Mother selects the Pain Link power. If an ally is hit for damage, enemies close to that ally also take 25% of that damage. Alliria is often a good candidate to use it. The damage caused by Pain Link will also trigger Combusting Wounds.
She also selects the Weapon Focus: Soldier talent in order to increase her Accuracy with her Tidefall sword.
Sagani acquires the Faithful Companion talent. It considerably increases resistances against Charmed, Confusion and Domination. It makes sense since I often have Ituumak run straightaway to the enemy spellcasters and therefore occupy their immediate attention.
There are stairs at #35 that lead to the Matron's lair on the upper level.
*Evil* Crag Ogres' First Armory
The evil party continues their slaughter of the Crag Ogres in the southeast room of the lower level. The containers at #17 and #18 have random items of various sorts.
*Evil* Crag Ogres' Second Armory
More slaughter in the northeast room of the lower level. The chest at #20 has an Exceptional Scepter and a Spellward Amulet. I don't have any use for either.
I rest with the bonus vs. Wilders option. The crate at #19 has Camping Supplies.
*Evil* Severed Horn
The evil party continues west to the mines. Zakara uses a Hammer and Chisel on the quarry at #21 to extract 7 Velunes. She is, however, unable to make the Dexterity check of 16 to get the Topazes as well.
I grab the Severed Horn from the crate at #22. I have a vision of its previous owner, Garodh, as his sister in danger from a bear. I have a choice between bravely attacking the bear, or hiding away from it.
This vision triggers the Garodh's Chorus task. The choices that I make will affect the properties of the helm that is the reward for the task. Brave choices will give it the Retaliation property, while cowardly choices will give it defensive bonuses that trigger on its wearer becoming Prone or Stunned. The evil party chooses the former, since it fits in with my plans for Zahua.
*Evil* Crag Ogres and Winter Wolves
The evil party now charges right into the room at #24, and casually slaughters the numerous Crag Ogres and Winter Wolves there.
*Evil* Wayfarer's Hide
The evil party makes its way towards the lake in the southwest corner of the lower level, fighting groups of Lagufaeth along the way. I simply cast the usual per encounter buffs if they're small enough in number. However, Durance is willing to start with a Prayer Against Imprisonment spell if they are numerous enough, so as to protect against their paralytic darts and bolts.
A hidden dead body at #26 has the Wayfarer's Hide, but I have no use for it.
*Evil* Trollhide Belt
The evil party continues east and kills a single Lagufaeth. At #31 will be a dead body that has a Trollhide Belt, but I have no use for it.
*Evil* Scrying Chamber Key
The evil party continues westwards, and continues to battle Lagufaeth. And again, I simply cast the usual per encounter buffs if they're small enough in number or have Durance start with a Prayer Against Imprisonment spell if they are numerous enough, so as to protect against their paralytic darts and bolts.
A dead body has the Scrying Chamber Key, which I'll need to reach the Ogre Matron's lair.
The video concludes with the party resting up with the Accuracy vs. Wilder bonuses, and then getting Camping Supplies from the crate at #27.
Matron Beregan
Matron Beregan and a large force of Crag Ogres will be at #13 on the Upper Caves map. You can of course cut straight to the chase and start a fight. A straightforward dialogue option will start a fight, but so will contradicting yourself during the conversation along the lines of saying you aren't present on behalf of Stalwart Village but then admitting that you are, or vice versa. Alliria decides to reach a peaceful resolution with the Matron. It basically involves getting her to admit that she fears the forge inside Durgan's Battery, and then making a Resolve check of 12 during the subsequent dialogue. The Matron voluntarily provides the following:
*Evil* Matron Beregan
Zakara at the outset chooses to slaughter Matron Beregan and the rest of the Crag Ogres. She tags the Matron right away with Sworn Enemy.
Durance puts up his usual per encounter buffs, plus Crowns of the Faithful for good measure.
Aloth begins with an Eldritch Aim, and afterwards hits the enemies with damage spells like Wilting Wind and Death Ring. The battle is soon won.
I loot the Matron's body for:
Severed Horn
It is at this point that the good party now makes it way to obtain the gemstones from the quarry at #21, and the Severed Horn from the crate at #22. I likewise select the brave choices of fighting off the bear in order to give the helm the Retaliation property, for when Grieving Mother will wear it.
I go back up the stairs at #35, and then leave the Cavens altogether.
Morug
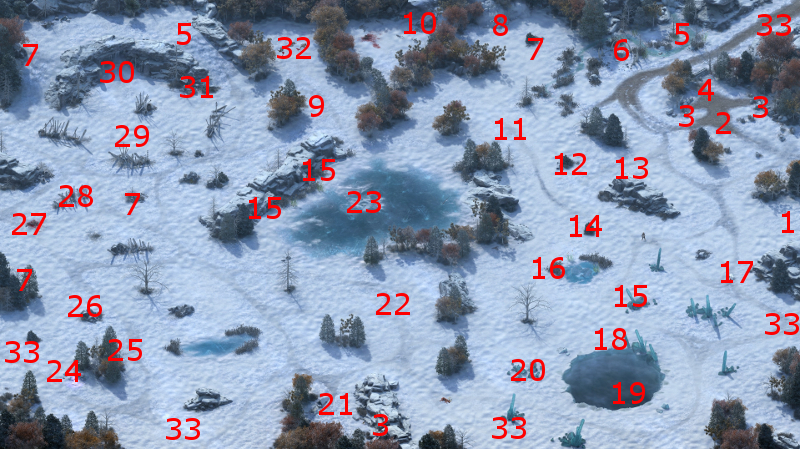
The good party managed to gain the Battery Relief Tile without killing any of the Ogres inside the Caverns. That means that a Crag Ogre Merchant named Morug will now be at #31 on the map of the Russetwood. He sells a few Potions, Plants and Camping Supplies. Specific items that may be of interest include:
*Evil* The Ogre Matron
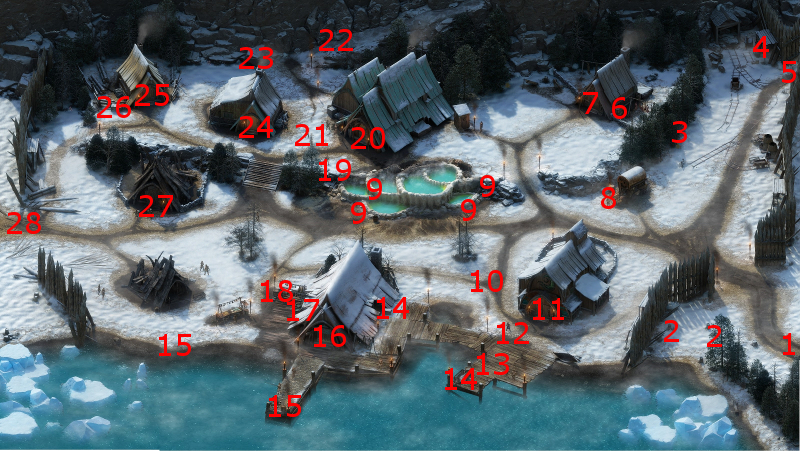
I show this part from the perspective of the evil party. Renengild will be in her house at #24 on the Stalwart Village. She informs me that the village is grateful for the Crag Ogre clan no longer being in the Russetwood, which translates into a reputation increase with the Village. She also advises me that Haeferic has cleaned out his rooms and that Yduran's supply lines have opened. What that means will be explained shortly. Informing Renengild of the slaughter of the Crag Ogres marks the conclusion of The Ogre Matron quest for the evil party.
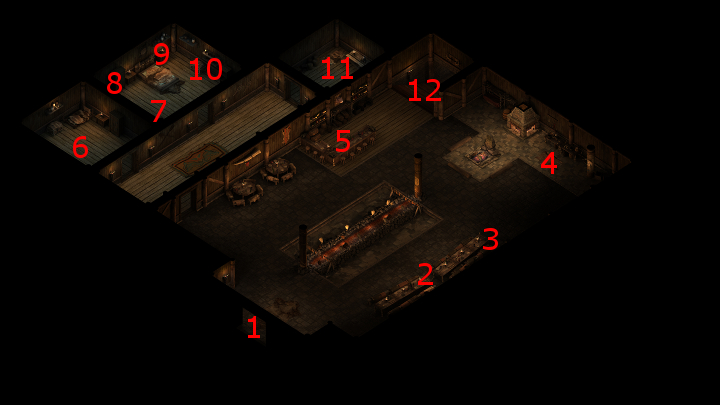
Haeferic will be at #5 in the main floor of Gref's Rest. All of his resting options will now have extra benefits as a reward for taking out the Crag Ogre Clan. For example, the Golden Whale resting option will also provide +2 to Resolve in addition to the +2 bonuses to Constitution, Dexterity and Might.
*Evil* Cracked Horn
I also show this part from the perspective of the evil party. I head over to Yduran at #8 on the Stalwart Village map. I bring up the subject of a horn in his possession, and he admits that he has one. Zakara uses the Deceptive option to bring its price down to 300cp, and thereby obtain the Cracked Horn.
I next have another vision of Garodh, where the choice becomes either attacking the sea serpent or hiding from it. I choose the former, since I want the helm to have the Retaliation property.
Cracked Horn
Alliria doesn't even bother with Renengild, since she has already concluded The Ogre Matron quest. She goes straight to Yduran.
Another difference is that she selects the Honest reply, with the result of giving Yduran 600cp to purchase the Cracked Horn. However, she also selects the reply of attacking the sea serpent.
The good party now travels to Caed Nua.
Patchwork Boots
The good party returns to the rewards chest in the Great Hall. Waiting inside will be the Patchwork Boots, which is a reward for The Unworn Path companion adventure. It doesn't fit into my plans though, so I just sell it to the merchant.
Both the good party and the evil party now return to Durgan's Battery.