-

- Forums
- Chatrooms
- Gallery
- Gameplay Videos
- Upload
- Articles
- Mod Reviews
- Shop SP: Games, Movies, Books
|
|
Foundry
*Evil* Battery Defenders
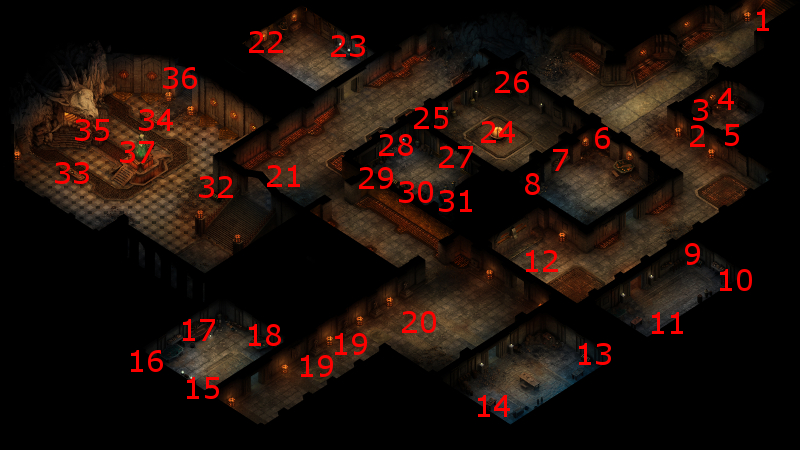
Here I show the evil party entering the Foundry at #1. A major companion adventure becomes available, although I don't care which one. It happens to be the Ring Finger. I assign Devil of Caroc to it.
I make my way south through the hallways, and witness visions of the past Pargrunen Dwaves in a desperate defense against an incoming enemy.
At #12 will be a very large force of Battery Defenders. I keep the party some distance north of them, and have Zakara go forward and lure them to the rest of the party. The point is to avoid having to have other nearby monsters join the battle as well. Durance does his usual buffs while the warriors hold position.
Aloth pretty much obliterates most of them with a Wilting Wind spell. He also takes out the crossbow wielding Defenders who are hanging back with a Malignant Cloud spell.
Battery Defenders
The equivalent video for the good party. A major companion adventure becomes available, and I reload until I get The Weaver's Song, since I adjust my plans at the prospect of getting a great cloak out of it. I assign Maneha to it. I win the battle at #12 quite easily.
On the Binding of Souls
I continue southwest. The table at #17 has a Durgan Iron Ingot and a book called On the Binding of Souls, which reveals Dwarven attempts to mimic Engwithan experiments with binding souls to vessels.
Adra Disc
I take the Adra Disc from the table at #17. That has two consequences.
There will be traps at spots marked #19. Devil of Caroc disarms the first one. The other will have to wait until later.
There will now be a very large group of Wraiths and Battery Sirens at #20. The Wraiths use their teleportation powers to split Kana apart from the rest of the party. I am nonetheless able to outlast them, while taking care not to trip the other trap. That trap gets disarmed once the fight ends.
Armory Key and Adra Sphere
I go northeast. The chest at #14 has the Armory Key, a Hammer and Chisel, and a few other random items.
The trapped and locked chest at #13 has an Adra Sphere.
*Evil* Shimmering Cloak
I show this part from the perspective of the evil party. The room east of #20 has a few Wraiths and Battery Sirens in it, but I defeat them easily. The trapped and locked chest at #9 has the Shimmering Cloak in it. It doesn't fit into my plans, so I'll just sell it.
Annals of the Pargrunen
There will be plenty of random scrolls in the room just west. The cabinet at #8 will have a random magical item, and a book called the Anals of the Pargrugen, which provides additional confirmation that the Dwarves performed experiments with soul-binding.
Girdle of the Driving Wave
I continue north and use the Armory Key to open the door at #2.
The chest at #4 will have the Girdle of the Driving Wave as a set item. It is an interesting possibility for anybody who wants a non-Fighter character to have Knockdown as a capability. It doesn't fit into my plans though.
I also lucked out and got a pair of Gauntlets of Swift Action from the chest as a random item. Devil of Caroc wears them for the rest of the game. The obvious idea is her hitting her targets with her axe as often as possible.
I rest up and then grab the Camping Supplies from the chest at #5.
Wodewys
Now I continue south and then west until I reach the room at #24, where I have to kill off several Battery Sirens and Wraiths.
The chest at #26 has a Ring of Overseeing and a few other random items. Sagani wears the ring for the rest of the game. The point is to increase the area of effect for both Combusting Wounds when it's triggered by her Ring of Searing Flames and her Returning Storm when it's triggered by her Stormcaller bow.
The orb in the room has Sapphire buttons. The correct order to press them is "Old Vialia", "Living Lands" and then "Ruatai". The sequence opens the door at #27.
The room beyond has a lot of treasure chests in them. The one at #30 has Bracers of Spiritual Power. The one at #31 has a Girdle of Eotun Constitution and Boots of Evasion. The one at #29 has a unique Battle Axe called Wodewys. The ability to inflict Nature's Mark on its target, and its defensive bonuses against poisoning and disease are interesting, but I ultimately have other plans.
Adra Sphere
I continue to the room to the south. The chest at #23 has a book called the Precepts and Proverbs of Abydon.
The chest at #22 has another Durgan Iron Ingot and the other Adra Sphere.
Battery Defenders and Spirits
I go south and fight a large horde of Spectres, Wraiths, Battery Defenders and Battery Sirens at #20. I win easily enough, especially after Hiravias casts Relentless Storm and Alliria uses Sacred Immolation.
I rest up and then grab the Camping Supplies from the chest at #32.
Furnace of the Forge
Kana activates his Phrase modal that includes They Shielded Their Eyes 'Gainst the Fampyr's Gaze. It is in anticipation of the next battle.
The table at #33 has a Ring of Searing Flames and a few other items, but I already have one. The table at #34 has a couple of Durgan Iron Ingots and a few other items.
I click on the White Forge at #35, and insert an Adra Sphere into it through a scripted interaction. I repeat the process for the other Adra Sphere, and the Adra Disc.
Forge Guardians
After that, I get attacked by the spirits of Exandru, Marunn and Zoltun, as well as several large constructs called Forge Guardians.
Zoltun presents a real danger in that he can hit the party with a Confusion spell, and render them especially vulnerable and unable to fight back against the Guardians. I therefore have Ituumak use Takedown on him, while Grieving Mother, Devil of Caroc and Sagani go all in to take him out as quickly as possible.
Alliria tags Kana and Devil of Caroc each with reinforcing exhortation, and then activates her Sacred Immolation.
Hiravias starts with Weather the Storm, since the Forge Guardians can inflict extra Burning Damage with their attacks. He follows up with Relentless Storm and Moonwell. At some point several Guardians gang up on Kana the tank, so Hiravias plants a Venom Bloom spell over them, which will inflict Raw Damage on the Guardians but won't warm Kana.
Kana in turn uses the Invocation that gives Might, Constitution and Resolve bonuses on his comrades to buff them up. After that, the battle pretty much takes care of itself.
The White Forge
Now I click on the Adra pillar at #37, and speak with the spirits of Exandru, Marunn and Zoltunn. What follows is a lengthy conversation on the background of the White Forge and the Pargrunen Dwarves. The contours of the conversation itself, and whether you can make the numerous skill or attribute checks during it, won't particularly matter.
What does matter is one of three possible choices at the end of the conversation:
Refined Durgan Iron Ingots
I click again on the Adra pillar at #37, and use the crafting menu that's unique to the pillar to convert 15 Durgan Iron Ingots into 5 Refined Durgan Iron Ingots.
When I have Refined Durgan Iron Ingots, I have the option of opening the 'Enchant' menu on a weapon, armor or shield and using one or more Refined Durgan Iron Ingots to add enhancements to it. The possibilities are:
*Evil* Refined Durgan Iron Ingots
The table at #34 has two more Durgan Iron Ingots, which means that I have a total of 19 (the evil party had done Cragholdt earlier). I click on the Forge at #37 and have 18 of them converted into six Refined Durgan Iron Ingots.
Increasing Zakara's damage and Attack Speed is my first priority. I Durganize her Bittercut sabre and her Sanguine Plate Armor.
Zahua's weapons are likewise a priority. I Durganize both his Wei Toki and Edge of Reason axes. In this instance, there is the additional benefit that the Durgan enchantment bonuses to Critical Hit Modifier will stack with the bonuses to Critical Hit Modifiers inherent to Battle Axes.
I also Durganize both Durance's Vengiatta Rugia and Aloth's Aloth's Leather Armor. Reducing the Armor Speed Penalty, and thereby increasing the speed with which they can cast spells in succession, is a priority for my spellcaster.
The evil party has priorities as well when it comes to the allocation of a finite number of Refined Durgan Iron Ingots. Zakara and Zahua are my heavy hitters in melee, so it was a priority to increase their Attack Speed and Damage. Having Durance and Aloth cast spell sequences in more rapid succession was likewise another priority.
The other characters in the party do not by comparison command so urgent a priority. Eder's build is based on him keeping multiple enemies locked down in Engagement around him on threat of knocking them Prone should they try to Disengage. His Disengagement attacks come out automatically in response to an enemy trying to Disengage, irrespective of Attack Speed.
As for Maneha, her Blood Thirst ability will completely void Recovery time whenever she lands a killing blow, so I don't feel any urgency when it comes to her either. If I am going to spend any Refined Durgan Iron Ingots on my tanks, it will have to wait until I find more raw Durgan Iron Ingots.
Renengild's Reward
I end up at #36 on the map of Durgan's Battery. I click on the broken gangway at #37 and jump across. I take the door near #21 to end up at #20. From there I return to Stalwart Village.
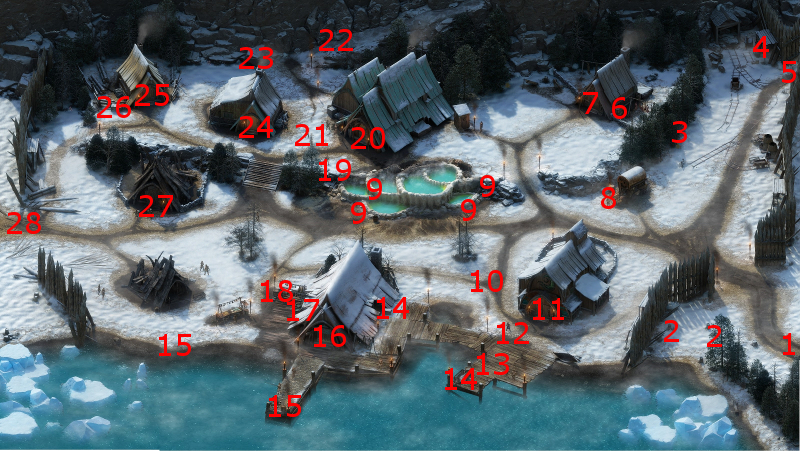
I enter Renengild's house at #21. She rewards me with two Diamonds, a Sapphire, a Topaz, and a major gain to reputation with Stalwart Village.
Ring of Deflection
I stop off at Yduran at #8 and sell off my excess wares. I also purchase a Ring of Deflection from him. Kana wears it for the rest of the game. The +9 bonus to Deflection obviously helps him in his tank role. True, he is wearing a Cloak of Deflection, but it now makes sense to buy the ring as I am about to make a transition to a different cloak.
I leave for Caed Nua.
Cloak of Comfort
The good party returns to the rewards chest at #3 in the Great Hall. Waiting inside will be the Cloak of Comfort, which is a reward for The Weaver's Song companion adventure.
Kana wears it for the rest of the game. This is arguably one of the best cloaks in the game. It provides a +30 bonus to Endurance. It provides a +5 bonus to all Defenses that stacks with all other Defense bonuses, even ones provided by other items. So in this instance the Defense bonuses of the Cloak will stack with the bonuses provided by the Ring of Deflection and the Ring of Protection. It also provides +3 bonuses to Crushing, Piercing and Slashing Damage Reduction that stack with all other Damage Reduction bonuses. *Evil* This may have been a better cloak for Eder too, and I should probably have got it for him when I had the chance. Oh well, live and learn ...
*Evil* Nidhen's Finger
The evil party returns to the rewards chest at #3 in the Great Hall. Waiting inside will be an amulet called Nidhen's Finger, which is a reward for the companion adventure called Ring Finger.
Zakara wears it as an interim item for the time being, for its Constitution bonus.
The Forgotten Army
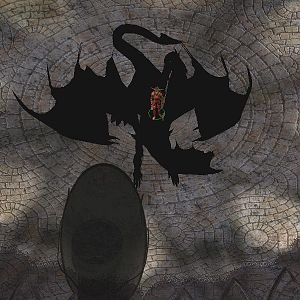
I rest in the courtyard of Caed Nua, and have a dream of an army descending on the White March. The dream triggers The Forgotten Army quest. The dream also marks the start of part 2 of the White March expansion.
The good party leaves for the Cragholdt Bluffs. *Evil* The evil party at this point has already done Cragholdt, so they make their way to Stalwart Village as a brief stopover on the way to the Iron Flail Fort to begin part 2 of the White March expansion. The priority that I am pursuing is a weapon that's just right for Durance.