-

- Forums
- Chatrooms
- Gallery
- Gameplay Videos
- Upload
- Articles
- Mod Reviews
- Shop SP: Games, Movies, Books
|
|
Ondra's Gift
*Evil* Curnd
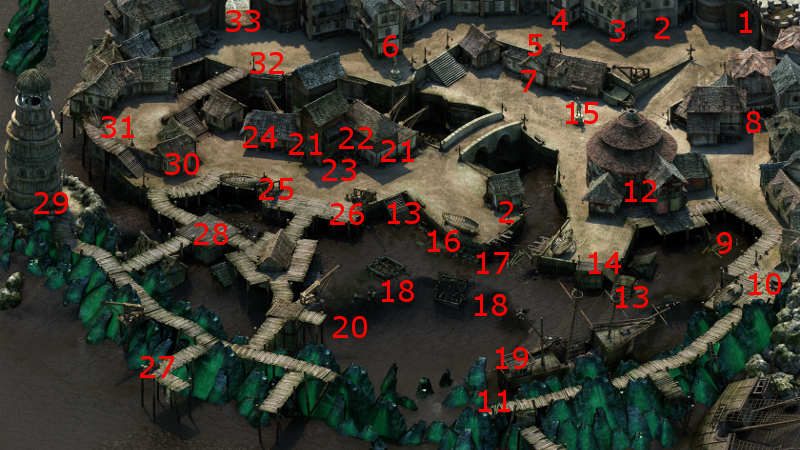
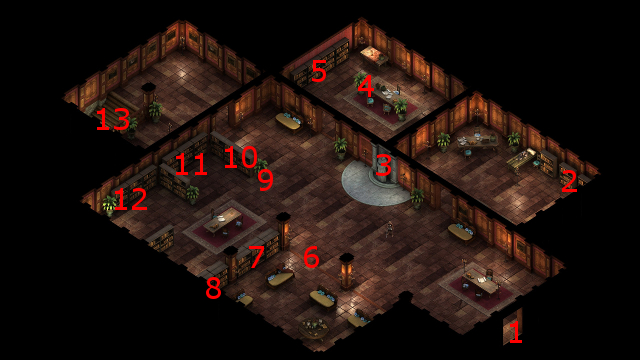
The evil party arrives at #1 in Ondra's Gift. It is night time, so now I make my way towards #8. There at night will be a fence who specializes in higher-tier precious gems, particularly those that are needed for stronger enchantments on your armor and weapons. If you find yourself short on gems that you may want, Curnd is the man to come to.
However, he won't open his shop up to just anybody. Zakara shows one way to get access to his wares, and that is to intimidate him with a Might check of 15.
*Note* Another way is available if you have obtained the Tattered Note during The Smith's Shipment quest. You can then simply say 'Yc Nybeon Eyldfeon' to Curnd as a password to gain access to his gems for purchase.
One gem that I purchase is a single Ruby. I has also obtained a third Vithrack Brain when I went to my rewards chest in Caed Nua earlier. So now I add the Exceptional Quality enchantment to Durance's Spelltongue rapier.
I also purchase a Diamond, with a view towards enchanting a certain armor once I find it for Zakara.
Cartugo
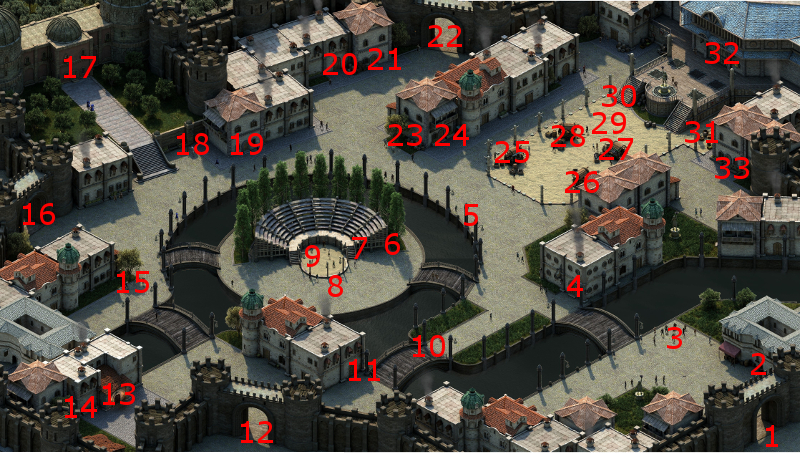
There will be a merchant named Cartugo at #22. I purchase the Belt of the Stelgaer for Sagani. The key point is to increase the rate at which she can shoot her arrows, and in turn increase the probability of triggering a Returning Storm with Stormcaller. The -33% Knockdown reduction time is gravy.
I also purchase the Ring of Wonder for Alliria, with an interim objective in mind. The Second Chance power of the ring will allow her to get back up once with a partial recovery of Endurance upon taking enough damage to render her unconscious. Being able to use this power in at least 5 fights will help her obtain the next upgrade for her St. Ydwen's Redeemer.
*Evil* Cartugo
In the evil party, Zakara purchases the Belt of the Stelgaer for Aloth. It increases his Dexterity by +2, and thereby allows him to cast spells and attack with projectiles faster. And it also means that his Dexterity bonus comes from a source other than his ring slots. The -33% Knockdown reduction time is likewise sugar on top.
I also purchase the Cloak of the Tireless Defender for Eder. It's the natural choice for Eder since it will enhance his Constant Recovery ability.
Lastly, I purchase an Awakened Root. It's the last ingredient that I need to add +3 Burning Reduction toDurance's Angio's Gambeson armor, which I show at the end of the video. It's more for thematic reasons than anything else, Durance being a Priest of Magran and all.
Angry Pallegina
At #24 is where I encounter the Paladin named Pallegina for the first time. She is apparently quite angry of the view that something is quite amiss in the nearby Vailian Trading Company, the entrances to which are at points marked #21.
Mestre Verzano
Now I enter the Trading Company and speak to Mestre Verzano, who gives me some Bitter Squash Seeds with the intention that I deliver them to a man named Gareth in the Goose and Fox. This request triggers the quest called At All Costs.
The video concludes with the party making its way to Copperlane.
Gareth and Dalla
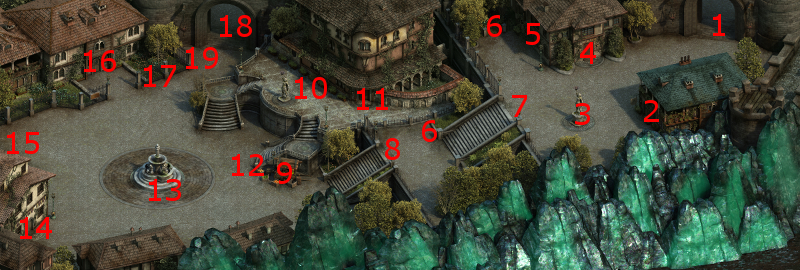
The entrance to the Goose and Fox is at #4 on the map of Copperlane.
Gareth will be at #6 on the map of the main floor of the Goose and Fox. I give him the Bitter Squash Seeds.
Dalla and her crew will show up after the exchange is made. I have two choices. One choice is to kill Dalla and her minions. Both the good and evil parties avoid going that route though, since it forecloses any possibility of doing quests for House Doemenel. The good party in particular is going to pursue a dedicated alliance with House Doemenel.
The choice both parties make is to let Dalla deal with Gareth, and promise to kill Mestre Verzano at the behest of House Doemenel. The video concludes with the party returning to Ondra's Gift.
At All Costs
Now I return to Mestre Verzano. Pallegina arrives and lets him know that the Vailian Ducs have washed their hands clean of him. He would have rewarded me with his Pocket Watch and a Pistol called Forgiveness had I previously killed Dalla. But as it is, I am now limited to two choices.
I could simply depart and leave him to his inevitable death at the hands of Dalla and her crew. I prefer not to though, since I won't gain any positive reputation gain with House Doemenel.
I instead prefer to help Dalla take out Verzano. The battle isn't hard at all. I make a point of having Sagani kill the archer herself to inch closer to the upgrade for her Stormcaller bow.
Verzano leaves behind his Pocket Watch and Forgiveness. It ultimately didn't fit into my plans, but a point in favour of Forgiveness is that it is the only firearm with a bonus to Attack Speed that will stack with the same bonus provided by the 'Durganized' enhancement.
I gain positive reputation with House Deomenel. The killing of Mestre Verzano also marks the conclusion of the quest called At All Costs.
Pallegina Joins
Now I speak to Pallegina at the same spot as beforehand, and she becomes a joinable companion.
Imatl
Now I speak to Imatl at #26. He wants me to recover relics from a shipwreck out at the shallows, and he'll compensate me. This conversation triggers the Clandestine Cargo task.
Engwithan Scepter Pieces
I wait until it's day and the tide of the nearby shallows goes low. I then descend down the stairs at #13 just to the right of Imatl.
There will be a group of Animats and Rain Blights led by an Adra Animat at #18 to the southwest. Alliria marks the Adra Animat with Sworn Enemy, and then starts using her St. Ydwen's Redeemer with the intention of triggering her Strange Mercy power upon insta-killing any of the Animats. The battle is quite easy. As things wind down, I start to pull the party away from any Animats that may be left and attacking at a distance. The intention is to have Sagani finish it off in order to earn killing blows to upgrade her Stormcaller bow.
The Engwithan Scepter Shaft will be in a crate at #20. The Engwithan Scepter Base will be at #17.
There will be another group of Rain Blights and Animats led by an Adra Animat at #18 to the southeast. I repeat the process. Sagani now has 22 out of the 25 kills she needs for her next upgrade. The Engwithan Scepter Spike will be in a crate at #19.
Runic Engwithan Relic
I return to Imatl. He's willing to sell me the Runic Engwithan Relic for 200cp, along with the suggestion that an Animancer he knows in the Sanitarium can assemble all the pieces together into a complete Scepter. Alliria talks him into taking 100cp instead. The video concludes with the party making its way to Brackenbury.
Zakara makes a Might check of 14 to earn Aggressive disposition and intimidate Imatl into giving her the relic. However, this also results in a minor loss of reputation with Defiance Bay.
Clandestine Cargo
The entrance to the Sanitarium is at #16 on the map of Brackenbury.
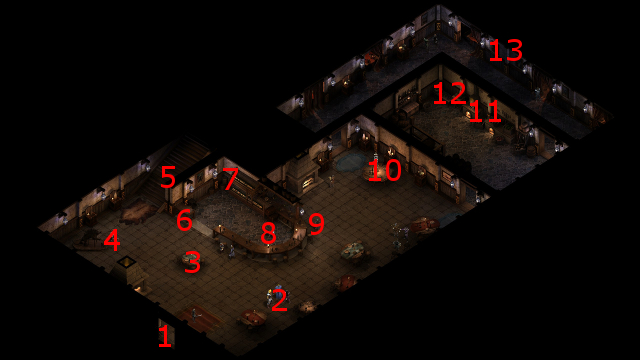
The party starts off at #1 on the map of the main floor of the Sanitarium. Nans is at #4. She will initially offer 500cp for the pieces I've gathered.
However, I decide to make a Lore check of 4 (I couldn't make the Perception check of 14) to convince her to assemble the pieces together. I also make a Resolve check of 13 to lower her price from 1,800cp to 1,500cp. I end up getting the Engwithan Scepter, which I'll sell later. *Evil* But Zakara could make the Perception check in the evil party.
The Clandestine Cargo task is now completed. I return to Ondra's Gift.
Marceno
Marceno will be at #27 on the map of Ondra's Gift. He wants me to retrieve his Captain's personal chest for him, in order to spare him a world of trouble with the Captain. This conversation triggers the All Hands On Deck task.
*Evil* The difference with the evil party is that they head off to Caed Nua. There is a specific reason why.
Captain Fortanero's Chest
A gang of Thugs led by Waldr "Three Fingers" and Lefty "Lisc" will be at #10. Combat is inevitable once they notice you. The battle isn't difficult. However, I make a point of Sagani landing the killing shots on the last three enemies as they near death, and she thereby obtained the next upgrade for her Stormcaller bow. It now has a 10% chance on each hit of triggering a Returning Storm spell-effect.
I also take Captain Fortanero's Sea Chest without making any effort to open it.
*Evil* Captain Fortanero's Chest
The evil party rests at Caed Nua, choosing the Artificer's bonus. The reason is so that Zakara gets +2 to Mechanics after that resting option.
After I slaughter the gang, I have Aloth lend his Gloves of Mechanics to Zakara. Opening the chest requires that the Watcher protagonist, and ONLY the Watcher protagonist, have a Mechanics of at least 4.
I open it and take the hat and rapier from the chest, which for now are quest items that I can't use.
All Hands on Deck
Now I return to Marceno. As I did not open the chest, there will be three possible outcomes:
*Evil* All Hands on Deck
There are three additional possibilities if you return to Marceno after having emptied the chest of its contents:
Now it's time to investigate the Lighthouse.