-

- Forums
- Chatrooms
- Gallery
- Gameplay Videos
- Upload
- Articles
- Mod Reviews
- Shop SP: Games, Movies, Books
|
|
Charred Barrel
Captain Emery
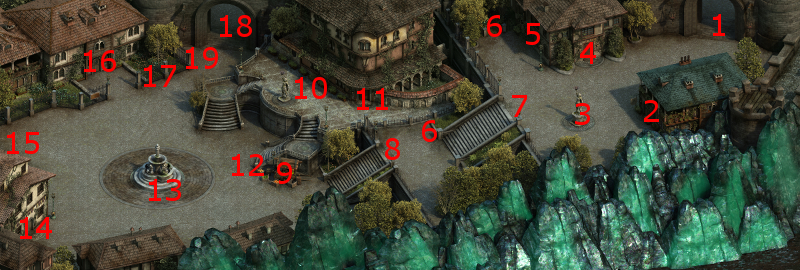
The entrance to the Charred Barrel is at #2 on the map of Brackenbury.
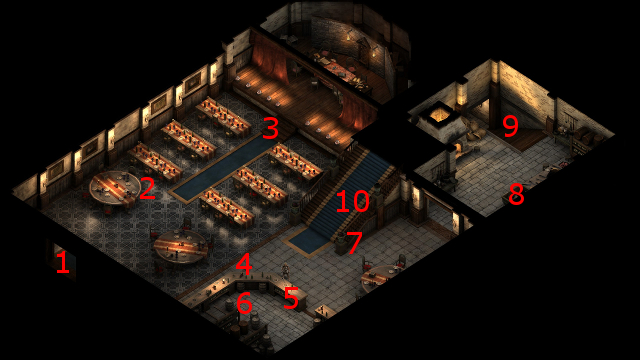
I start off at #1 on the map of the main floor of the Charred Barrel. Chancellor Warrin will be at #3 as part of the task called A Return to Court. Speaking to him triggers an encounter with Captain Emery and her soldiers as they come through the front door. I could choose to battle the whole lot of them (see below).
However, the dialogue option that suggests working together opens up new possibilities. Paying her 2,500cp is only a temporary solution, as she'll show up at the future Battle of Yenwood field and with no possibility of getting her to switch to your side.
The dialogue options based on having either 3 points in Benevolent disposition or 3 points in Cruel disposition will convince her to walk away, and either with the distinct possibility of getting her to join you should you show well enough during the Battle of Yenwood Field. Alliria uses the former option. I thereafter return to Caed Nua.
*Evil* Captain Emery
The evil party decides to slaughter Emery and her crew. The benches leading up to Chancellor Warrin actually provide choke points that I can exploit. I position Eder and Maneha towards the rear so that they'll actually form the front line once the battle begins. Aloth sets up a Chain Lightning Trap just south of them, while Durance will cast a Searing Seal south of that.
Once battle begins, Durance initiates a sequence of Devotions for the Faithful, Consecrated Ground, Circle of Protection, Salvation of Time, and then Interdiction. Aloth initiates a sequence of Eldritch Aim, Pull of Eora, Chill Fog, and then Malignant Cloud.
The foes wither before the onslaught while Aloth blasts away with his scepter. Eder, Zakara and Maneha cut down any that make it out.
I also accomplish another objective for this fight, which is for Aloth to obtain the last upgrade for his Gyrd Haweanes Stenes, which required that its Dominate effect succeed on at least 15 targets.
A Return to Court
The next sequence continues the task called A Return to Court. An angry mob has gathered in the courtyard of Caed Nua. Alliria spends 1,000cp to both placate the mob and raise her stronghold Prestige by 3 points.
Now I enter the Great Hall and speak with Marshall Forwyn. Completing the task requires the dialogue option to command Forwyn to take the army to the field and start the Battle of Yenwood. I hold off on that for now, and do no more than spend 10,000cp for the time being to acquire veteran mercenaries. The reason is that there are some special allied forces that I will bring into my army in the future, like a clan of Crag Ogres and the Iron Flail Mercenaries.
The video concludes with me selling off my special wares to the merchant in the Great Hall, resting up, and then returning to Brackenbury.
*Evil* A Return to Court
Zakara disperses the mob with a Cruel option, even though it misses out on the chance to 'purchase' Prestige points so to speak.
She's only going to rely on the Knights of the Crucible and the Mercenaries (for 10,000cp) as her allies in the upcoming battle.
Thristwyn
An Elf named Thristwyn will be at #2 on the main floor of the Charred Barrel. He'll want me to retrieve an amulet precious to him from a courtesan named Serel. This conversation triggers the Far From Home quest. I thereafter make my way to Ondra's Gift.
Serel
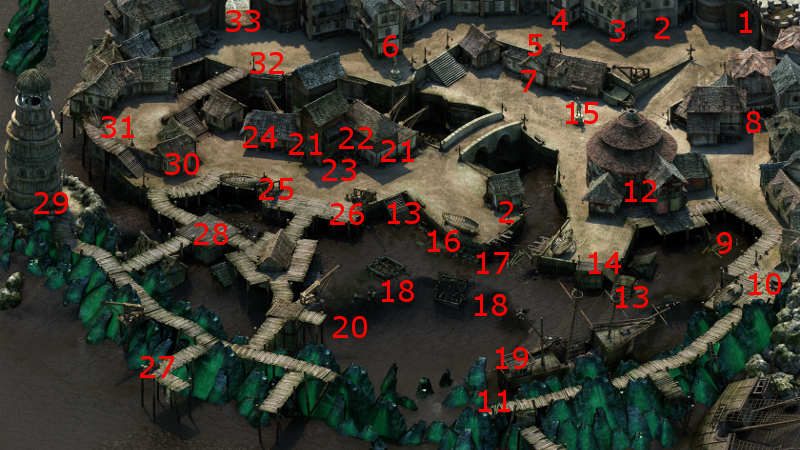
The entrance to the Salty Mast is at #12 on the map of Ondra's Gift.
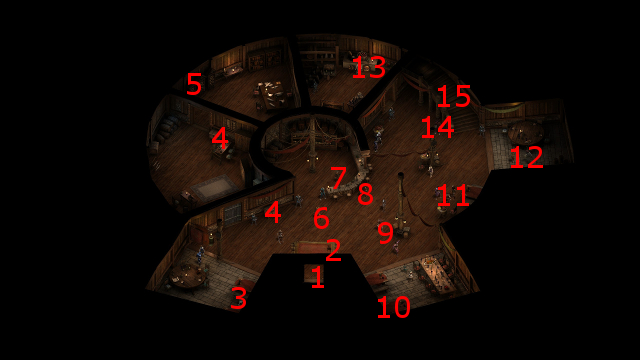
I speak with Maea at #6 on the map of the main floor of the Salty Mast. She'll want a 1,000cp for time with Serel. I would have been able to reduce that fee to 500cp had I previously completed the Supply and Demand quest in a way that favored Maea over Aefre. However, since that was not the case with the good party, Alliria ends up paying the full 1,000cp. The stairs to the next level is at #15.
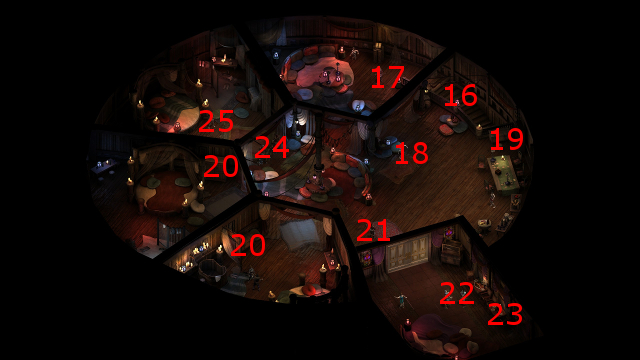
I start off at #16 on the map of the second floor. Serel's bodyguards would normally be standing watch over a closed door at #24. However, the door is now open and I'm free to go in after paying the fee.
Serel herself is at #25. One possibility is to decide you'll let her keep the Stolen Engwithan Medallion. When you return to Thristwn, he won't be happy with you. A Resolve check of 17 or a Might check of 16 will convince him to walk away defeated. Anything else, including the Aggressive option, will result in him attacking you. If you kill him, the distinctive item that he'll leave behind is the Cloak of Many Feathers. Return to Serel, and she'll give you Serel's Ring however things shook out with Thristwn. However, you will lose minor reputation with Twin Elms (coming up during Act 3) if you left Thristwn alive, and moderate reputation with Twin Elms if you had killed him.
If you're determined to get the medallion from her, one way is to kill her and her bodyguards (see the evil path described below). Less confrontational options include:
*Evil* Serel
Zakara bypasses Maea altogether without paying her fee. She and her companions slaughter Serel's Guards outright.
She also decides to murder Serel as well. Serel's corpse is looted for the Stolen Engwithan Medallion and another Frigid Claim ring.
Zakara will soon keep the former as an interim amulet. Zahua wears the latter as an interim ring.
Far From Home
There are multiple possibilities now that I return to Thristwyn with the Stolen Engwithan Medallion:
*Evil* Far From Home
Zakara returns to Thristwyn in the Salty Mast. He's none to happy to hear about what happened to Serel.
But that doesn't matter, since I tell him I'm planning on keeping the amulet. His inclination is to go hostile and attack. I could take him out of it with a Might check, but I prefer to start a fight with him through an Aggressive dialogue option. I easily gang up on him.
The medallion now becomes a useable Stolen Engwithan Medallion that provides a +2 Might bonus. Zakara wears it as an interim item.
The one unique item that Thristwin leaves behind is the Cloak of Many Feathers, but I'll just sell it as I have no use for it.
*Evil* Celebrant's Gloves
Zakara returns to the Great Hall in Caed Nua. The chest at #3 will have The Celebrant's Gloves, which she wears for the rest of the game. They expand the area-of-effect of all her abilities by 10%, so it will also enhance the Sacred Immolation and The Black Path abilities, and not just the Zealous Endurance aura. I also figure there may be some benefit to activating the Holy Meditation spell on its wearer getting Critically Hit. The Gloves are themselves a reward for The Celebrant's Dirge.
*Evil* Malina's Boots
No sooner does the evil party make its way back to Brackenbury that I get an announcement that Azzuro has Malina's Boots available for purchase. I do so immediately from the Stronghold menu.
Getting the Boots themselves requires that I go back to the Great Hall and fetch them from the rewards chest. Aloth will wear them. Keep in mind that none of the boots available in the game are anything close to game breaking, so I find what utility I can in them. Aloth is always pretty vulnerable whenever enemies get close to them, and more so should he get Stunned or knocked Prone. I figure the Boots should keep him relatively safer in such situations.
The next stop for the good party is House Doemenel. The evil party has already done that part, so now they head for the Sanitarium.