-

- Forums
- Chatrooms
- Gallery
- Gameplay Videos
- Upload
- Articles
- Mod Reviews
- Shop SP: Games, Movies, Books
|
|
Lighthouse
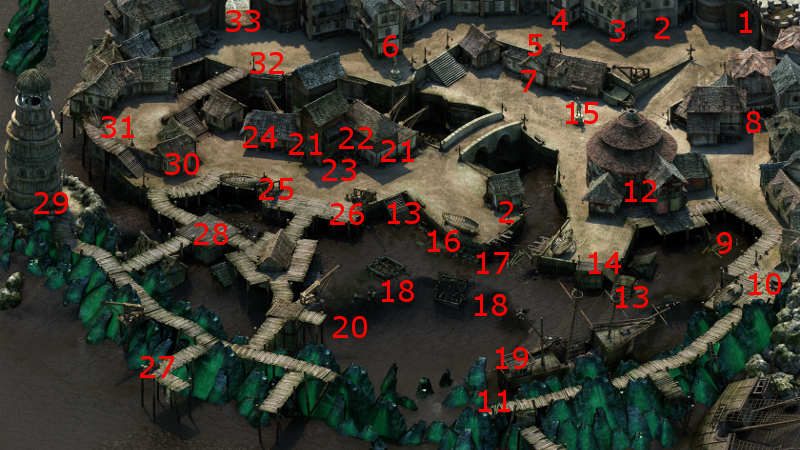
Niah
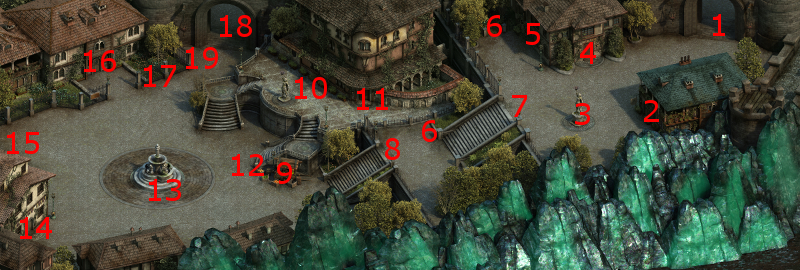
Niah will be at #28 on the map of Ondra's Gift. She requests my help in getting rid of whatever is haunting the nearby Lighthouse. She gives me the Lighthouse Tower Key. The conversation and receipt of the key triggers The Wailing Banshee quest.
The front door to the Lighthouse is at #29, which I use the Lighthouse Tower Key to open.
Lighthouse Ruin, First Floor
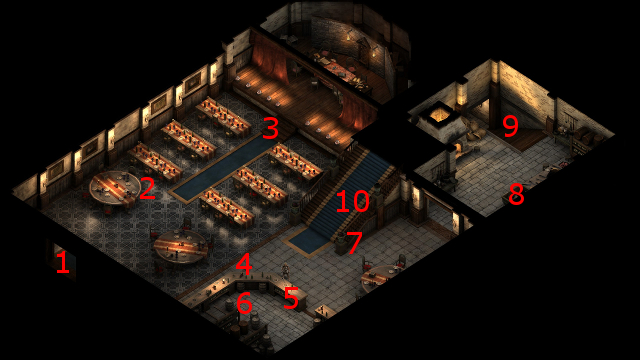
I start off at #1 on the map of the first floor of the Lighthouse. I loot the locked chest at #3, which causes several Rain Blights to attack me, but I defeat them easily.
I click on the door at #6, whereupon I get attacked by several spirits. This battle is now very winnable, but I still have Hiravias use a Moonwell spell just to be sure.
The stairs to the next level are at #7.
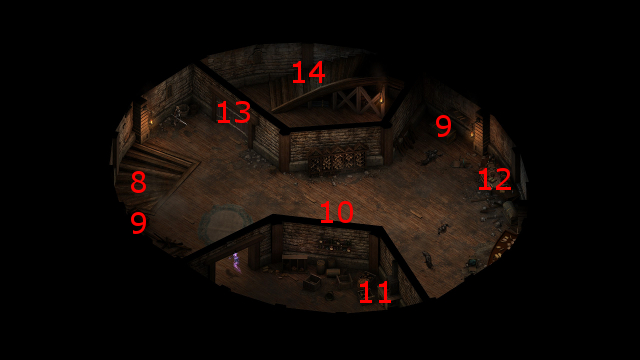
Lighthouse Ruin, Second Floor
I start off at #8 on the map of the second floor. I open the door at #13, tuck everyone into the room near the stairs at #14, have Alliria go out on her own and close the door behind her.
She goes on ahead to get the attention of the Shades and Spectres at #10. She initially absorbs some of the damage, although eventually most of them go after the rest of the party. The party kills them off gradually. Still, she manages to keep the attention of one of the Spectres. She thereafter runs around without attacking it, essentially letting the Spectre knock her unconscious.
Thereafter, the party rushes forward. Alliria will herself be revived by the Second Chance power of her Ring of Wonder. Hiravias casts a Beetle Shell spell on her, to protect her against being brought to 0 Endurance a second time with the possible result of getting killed permanently. I then finish off the Spectre.
The whole point of that exercise was to have Alliria knocked unconscious and revived during combat. She needs to do that at least four more times to obtain the last upgrade for her St. Ydwen's Redeemer.
The table at #12 has an Evacuation Notice, which may provide a clue for The Wailing Banshee quest.
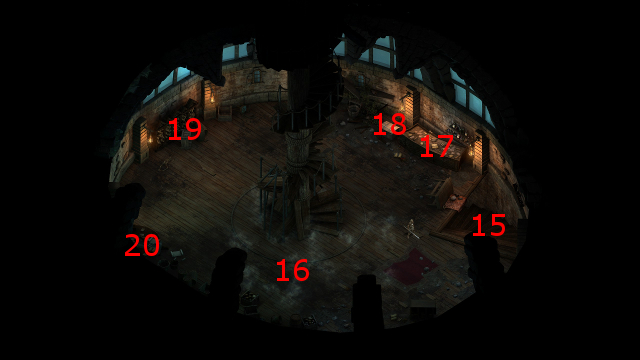
Lilith
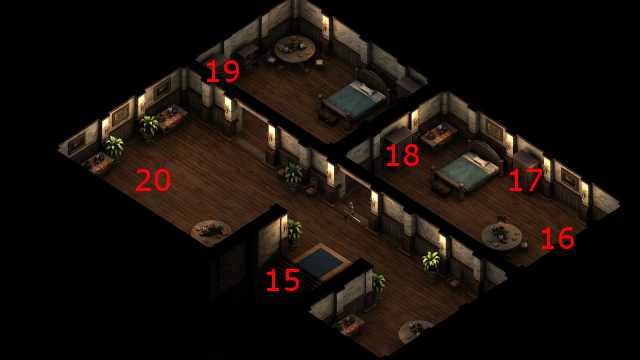
The party is at #15 on the map of the third level. A Cean Gwla named Lilith hovers around #16. I could attack her at the outset. However, Alliria creeps closer as a dialogue option multiple times until the required Perception check gets reduced from 18 to 12, and then observes that the spirit seems fixated on the windows looking out to the sea.
A table at #17 has the Logbook, which suggests that the term 'Red Dream' may be of some significance.
A chest at #18 has a Padded Armor called Jack of Wide Waters. This armor can be useful for a character that wants hefty combat bonuses that come from resting outdoors combined with a high Survival skill. I however could not fit it into my own plans.
I leave the tower and ask Niah about 'Red Dream'. Niah reveals that the Red Dream is a ship that has recently docked in Defiance Bay and that her captain, Maerwith, is staying at the Charred Barrel. The party makes haste for Brackenbury.
*Evil* Lilith
Zakara prefers to attack Lilith outright. Durance gets started with Devotions of the Faithful, Watchful Presence, Consecrated Ground, and then Circle of Protection. The last buff is to protect against Lilith's stun powers.
Aloth initiates a sequence of Kalakoth's Minor Blights, Merciless Gaze and Llengrath's Displaced Image. The last spell accounts for the possibility that some of the spirits may teleport near him and attack him. He begins to bombard the enemies once the sequence is complete.
The warriors as always are hacking away, although Maneha occasionally takes care to attack an enemy near Aloth, since she's closest to him. The battle is soon won.
It is Zahua who gets Lilith's Shawl, with the obvious point that more Perception will increase the Accuracy of his attacks. The Stealth aura is sugar on top.
*Evil* 9th Level
The evil party now has enough experience to advance to their 9th levels. Zakara gets the Coordinate Attack ability. It is a passive ability where the ally standing closest to Zakara and attacking the same enemy as Zakara will gain a +10 Accuracy bonus against that enemy. Eder and Maneha will benefit a lot from this ability, as well as Zahua though probably not as often.
Eder acquires the Fearless ability. It renders Eder immune to the Frightened and Terrified afflictions. In battles against enemies that can impose those afflictions on party members (e.g. Dragons), at least Eder can be relied on to keep fighting without any Accuracy penalties.
Maneha acquires the One Stands Strong ability. It's a passive ability that increases Maneha's damage by 20% whenever she's next to at least two enemies, and considering that I'm building her as a tank that will be almost every fight from this point onwards. She also can only get Flanked if three or more enemies surround her.
Zahua acquires the Clarity of Agony ability, which he can use twice per Rest. It allows Zahua to cut in half any negative status effects that may hit him. He can initiate it even if he has already been hit with such an effect, so he doesn't have to pre-buff in anticipation. He can call on it after the fact. It's useful since if multiple party members, including Durance, get incapicitated in any way, Zahua will be the one character that can stay in the fight and keeping hitting enemies with Torment's Reach and such. He is also programmed to use it as part of the Aggressive AI.
Durance chooses Withdraw has his 1st level mastered spell. Withdraw packs a lot of punch for a 1st-level spell, since it can completely protect a severely wounded character from all harm and allow that character to basically get back to 100%.
Aloth chooses Eldritch Aim as his 1st-level mastered spell. If he needs to start a sequence of spells, the efficacy of which depends on Accuracy, he can pop this off for free at the start of the battle and then initiate the rest of his sequence (e.g. Pull of Eora in particular).
He also learns two new spells. One is Malignant Cloud, which inflicts Raw damage over the area of effect over its duration. It is one of the few powers that can inflict Raw damage on multiple targets. One application is to blanket it over archers and spellcasters who are hanging back and tend to stay in the same spots at a distance. The other application is when Aloth is keeping the enemies under crowd-control through a Pull of Eora. The two spells together provide a potent combination.
The other spell is Call to Slumber. This is the key resource for the evil party should they get swarmed by numerous foes from all sides. It allows Aloth to render enemies, and only enemies, Prone in its area of effect.
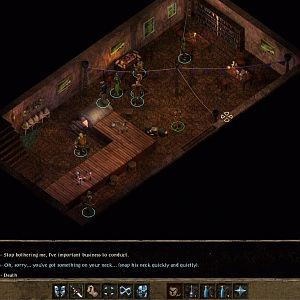
Maerwith
The entrance to the Charred Barrel is at #2 on the Brackenbury map.
I start off at #1 on the map of the main floor of the Charred Barrel. I speak to the inn keeper and rest up, both to recover and also to recharge the Second Chance power of the Ring of Wonder. *NOTE* I selected the Noble's Stay resting option, which provides a +2 bonus to Intellect. That will be important for another quest that I'll be doing soon. I go up the stairs at #10.
I am now at #15 on the map of the upper floor. I speak to Maerwith. Indicating that somebody at the Lighthouse has been keeping track of her ship, referencing the Logbook, and then indicating her mother remained in the Lighthouse despite the advance of invading Aedyrans, will convince her to go see the spirit.
The video concludes with the good party making its way back to Ondra's Gift.
Lilith's Shawl
I return to the top level of the Lighthouse Ruin. Lilith will be long gone, so that good party is free to grab Lilith's Shawl from the table at #20 on the third-level map. I have Alliria wear it for its +3 Perception bonus on an interim basis. I leave the Ruin and return to Ondra's Gift.
The Wailing Banshee
I speak to Niah again to receive a 1,000cp and complete The Wailing Banshee quest.
A new major companion adventure becomes available, although I don't care which one. It happens to be Sir Ifen's Knot. I assign Eder to it.
9th Level
The good party now has enough experience to advance to their 9th levels. Alliria gets Reinforcing Exhortation. It allows her, twice each Encounter, to give either an ally or herself a +25 bonus to Deflection. It can be used in a number of ways. I very often tag both Hiravias and Devil of Caroc with it at the start of a fight so that they can function better as off-tanks. Sometimes I put Kana ahead and use this ability on him so that he can stick his neck out as a super-tank. Or sometimes she'll use it on herself if she's in it tough and surrounded by enemies ganging up on her.
Kana acquires The Dragon Thrashed, The Dragon Wailed phrase, which inflicts a significant amount of Burning and Slashing Damage over time within its large radius. It forms a key part of my standard crowd-clearing chant. In fact, I begin to set up that Chant with my newly acquired phrase, and include Rime and Frost Followed the Footfalls of Karth in it for now.
Devil of Caroc acquires the Persistent Distraction ability. If she's right next to a Flanked enemy, that enemy will also be Distracted. That in turn means a further -6 penalty to Deflection, and in turn makes a Critical Hit that much more likely. Since Grieving Mother very often leads off with Flanked Foes, this passive ability is almost always in play.
Hiravias chooses Nature's Mark as his mastered 1st-level spell. It imposes a Deflection penalty on enemies only within its radius, which is a useful option to have each fight.
Grieving Mother acquires two powers. One is Detonate, which inflicts Raw Damage on a single-target, and a lesser amount of Crushing Damage on targets within a small surrounding radius.
The other is Borrowed Instinct, which provides an option to ramp of all of her Defenses by +20 if she needs it during a particularly intense fight.
Sagani chooses Takedown. It allows her pet, Ituumak, to take knock a target Prone. Can be used twice each Encounter. It can make taking down enemy spellcasters at a distance that much easier, or if you want the pet to take down an otherwise particularly troublesome target.
The Salty Mast is my next stop.