-

- Forums
- Chatrooms
- Gallery
- Gameplay Videos
- Upload
- Articles
- Mod Reviews
- Shop SP: Games, Movies, Books
|
|
Hadret House
Dunryd Row Messenger
No sooner do I leave the Sanitarium then a messenger from Dunryd Row informs Alliria that Lady Webb wants to speak to her.
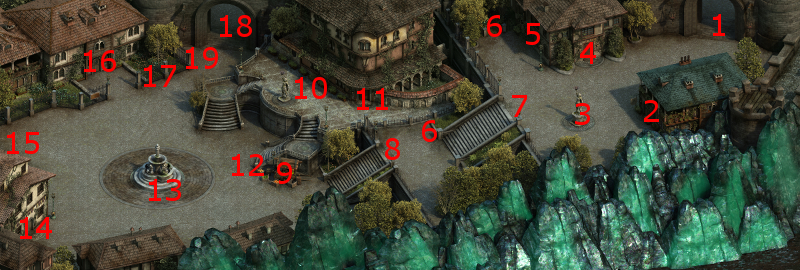
As she approaches the entrance to Hadret House, which is on #14, she has another vision of the Older Robed Man.
Lady Webb
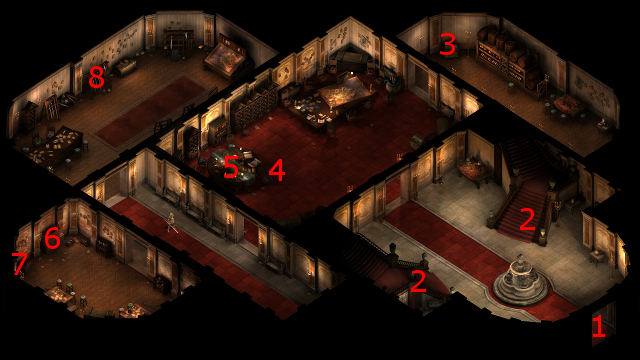
The party starts off at #1 on the main floor of Hadret House. Stairs to the upper floor are at points marked #2.
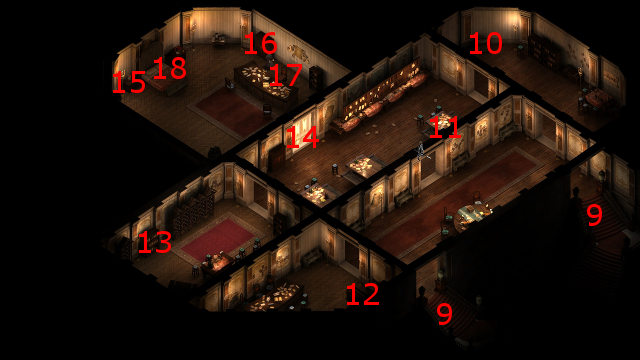
Either stairs will bring the party to points marked #9 on the map of the upper floor. I speak at length with Lady Webb at #17, who explains much of the background and at the same time gives the party the mandate to investigate the activities of the nefarious group called the Leaden Key. This conversation triggers The Hermit of Hadret House quest.
Kurren
I speak to Kurren at #4 on the map of the main floor. He wants me to investigate the disappearances of Lendry, Kendal and Kora. He also suggest Lora, Oly and Elcga as possible witnesses. This conversation triggers The Final Act quest. I leave Hadret House.
Elcga
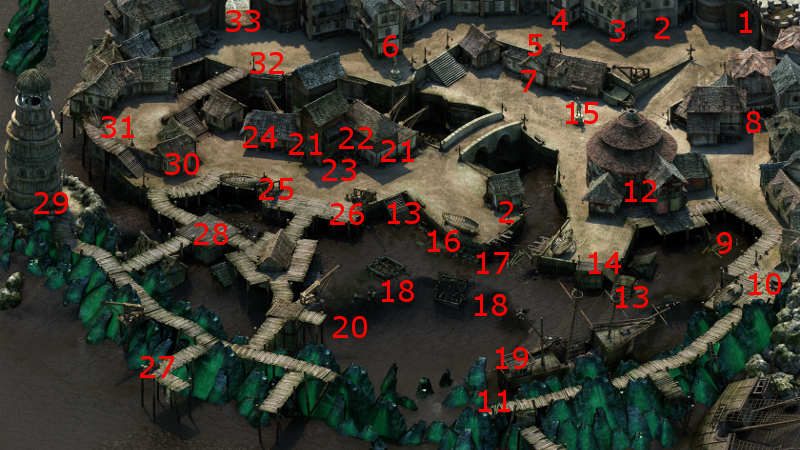
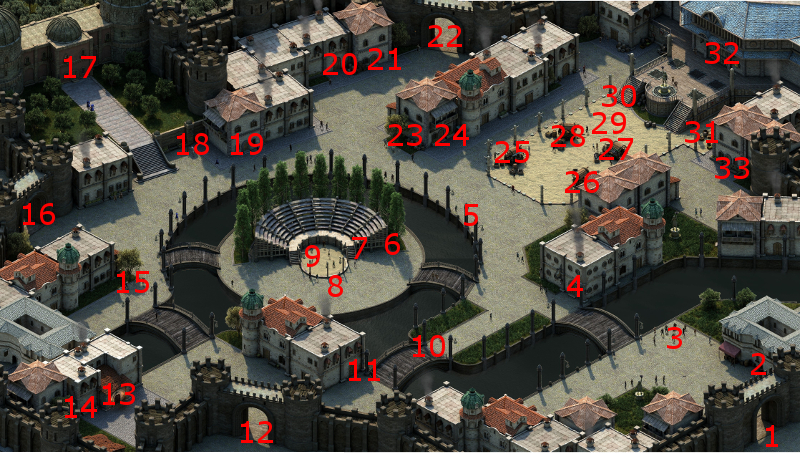
I speak to a Dwarven woman at #12 on the map of Brackenbury about Kendal's disappearance. He apparently took in with an acting troupe along with a tall actress. I leave for Ondra's Gift.
Oly
The entrance to the Salty Mast is at #12 on the map of Ondra's Gift.
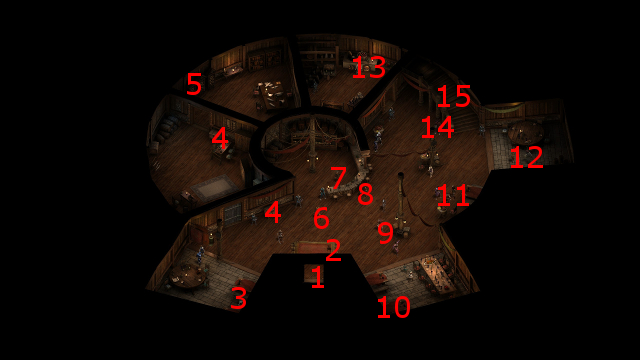
I speak to Oly at #10 on the map of the main floor of the Salty Mast. He's initially reluctant to speak to me, but Alliria makes a Resolve check of 11 to convince him to answer my questions. A Constitution check of 14, or a Might check of 13 that also earns Aggressive disposition, would have worked as alternatives.
Oly will let on that Lendry also took up with the tall actress. Her name is Lumdala, and she works at the Amphitheater in Copperlane.
I rest up in the Salty Mast, and then make for Copperlane afterwards.
Assassins in Copperlane
I travel towards the northeastern part of Copperlane, where I get attacked by numerous Assassins. I dispatch them easily with the usual tactics.
Lora
Lora at #25 will gladly answer any questions about her missing sister, Kora. She also provides the name of the acting troupe the missing people had taken up with, the Revel of Stars.
Amphitheater
Now I question Lumdala at #8 at length about the recent disappearances. She of course admits to nothing.
Kadal, who's been at #7, thereafter tells me to meet him at Lumdala's house. I make my way to the house at #21.
*Evil* Lumdala's House
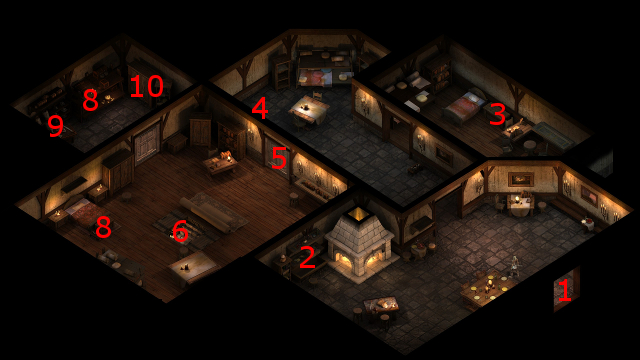
I show this part from the perspective of the evil party. I start off at #1 on the map of Lumdala's House. Kadal will be at #3. He gives me the Rusty Bronze Key, which opens the door at #5.
The evil party also gets a Grand Companion Adventure upon speaking to Kadal. I don't care which one at this point. In this instance it happened to be the Lavender and Lye adventure, which will eventually result in obtaining the Lavender Wreath as a reward. I assign Hiravias to it.
The trap door leads to a part of the Copperlane Catacombs that was previously inaccessible.
*Evil* Lumdala
I also show this part from the perspective of the evil party. They start off at #23 on the map of the Copperlane Catacombs. At #25 is a scarf. Zakara uses her Watcher abilities on it to learn that Nora was strangled and murdered by Lumdala in front of the patron audience in what amounts to the theatrical equivalent of a snuff film.
Lumdala and her companions show up. I could attack them from the outset. However, Lumdala will propose parting peacefully in return for her giving up the name of her wealthy patron. Zakara could make that agreement and let her go. Instead, she goes along with it temporarily, and then attacks Lumdala and the rest of her thugs. *Good* Alliria conducts the conversation the same way. In either case, the patron's name is Lord Gaderman.
The evil party has to conduct this battle carefully, because Aloth is in real danger of getting taken down by Lumdala's pistol and the missile attacks from her archers. Before the encounter itself, he had set a Malignant Cloud Trap about halfway between the party and the door they just came through, where Lumdala will trip it.
Once battle starts, Zakara, Eder and Maneha form a front line across the breadth of the gangway. Durance initiates his sequence of Devotions for the Faithful, Consecrated Ground, Circle of Protection and Salvation of Time.
Aloth first starts with Llengrath's Safeguard, with the intention that the bonus Deflection and the bonus Damage Reduction together will protect him from the missile fire that will come his way. He follows up with Eldritch Aim, and then a Chill Fog whose area of effect will catch Lumdala and her Archers as well. He also adds in Kalakoth's Minor Blights and Merciless Gaze, although by that point it proved largely unnecessary since the Chill Fog and Malignant Cloud together pretty much sufficed to kill off the distant enemies.
I press the button at #26 to be able to leave through the door at #27.
I head south and rest up with the Accuracy bonus vs. Vessels resting option. I am doing this in anticipation of the Heritage Hill district being my next destination quite soon. The barrel at #9 will have some Camping Supplies that I pick up. The video concludes with me making my way back to Brackenbury.
Lord Gaderman
Since I found about Lord Gaderman from Lumdala, he will now be at #3 on the map of Brackenbury. There are three possibilities when you confront him:
The Final Act
I inform Kurren of the results of my investigation to conclude The Final Act quest.
Kurren is prepared to offer 3,000cp and a moderate increase in reputation with Defiance Bay. However, Alliria chooses the Benevolent option that turns down the money and earns a major increase in reputation with Defiance Bay.
*Evil* The Final Act
Zakara gives Kurren Linete's Signet Ring and selects a dialogue response that earns both Cruel and Deceptive disposition in order to mislead Dunryd Row into believing that it was Linete Reymont who committed the murders.
She had also borrowed Eder's Ring of Changing Heart so that she could make a Resolve check of 14 and increase her fee from Kurren to 4,000cp.
The video concludes with the party makes its way through Brackenbury and getting ambushed by a lot of Assassins. The fight is fairly easy. The only comment I'll add is that sometimes you may want to hesitate cloud-type spells if you can't be certain that the warriors will cover all of the ground as a shield-wall in a wide open space. And indeed in this battle some of the enemies 'curled' around my warriors, reducing the efficacy of cloud-type spells. Another way of putting it is that you can't be certain of setting up a chokepoint in a wide open space. In that situation, Eldritch Aim and then Call to Slumber may be a better way to start for Aloth.
10th Level
Every companion besides Devil of Caroc now has enough experience to advance to their 10th levels.
Sagani now selects the Vicious Companion talent. Ituumak will now enjoy a +15% bonus to Damage and a +3 bonus to penetration against Damage Reduction.
Grieving Mother selects the Savage Attack talent. It is a modal ability that increases her Damage by 20%, but at the expense of a -5 penalty to Accuracy. The more Damage on each hit, the more Focus she gains with each hit.
She also selects the Ringleader power. It will Dominate its initial target, while also acting as a mass-Charm power on all other enemies within a certain radius of the initial target. It can be really useful during fights against a LOT of enemies, but it also becomes important during a scripted interaction at the climax of the White March expansion, part 2.
Hiravias selects the Secrets of Rime Talent, which will increase his Freezing Damage Reduction and the Freezing Damage of some of his spells.
Kana selects the Beloved Spirits talent, which increases the regenerative power of his Ancient Memory talent.
He also selects the Invocation named The Brideman Slew Thirty 'Fore They Crossed Half the Hall. It will provide hefty +5 bonuses to Might, Constitution and Resolve to party members. Can be useful during especially intense fights.
Alliria selects the Weapon Focus: Ruffian, which provides a +6 Accuracy bonus to her weapons of choice, Sabres.
Either the good party or the evil party will now travel to Heritage Hill.