-

- Forums
- Chatrooms
- Gallery
- Gameplay Videos
- Upload
- Articles
- Mod Reviews
- Shop SP: Games, Movies, Books
|
|
Pearlwood Bluff
Xaurips and Forest Lurkers
I arrive at the southeast corner of the Bluff. There will be a horde of Xaurips, along with a few Forest Lurkers, at #10. They're easy enough to kill by now.
Wind Blights
There will be several Wind Blights at #8, and they're easy to kill too.
*Evil* Pearlwood Bluff Cave
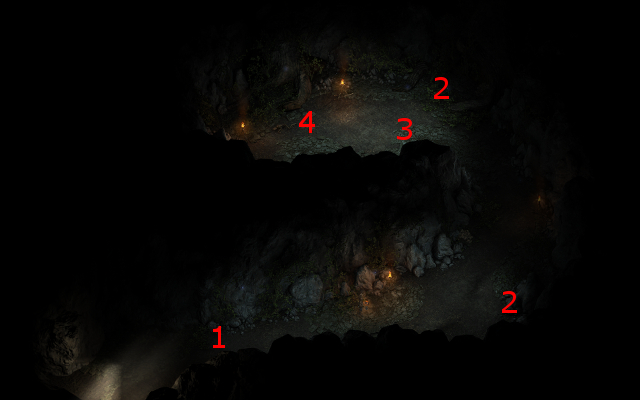
I show this part from the perspective of the evil party. There is a rock outcropping at #11 on the Pearlwood Bluff map, at which I can use a Rope and Grappling Hook to enter the Pearlwood Bluff Cave.
The cave is filled with Guls and Darguls, but I dispatch them pretty easily.
A dead body at #4 on the map of the cave has the Ring of the Selonan, which Aloth wears for the rest of the game. It provides 2 bonus 1st-level Wizard spells, and 2 bonus 3rd-level Wizard spells. In a game setting where I have less Camping Supplies, more bonus spells for a Wizard is a good thing.
The video concludes with the evil party leaving the cave and making its way back to the bluff.
Sagani and Persoq
Alliria temporarily borrows the Sanguine Plate Armor from Grieving Mother for the next little bit.
At #12 is a trace of the former Masuuk chieftain, Persoq. Alliria uses her Watcher abilities to get a sense of where Persoq has gone next. A Lore check of 6 and a Survival check of 8 (aided by the Sanguine Plate Armor) provide additional clues. She and Sagani now have a discussion of Persoq's legacy. The overall result is progress for Sagani's personal quest, The Long Hunt.
The video concludes with the party taking out a lone Forest Lurker a little to the northeast.
Pwgras and Drakes
At #4 will be a few Drakes and a few Pwgras and Menpwgras. This fight can be tougher than usual, so Hiravias helps things along with the Relentless Storm and Moonwell spells.
I return to Caed Nua.
Cean Gwlas and Phantoms Attack
I have to deal with an attack by a Cean Gwla and several Phantoms in the Great Hall. I want to minimize the chances of losing any hirelings, so I have Hiravias cast a Moonwell spell over as many allies as possible. The fight otherwise proceeds pretty casually.
Sagani on Thaos
I lost a couple of generic Hirelings, but they're always replaceable. As long as I don't lose any unique Hirelings (e.g. St. Waidwen's Fellow), I can live with the outcome of the battle. In fact, I now take the opportunity to take on a Thief of House Doemenel who provides +2 Prestige and +4 Security. I also bring on a Blood Thug as a Generic Hireling.
I sell off my excess loot and leave the Great Hall.
I rest outside with the Forum bonus (+3 Intellect). Sagani starts a conversation with Alliria about their enemy, Thaos. I leave for Dyrford Village.
The next stop for the evil party is Brackenbury. It is Cliaban Rilag for the good party.