-

- Forums
- Chatrooms
- Gallery
- Gameplay Videos
- Upload
- Articles
- Mod Reviews
- Shop SP: Games, Movies, Books
|
|
Cliaban Rilag
*Evil* Records Keeper
Here I show the perspective of the evil party. The goal here is to make progress with Eder's personal quest, Fragments of a Scattered Faith.
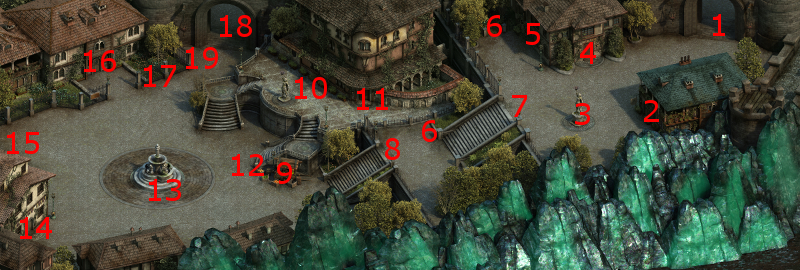
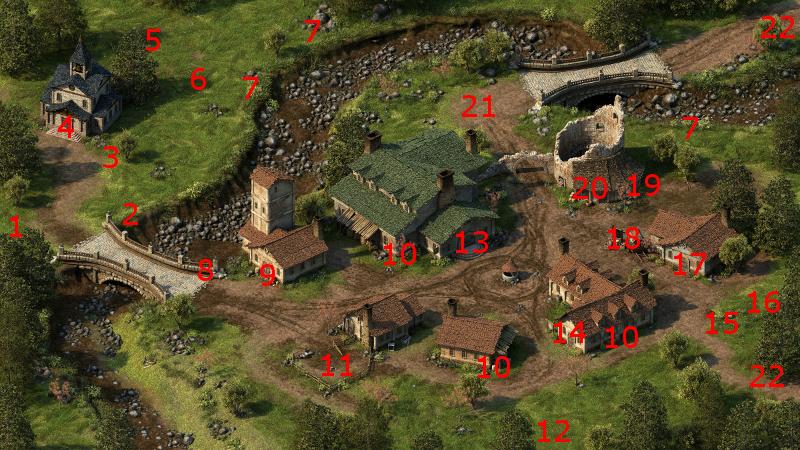
I stop off at the Charred Barrel, which is at #2 on the map of Brackenbury. I select the Criminal's Getaway resting option. The point is to obtain a +2 bonus to Perception, since one of the ways to make progress is to make a Perception check of 17 followed by a Lore check of 5.
Harbinger Beodmar
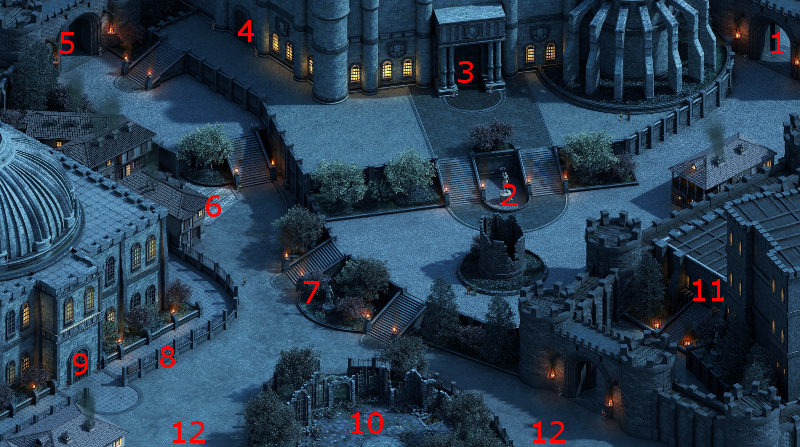
The entrance to the Temple of Berath is at #4 on the map of Dyrford Village. Once inside, I speak at length with Harbinger Beodmar, who is willing to reveal the location of Cliaban Rilag. Obtaining this knowledge progresses the quest called Through Death's Gate.
Cliaban Rilag will now appear on the World Map, but I first have to pass by the Dyrford Ruins.
*Evil* Orlan Bramble Ring
I show this part from the perspective of the evil party. To actually reach Cliaban Rilag, I have to first travel through the exterior of the Dyrford Crossing, starting from its west side, hit the north edge of its map, and then select Cliaban Rilag on the World Map.
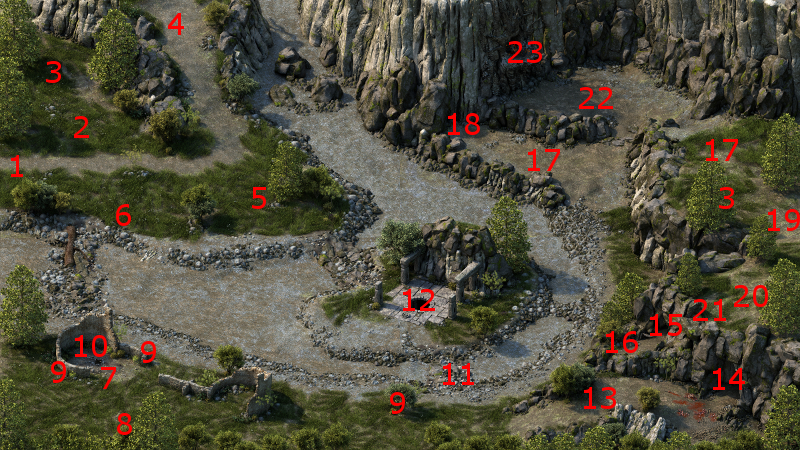
I arrive at #1 on the map of the exterior of Cliaban Rilag. Eder sure enough expresses some excitement about learing what happened to his brother upon arrival.
A corpse at #4 has the Orlan's Bramble Ring. That prompts me to shuffle some of my rings around. I have Maneha wear the ring for now. The bonus to Piercing Damage Reduction, as well as other Defense bonuses, will help her in her tank role. She passes on her Wyrwood Ring to Zahua, since its Damage Reduction bonuses can be helpful. He in turn passes on Serel's Ring to Zakara, who could certainly use the +2 bonus to Resolve during her dialogues and scripted interactions. I'll sell the Frigid Claim she had been wearing when I get the chance.
*Good* Devil of Caroc wears the ring in the good party in the interim, to benefit from its defensive bonuses and the Piercing Damage Reduction.
*Evil* Readceran Standard Piece
I continue to show the perspective of the evil party for this area. There will be a couple of Looters in the camp at #6. They're easily defeated.
One of the tents has Camping Supplies, but I'll save them for later.
A patch of mud near the camp has the Readceran Standard Piece. Eder becomes convinced that it can reveal what happened to his brother. If the protagonist was herself a Cipher, or had Grieving Mother been in the party, I would be able to have the divination done then and there. But as it is, I'll have to wait until I can get back to the Hadret House.
Sleafhota
A group of Glanfathan led by Sleafhota will be at #9. You can either attack them at the outset with an Aggressive option (like Zakara), or speak with them and avoid hostilities. If you're intent on entering the ruins without fighting them, you'll need to leap over the chasm at #7 to reach the entrance at #8. That route can be suboptimal though, since any characters with lower ranks in Athletics may end up with injuries.
The good party speaks with them, but then starts a fight by getting too close. The fight is won easily enough. Now I rest up and using the Camping Supplies from #6.
The entrance to the first level of the ruins is at #10.
Sura's Supper Plate
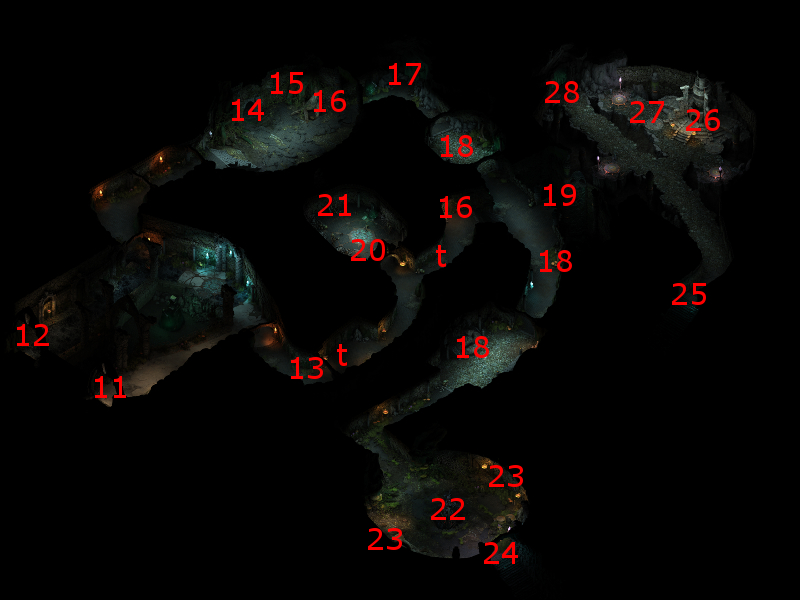
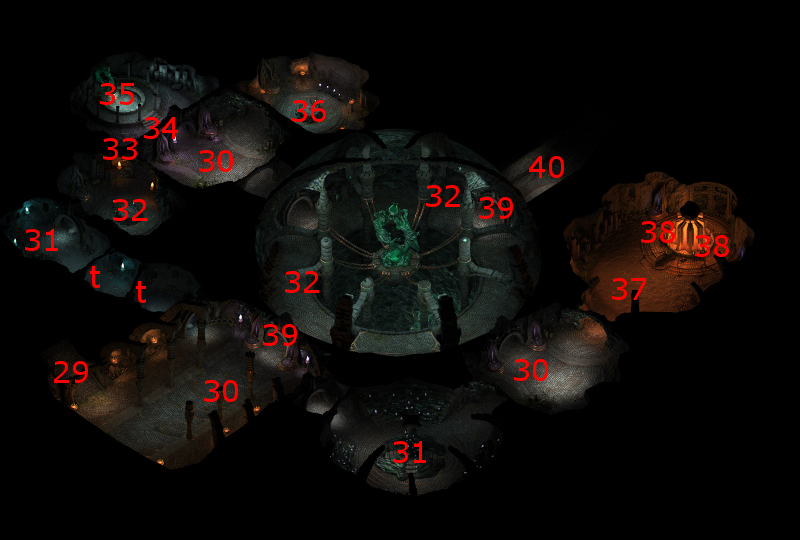
I start off at #13 on the map of the first floor of the Cliaban Rilag ruins. There will be the odd Troll wandering about, which will be easy enough to deal with. There is also the odd trap I need to disarm.
At #20 will be a group of Animats that I kill off quickly. At #21 is a Small Shield called Sura's Supper Plate. Devil of Caroc equips it for the rest of the game. It provides decent enough Deflection, especially when enchanted further. The Retaliation feature can help her wear down her enemies as well, especially in conjunction with a Combusting Wounds from Sagani's Ring of Searing Flames.
Corrupted Druids
Now I go clockwise around the tunnel that forms a perimeter for this level of Cliaban Rilag. I fight plenty of monsters along the way, like Trolls and Slimes of various sorts.
I occasionally run into Pwgras, Menpwgras and Corrupted Druids. My initial strategy is to go forward as fast as can to close the distance on them as much as possible. Also, I keep an eye out if any of them are casting any Insect Plague type spells. If I notice any of them are, I prioritize them for something like shots from Sagani's Stormcaller (with the possibility of Stunning) or Grieving Mother's Silent Scream. Those spells can damage the party significantly, especially if the party is hit by multiple instances of them. I did manage to make it towards the southeast corner with minimal damage.
Spores in Cliaban Rilag
A room at #22 is particularly dangerous. It has several Sporelings that can knock characters Prone, a few Dank Spores or Swamp Spores that can Charm or Confuse or Dominate enemies, and is littered with traps.
I have a simple way of dealing with it. Devil of Caroc can detect and disarm traps as she moves forward. And as a Construct, she just so happens to be immune to Charm and Confusion and Dominate.
I send her ahead, and should she encounter any groups of Sporelings, she simply lures them back to the rest of the party, and away from the stationary Spores, for slaughter.
She edges carefully forward after each battle, disarming any traps she finds. Should she come across a Spore, she stands still and takes only minor damage from an individual Spore. Sagani, meantime, safely kills the Spore at a distance and from behind Devil of Caroc. I repeat the process on each Spore, taking care of any traps along the way, until the room is clear. The stairs at #24 leads to the next level of the ruins.
*Note* If you don't have an immune character like Devil of Caroc, there are thematic variations for the approach I've outlined. For example, you can have the character with the highest Will defense in the party combine an item that provides defense bonuses against Charm or Confusion or Dominate (e.g. the Hand and Key armor), and an item that provides a bonus to the Will defense (e.g. a Ring of Protection. A modal spell or ability that provides additional defenses (e.g. the Chanter's At the Sight of Their Comrades Their Hearts Grew Bold or They Shielded Their Eyes 'Gainst the Fampyr's Gaze) couldn't hurt either. The character could then perform the same function as Devil of Caroc had for me.
Engwithan Key
I start off at #29 on the map of the second level. I go west along the hallway, and disarm a couple of traps. I also easily fight my way through Animats and spirits in the hallways at the west side of the level.
In a pool at #35 is the Engwithan Key.
*Evil* The Core
Here I show the perspective of the evil party. I continue through the east side of the level. There will be plenty of Animats to fight, along with a few Phantoms along the way. I manage to dispatch them rather easily.
I have to fight several Animats led by an Adra Animat at #37. I manage to win this fight rather easily as well. The Adra Animat leaves behind an amulet called The Core. I hold onto it for now. My intention is that Zakara will wear it once she finds a ring that provides a Might bonus.
Rain Blights
The Engwithan Key opens doors at spots marked #39. There will be pairs of Rain Blights at spots marked #32, whom I kill off easily.
The stairs at #40 lead back up to the first level of Cliaban Rilag.
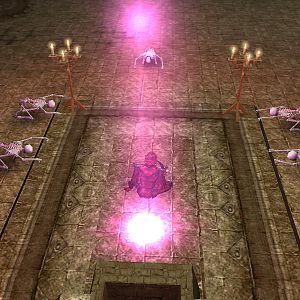
Ashen Effigy
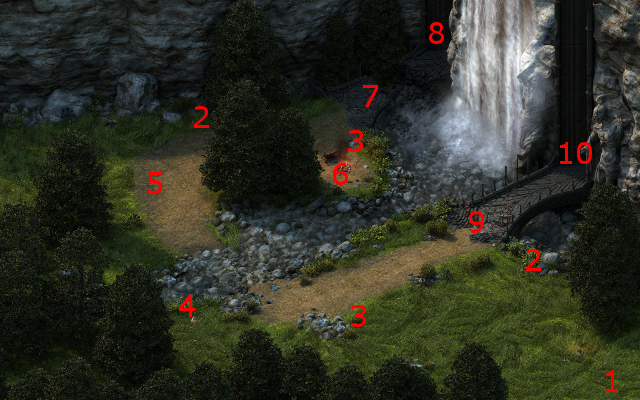
I emerge at #25 on the map of the first level of the ruins. At #26 is another Engwithan soul machine. At #27 is an Ashen Effigy. Alliria uses her Watcher powers on it to learn that several such machines have been used throughout the Dyrwood in order to harness soul energy. This revelation also progresses the quest called Through Death's Gate.
Rose of Salthollow
Clicking on the opening at #28 prompts a scripted interaction whereby you could swim straight through to #14. The scripted interaction also offers an opportunity to investigate a glimpse of light emanating from a side tunnel. Alliria makes the required Constitution check of 16 to successfully reach the other end of the tunnel and obtain a Morning Star called The Rose of Salthollow. It is a two-handed weapon that both inflicts extra Corrosive damage, and also recoups Endurance for its wielder with each hit. I cannot fit it into my own plans though, so I'll end up selling it.
*Evil* Eder easily makes the Constitution check.
Drakes Attack
No sooner does the good party rest at Caed Nua than an attack led by Drakes is headed for my Stronghold. I have Alliria, Kana and Devil of Caroc charge the enemy. Grieving Mother hits the mass with Phantom Foes and then charges. Sagani and Ituumak team up to take down the Xaurip High Priest. Hiravias positions himself, and then catches as many enemies as possible with Relentless Storm. He follows up with Moonwell. Victory soon follows, although I do have to replace my Vagabond Skald hireling.
Gafol the Drunkard
Now I rest up until I get a visitor, Gafol the Drunkard. Alliria gives him 1,200cp to help him clear his debts, and thereby earn a minor increase in positive reputation with Dyrford Village.
*Evil* Lavender Wreath
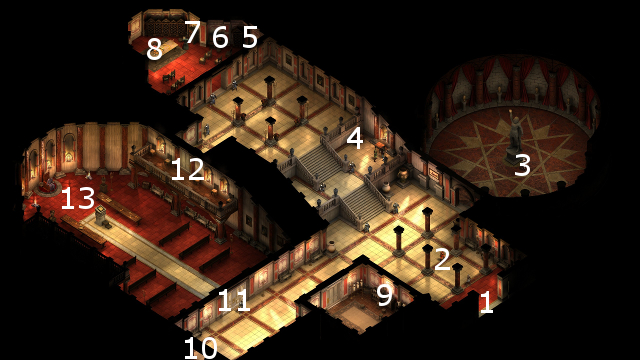
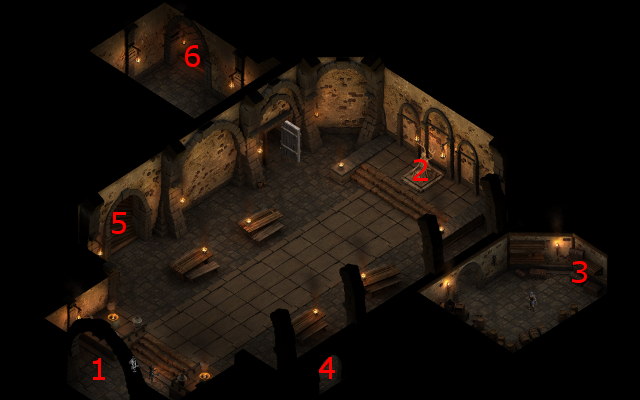
The evil party returns to the Great Hall in Caed Nua. Waiting in a chest at #3 will be the Lavender Wreath as a reward for the Lavender and Lye companion adventure. But I have no use for it, so I just sell it off along with the rest of my excess loot.
*Evil* Fragments of a Scattered Faith
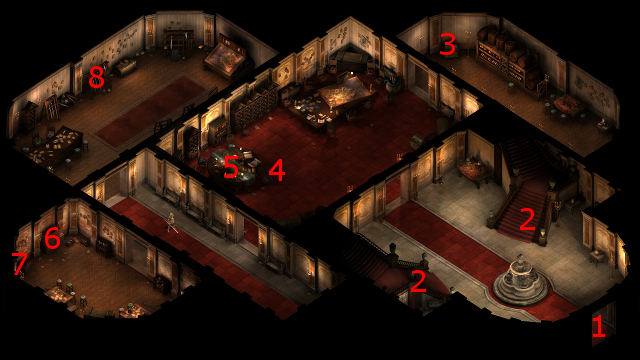
The entrance to Hadret House is at #14 on the map of Brackenbury.
Kurren will be at #4 on the map of the main floor of the Hadret House. I speak to him to conclude Eder's personal quest, Fragments of a Scattered Faith.
Getting a reading from the Readceran Standard Piece requires both Zakara's Watcher powers and the powers of a Cipher together.
Unfortunately for Eder, I can see the moment when his brother joined St. Waidwen but cannot ascertain the motives as to why. I choose Cruel and Deceptive dialogue options whenever possible.
Through Death's Gate
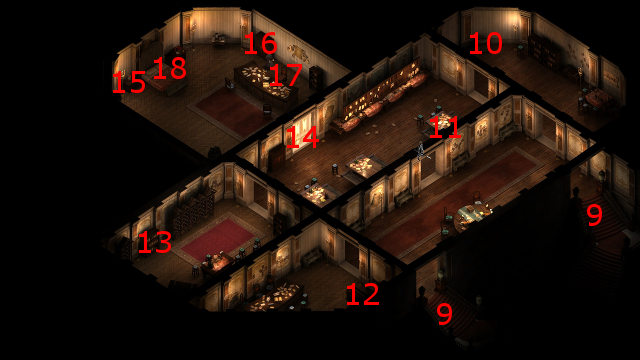
I return to Lady Webb on the second floor, and inform her of my discoveries at Cliaban Rilag. That marks the conclusion of the quest called Through Death's Gate. I have also previously completed The Man Who Waits and Undying Heritage quests, and that in turn means progress for The Hermit of Hadret House quest.
Lady Webb now wants me to attend the upcoming hearings before Duc Aevar, the purpose of which is to determine whether animancy should remain legal in Defiance Bay. She would like me to gain the sponsorship of one of House Doemenel, The Dozens, or the Crucible Knights for purposes of attending the hearings. She is willing to have Dunryd Row sponsor my attendance, but only as a last resort. And for purposes of the game, this last option is available just in case you happened to blow your chances with all of the other three factions.
The Helwax Mold
The good party returns to the Great Hall of Caed Nua. The Blooded Warrior becomes available as a Hireling, and I immediately agree to take him on as he provides +3 Prestige and +2 Security. I now want to pump Prestige as high as possible in order to encourage the merchant named Azzuro to show up at some point.
Waiting in the chest in the Great Hall will be The Helwax Mold. As previously mentioned, it is a reward for The Wax Maker companion adventure.
A character can equip it in one of his or her quick-item slots, and click on it to use it. That action will open the character's inventory screen, whereupon the character can now create an exact duplicate of any item in his or her inventory. If you've added up upgrades to that item beforehand, including Durgan Steel refinement, they will be included in the new duplicate.
My long-term plan for the good party is similar to that for the evil party. The plan is to use it to create an exact duplicate of Alliria's Purgatory sabre, but only after she has fully upgraded the original. And those upgrades will not be realized until the end of Part 2 of the White March expansion.
My ambition is a long way off, so I simply put The Helwax Mold into my stash for now.
The Ducal Palace is the next destination.