Pillars of Eternity logo


Pillars of Eternity Online Walkthrough by David Milward


INTRODUCTION & ABOUT  |  WORLD MAP  |  WHITE MARCH MAP
General:  
Quests  |  Tasks  |  Bounties  |  Items  |  Characters
Areas:  
Act 1 Areas  |  Act 2 Areas  |  Act 3 Areas  |  Act 4 Areas  |  Caed Nua  |  White March - Part 1  |  White March - Part 2  | 
Disable all ads!

Quests:   Main Quests  |  Act 1 Side Quests  |  Act 2 Side Quests  |  Caed Nua Side Quests  |  Act 3 Side Quests  |  White March Part 1 Quests  |  White March Part 2 Quests  |  Companion Quests  | 

Main Quests:   A Moment's Respite  |  Ruins of Cilant Lis  |  The Gilded Vale  |  Visions and Whispers  |  The Old Watcher  |  Never Far from the Queen  |  Undying Heritage  |  Through Death's Gate  |  The Man Who Waits  |  The Hermit of Hadret House  |  The Assassin at Large  |  Council of Stars  |  Court of the Penitents  |  Memories of the Ancients  | 

The Man Who Waits

  1. The prerequisite is to complete the Never Far From the Queen quest.

  2. Brackenbury

  3. The entrance to the Sanitarium is at #16 on the map of Brackenbury.

  4. Sanitarium, Main Floor

  5. You start off at #1 on the map of the first floor of the Sanitarium.

  6. Head Warden Ethelmoer is a soul encased within a statue, and he's at #3. It won't take much to convince him that the Leaden Key may be trying to infiltrate the Sanitarium, and for him to give you limited permission to investigate further downstairs.

  7. The stairs down to the basement are at #13.

  8. Sanitarium, Basement

  9. You start off at #14 on the map of the second floor of the Sanitarium.

  10. Moedred will be at #18. He'll indicate that Caedman Azo is in charge of the experiments on the patients in the North Ward.

  11. A locked chest at #19 has the following:
    They provide clues that suggest at least one or two of the patients in the North Ward are relevant to the quest.

  12. Azo's lan assistant, Riply, is at #20. She unwittingly lets on that Caedman Azo is conducting experiments on the patients in the North Ward.

  13. The bookcase at #21 has the Note from Azo, which suggests that Caedman Azo is deliberately bypassing official channels to conduct his experiments.

  14. The door at #22 will not open unless you first obtain permission from Head Warden Ethelmoer on the first level to investigate the North Ward.

    Simply head back upstairs and speak to the Headman again. Getting the permission you need is as simple as letting on that Caedman Azo is performing experiments on the patients, which were supposed to have been suspended. Once you get the permission, the Guards will have opened the door for you.

  15. The room at #23 will be filled with Patients and Flesh Constructs. One patient here, Freyol, will be able to offer information on Caedman Azo's motivations.

  16. Caedman Azo is at #26. At some point you'll need to get his permission to access the North Ward. When you ask him for permission, any reply besides "you had best cooperate" will suffice to get the North Ward Key. Even if you seemed to have blown it with the 'cooperate' dialogue option, you can simply speak to him again and select a different dialogue option to get the Key.

    The North Ward Key will open the door at #28.

  17. A Patient named Gram is at #29. Aggressive replies, as well as a Perception check of 13, are possible during the conversation. He will clue you in that it's Uscgrim (at #30) that you need to speak to.

  18. Uscgrim
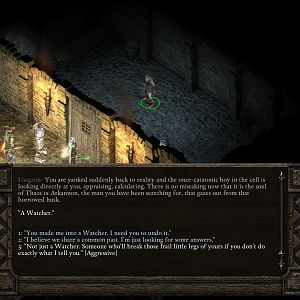
Uscgrim is at #30. Speaking to him at length will reveal that is body has been taken over by the same Older Robed Man who activated the machine in Cilas Lint. The Man will recognize you as a Watcher, and thereafter take control of the Flesh Constructs. The Constructs in turn will open every cell door that had previously held back a violent Crazed Patient, as well as the Wicht pen at #32. That in turn means you'll have to battle every Flesh Construct, Crazed Patient and Wicht on the floor.

    The Flesh Constructs and Wichts will leave behind Vessel Flesh when killed. The Crazed Patients leave behind Clubs, Hoods and Simple Clothing when killed.

  19. If you like, you can confront Azo over what he was doing to the Patients. You can either agree to keep his secret, or threaten to expose him, in which case he'll attack you. If you kill him, he leaves behind Azo's Research Journal and North Ward Patient Record: Gram.

  20. Now head back upstairs. Ethelmoer will obviously want to know what the disturbances downstairs were about. He'll accept your explanation and be thankful that you spared the Sanitarium significant embarassment.

    If you have previously killed Azo, he'll think no more of it and thank you again.

    If you left Azo alive, you have three possible replies in response to Ethelmoer's query. The first two will allow Azo to remain in the Sanitarium to do his research, but under tighter supervision. The third response results in Azo's expulsion from the Sanitarium. However things shake out, the quest is now complated.

  21. If you had completed this quest before either the Undying Heritage or Through Death's Gate quests, then a Messenger of the Dunryd Row will speak to you in Brackenbury once you leave the Sanitarium. The dialogue will trigger the The Hermit of Hadret House quest.


Amazon.com
Amazon.ca
Amazon.co.uk
Sorcerer's Place is a project run entirely by fans and for fans. Maintaining Sorcerer's Place and a stable environment for all our hosted sites requires a substantial amount of our time and funds on a regular basis, so please consider supporting us to keep the site up & running smoothly. Thank you!

Disable all ads!