-

- Forums
- Chatrooms
- Gallery
- Gameplay Videos
- Upload
- Articles
- Mod Reviews
- Shop SP: Games, Movies, Books
|
|
Crucible Keep
As previously mentioned, the good party does this immediately after the Salty Mast, while the evil party will wait until after doing all quests and tasks originating in Brackenbury.
Justiciar Aldmar
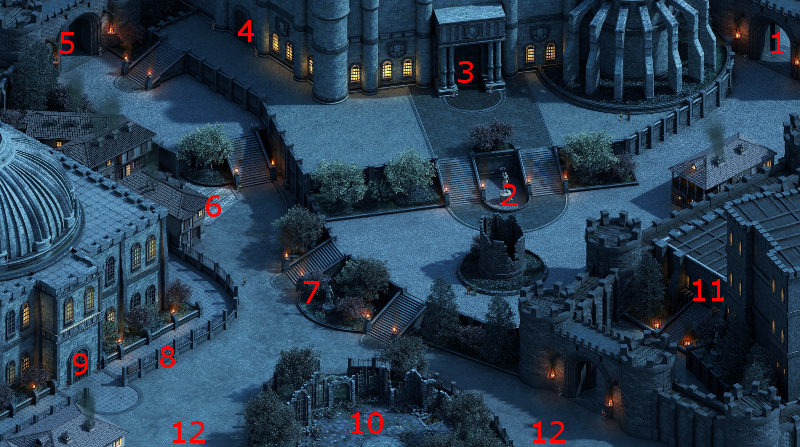
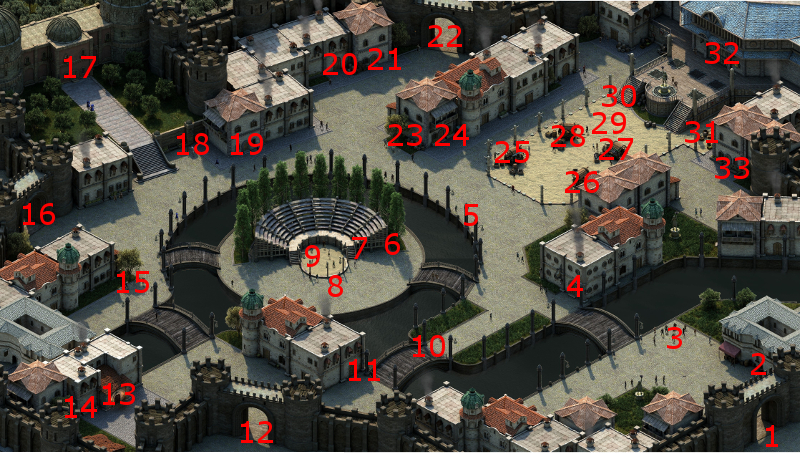
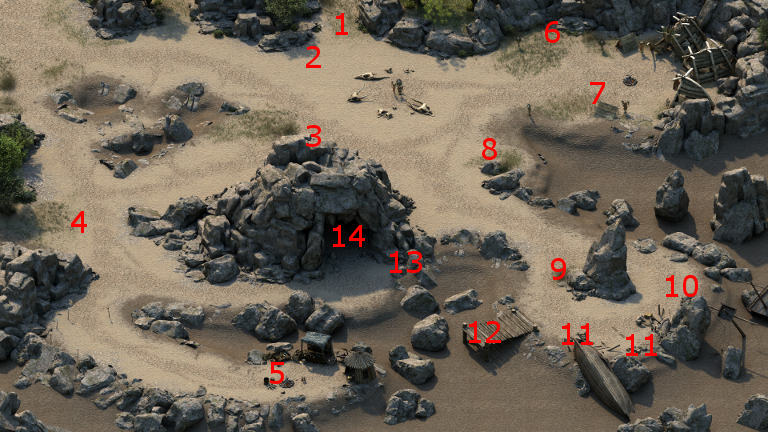
The entrance to Crucible Keep is on #11 on the map of First Fires.
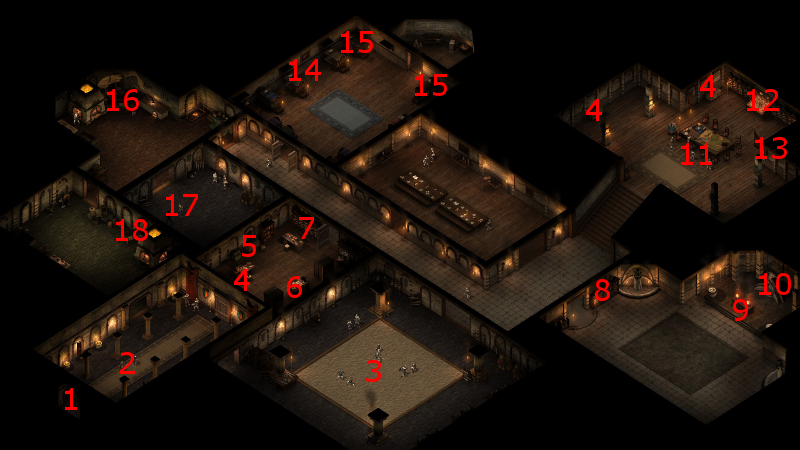
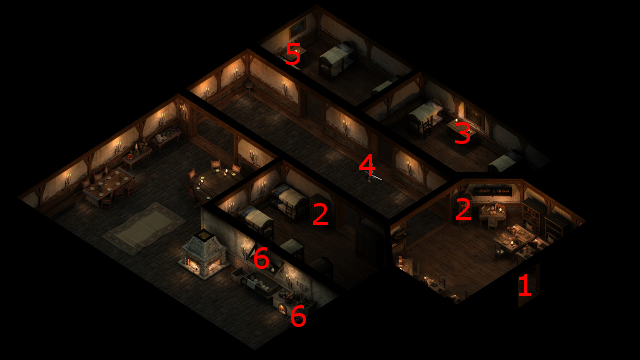
The party starts off at #1 on the map of Crucible Keep. Justiciar Aldmar is at #2, and I speak to him for a bit to get some background information on the Knights themselves.
Wyla
Wyla will be at #3. I speak to her and agree to investigate the disappearances of her men in Heritage Hill. This conversation triggers the Missing Sentries task.
The video concludes with the party leaving the Keep and making its way to the Heritage Hill district.
Heritage Hill Gate
I start off at #1 on the map of Heritage Hill. A couple of Justiciar guards will be manning the gates at #2. I could offer a bribe, or make a Might check of 18 that increases Aggressive disposition, in order to convince them to let me through. However, since I've already accepted the Missing Sentries task from Wyla, it's easy enough to drop her name.
There will be several Skeletons to the west. I send Alliria ahead to take all of them down by herself besides a lone Skeleton Wizard. I then let the Wizard knock her unconscious at a distance. The Second Chance power from her Ring of Wonder triggers, and brings her that much closer to the last upgrade for her St. Ydwen's Redeemer. It's easy enough to finish off the last Wizard once she revives.
I rest up and then grab the Camping Supplies from the crate at #10. A hidden cache near #14 has a random scroll and some coins.
Spellward Amulet in Heritage Hill
The party continues north along the eastern edge of Heritage Hill. They sometimes have to fight their way through hordes of undead, but they're little trouble by now. A vault at #4 has a Spellward Amulet, which I don't have any use for. The party eventually makes it way to the door to a crypt at #5.
Leyra
Once inside, I have Alliria remove her armor. I also position the armored party members against the south wall of the crypt. I send Alliria to converse with Leyra, who has become a Cean Gwla. The conversation ultimately leads to her and her undead Novitiates attacking the party. My plan succeeds in that most of them gang up on Alliria, just as I hope. The odd straggler goes after the rest of the party. I kill it off, and head to the north side of the crypt.
I wait until Alliria gets knocked unconscious and then gets revived by the Second Chance power of her Ring of Wonder. After that, Hiravias keeps her protected with a Beetle's Shell spell. The rest of the party finishes off what remains of the enemies.
Alliria has now obtained the last upgrade for St. Ydwen's Redeemer. Its quality enhancement has been raised to superb, and it now allows Alliria to use Revive the Fallen once per rest.
The video concludes with Alliria putting her armor back on, and the party returning to First Fires.
*Evil* Leyra
The evil party wins this battle somewhat differently. Durance begins a sequence of Prayer Against Imprisonment, Circle of Protection and then Salvation of Time.
The Prayer Against Imprisonment serves to immunize the party against Leyra's paralysis power.
However, there is no spell that will immunize multiple party members against Stunning (Litany Against Major Afflictions can only be cast on a single character). That's the reason for the Circle of Protection, to at least relatively improve the party members' chances against getting Stunned.
Sometimes you just don't have a target with beneficial buffs in place to use Spelltongue. In that instance, Durance can now cast the Salvation of Time spell to extend his spell buffs by an extra 10 seconds.
Once everything is in place, it's a matter of cutting them all down. Leyra managed to injure the party quite a bit with her Silent Scream power, so Durance ended up having to cast Consecrated Ground just to ensure the party can outlast the enemy.
Missing Sentries
Now I go back to the Keep and inform Wyla of the fate of her soldiers, and Leyra, to complete the Missing Sentries task. I get rewarded with 1,000cp and a moderate boost to reputation with Defiance Bay.
Edict of Arrest
There is an Edict of Arrest on the table at #6. Taking it triggers the Unwanted task. I now make my way to Copperlane.
Unwanted
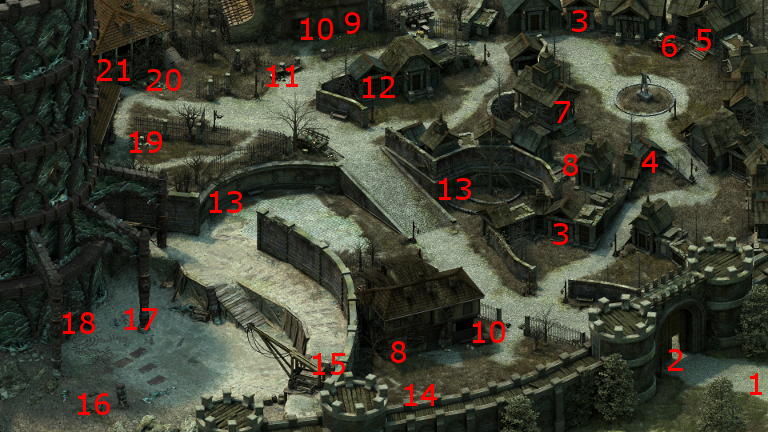
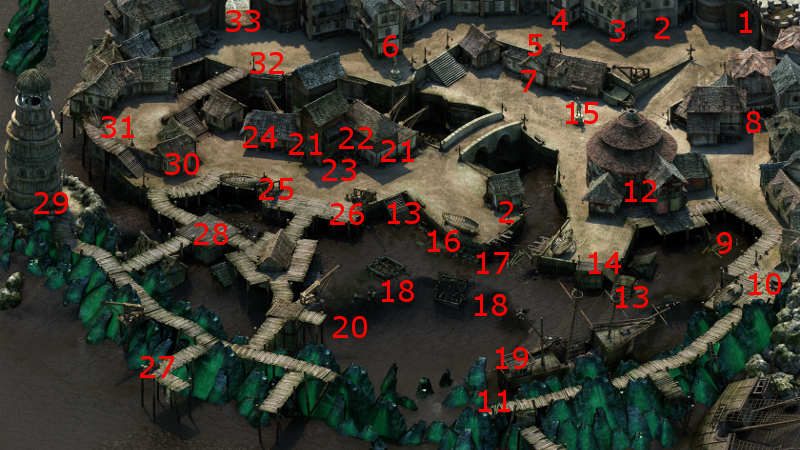
The entrance to the Catacombs is at #13 on the map of Copperlane.
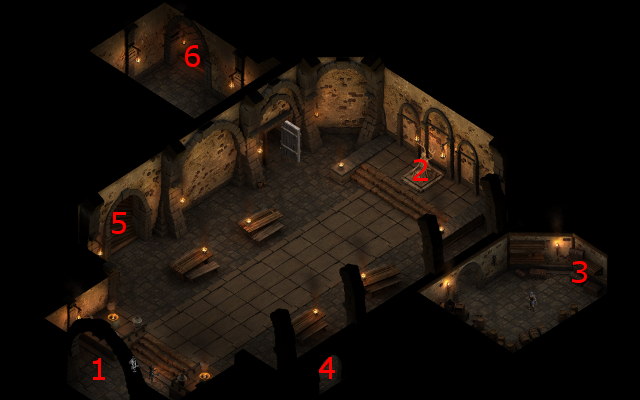
Eorn will be at #8 on the map of the Catacombs. I could imprison him in my Dungeons, but that would not result in any real rewards.
Alliria chooses to give him 300cp, so that he can safely get himself out of Defiance Bay. He gives me the Rabbit Fur Gloves and departs for Dyrford Village. A result is a minor gain of reputation with Dyrford Village. This course of action marks the completion of the Unwanted task. The evil party shows other ways to complete the task (as below).
The good party now rests up, grabs the Camping Supplies from the crate at #9, leaves the Catacombs and returns to First Fires.
*Evil* Eorn
Zakara selects the Cruel option so as to kill Eorn, with every intention of collecting the reward for his arrest. Eorn leaves behind a Fine Hide Armor and Rabbit Fur Gloves. Zakara wears the latter as interim gloves, since the bonus to Critical Hit Modifier will be useful for her fighting abilities.
*Evil* Unwanted
Zakara returns to Justice Aldmar and collect a 250cp reward from him for the murder of Eorn.
Note that another way of accomplishing the same result would have been to leave Eorn alive in the Catacombs, reveal his location to Aldmar to collect the monetary reward, and then return to where the formerly living Eorn once was to collect his items as well.
Commander Clyver
I speak to Commander Clyver, who's at #11 on the map of Crucible Keep. He wants me to ascertain the whereabouts of an Animancer named Vianna and her research. This conversation triggers the Built to Last quest. I make my way to Copperlane.
Scriveners' Dormitory
The entrance to the Scriveners' Dormitory is at #19 on the map of Copperlane.
The party will now be at #1 on the map of the Scriveners' Dormitory. Coren will be at #4. He'll drop the hint that Vianna was going to meet somebody named Clessia in Ondra's Gift. He also sells quite a few plants if you're interested, including several drugs (e.g. Ripple Sponge, Snowcaps, Whiteleaf) that have side effects.
The drawer at #5 has Vianna's Diary, which indicates that Vianna was planning to meet Clessia in a house on the north side of Ondra's Gift. The video concludes with the party making its way to Ondra's Gift.
Vianna's Research
Vianna can be found in the house at #6 on the map of Ondra's Gift. She's being held captive in a room on the north side of the west, and through a door to the left, by several Dozens led by Dodwynna. The fight isn't difficult, especially after Hirivias casts both Relentless Storm and Moonwell. Be careful to avoid hitting Vianna herself with any offensive damage spells though, as she will go hostile.
Dodwynna's body can be looted for both Vianna's Research, which is needed for the quest, and a Brigandine armor called Aru-Brekr. Hiravias wears the armor on an interim basis.
Now I make my way back to First Fires.
Built to Last
I inform Clyver that I found the research. He advises me to give it to Dunstan.
Dunstan can be found at #16 on the map of Crucible Keep. I give him the research, and so he begins to build the Forge Knights despite his misgivings. The event marks the completion of the Built to Last quest.
Dunstan
Now I check out his wares. The one item of interest is a pair of boots called Shod-In-Faith, which I purchase for Grieving Mother. I've built her around using two-handed weapons in order to maximize her Focus build up with each blow. Doing so comes with the risk of a low Deflection score. However, I can take the edge off of that drawback by equipping her with these boots, which will activate Consecrated Ground when she's struck with a Critical Hit (once per Encounter). The fact that her Deflection will be low will make the triggering of Consecrated Ground a very frequent occurrence, improving not just her own resiliency but the rest of the party as well.
*Evil* Zahua gets Shod-In-Faith in the evil party. And for similar reasons. And indeed Monks rely on taking damage to be able to use many of their powers, so it makes sense to give him an item that will activate Consecrated Ground whenever he's struck with a Critical Hit. It's like getting the frills and with less spills so to speak.
Ifen's Candle
The good party now returns to the Great Hall of Caed Nua. Waiting in the rewards chest, along with numerous other miscellaneous items, will be Ifen's Candle. It is a reward for the St. Ifen's Knot companion adventure.
I have Kana hold onto it. It has the power to suppress the beneficial effects of enemies only with a large radius of the user, but only has 5 uses in total before disappearing. That power may nonetheless come in handy during certain battles.
The video concludes with the party returning to First Fires.
*Note* Alliria decides to end her involvement with the Crucible Knights at this point, since she is going to ally herself with House Doemenel. Zakara, however, continues on and has decided to throw her lot in with the Knights, as described below.
*Evil* Copy of Vianna's Research
Zakara speaks to Clyver again, who has another job for her. He gives her a Copy of Vianna's Research, with the intention that she deliver it to a courier in Anslog's Compass. But first ...
*Evil* The Helwax Mold
Zakara first returns to the Great Hall of Caed Nua. Waiting in the chest at #3, along with numerous other miscellaneous items, will be The Helwax Mold. It is a reward for The Wax Maker companion adventure.
The way the item works is for a character to place the item in one of his or her quick-item slots, and click on it to use it. That action will open the character's inventory screen, whereupon the character can now create an exact duplicate of any item in his or her inventory. If you've added up upgrades to that item beforehand, including Durgan Steel refinement, they will be included in the new duplicate.
My long-term plan is to use it to create an exact duplicate of Zakara's Bittercut sabre, but only after she has fully upgraded the original. And those upgrades will not be realized until the end of Part 2 of the White March expansion.
My ambition is a long way off, so I simply put The Helwax Mold into my stash for now.
*Evil* Aranroed
Zakara now travels to Anslog's Compass. The courier, Aranroed, will be at #12. Aloth sets a Noxious Burst trap somewhat north before I actually speak to her.
I next give Aranroed the Copy of Vianna's Research. A force of The Dozens, led by Padebald, shows up immediately thereafter. It's a very easy fight at this point, which I win in short order.
*Evil* Forge Knights
The evil party returns to the Crucible Keep, only to find the Crucible Knights in pitched battle against the newly created Forge Knights that have turned on them. Progressing the quest requires killing off all of the Forge Knights in the Keep.
Don't worry about any of the Crucible Knights dying. There's no in-game consequence for using them as expendable meat shields to hold up some of the Forge Knights so as to make things easier for yourself. I still have to have Durance use Consecrated Ground once in a while (i.e. when I'm getting attacked by enough of them at once) to make sure I outlast a given group of them.
*Evil* Eder on the Shrine of Abydon
I have by now uncovered every corner of Crucible Keep, including the Shrine to Abydon at #10.
Eder will now want to speak to Zakara about that Shrine, as well as what he perceives to be hypocrisy on the part of the Knights of the Crucible. Any dialogue choices you might elect will not have any in-game consequences.
*Evil* Winds of Steel
Zakara now speaks to Commander Clyver again, where upon she receives a few rewards.
Two items that she receives are the sword named Shame or Glory, and a Crucible Plate Armor, but I have no use for either.
My other reward is a talent called Second Skin, which adds +2 Damage Reduction that will stack with other sources of Damage Reduction. That is one reason why Zakara prefers an alliance with the Knights of the Crucible. More damage reduction enhances the efficacy of her Battle-Forged power when it becomes necessary.
The other reason for my choice of alliance is a roleplaying one. The dialogue offers me a chance to either talk Commander Clyver out of going further with the Forge Knights project, or encouraging him to see it through and improve it. Zakara chooses the latter, and the epilogue will reveal that she has given Commander Clyver her blessing to establish a Lawful Evil tyranny over Defiance Bay.
For either the good party or the evil party, the Vailian Embassy is my next stop.