-

- Forums
- Chatrooms
- Gallery
- Gameplay Videos
- Upload
- Articles
- Mod Reviews
- Shop SP: Games, Movies, Books
|
|
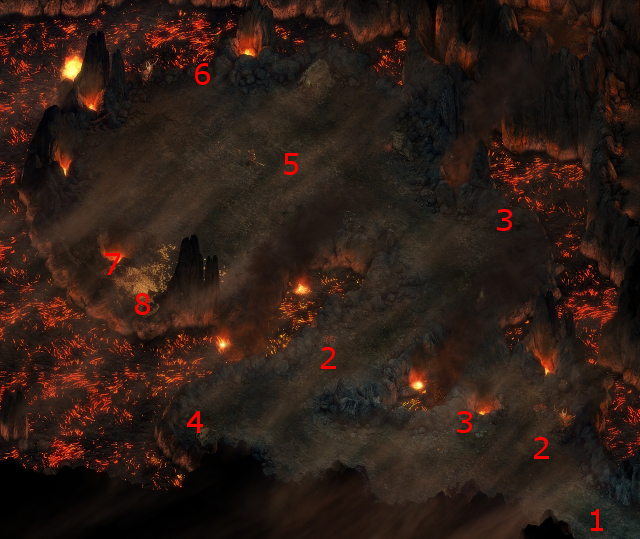
Searing Falls
Sidly
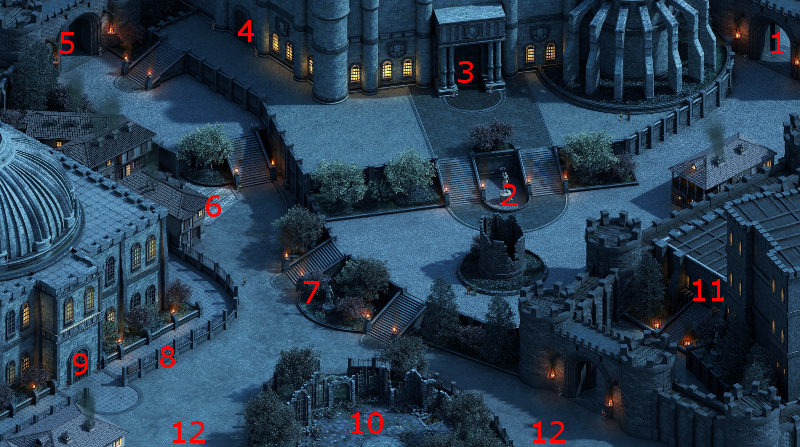
The entrance to the Ducal Palace is at #3 on the map of First Fires.
I start off at #1 on the map of the Ducal Palace. I speak to Sidly at #2, who's only too happy to provide background information on the Palace and city politics.
*Evil* Fyrga
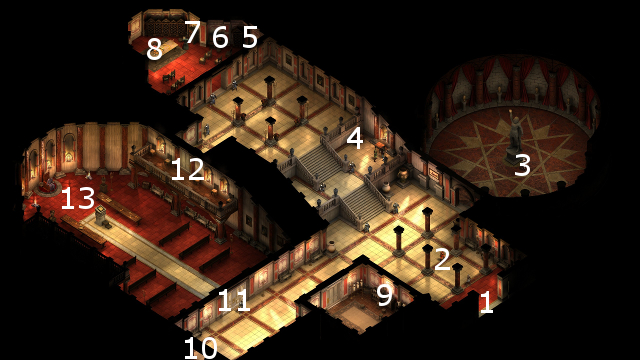
I show this part from the perspective of the evil party. Fyrga can be found in the Shrine of Magran at #3. She wants the party to find an object with which she can keep the flames of Magran in the Shrine perpetually lit. This conversation triggers the Cinders of Faith quest.
It turns out that Durance has plenty to say about what he perceives as Fyrga's unworthiness to be a Priestess to Magran.
The video concludes with my return to Caed Nua. Once there, I rest until it's about late Day 17 on the calendar month. The intention is to reach a certain container on the drop list on Day 19.
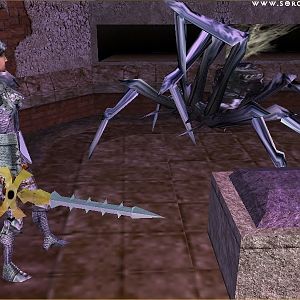
Drakes, Flame Blights and Xaurips
There will be numerous Younger Drakes, Flame Blights and Xaurips scattered throughout the Searing Falls. They are often led by larger full Drakes as well. The strategies can vary depending on the situation.
Alliria will often tag the most dangerous enemy (e.g. full Drake, Xaurip High Priest, etc.) at the start of the fight. If she considers the fight intense enough, she may protect Hiravias and/or Devil or Caroc with Reinforcing Exhortations. She also uses her Flames of Devotion on her Sworn Enemy once she closes in on it.
Grieving Mother's tactics depend on the numbers. If the numbers are large enough, she'll start right away with Ectoplasmic Echo on an ally, and then relocates herself so that the beam catches as many enemies as possible between herself and her ally. If it's just one or two enemies, she'll take a swipe or two to build up Focus, and then use Silent Scream.
It's a rare fight that goes long enough to warrant this, but one particularly intense fight saw Kana accumulate four Phrases (even though he's now using a modal with slower and higher-level phrases) with plenty of enemies still fighting. He therefore unleashed his Paralysis wave to hold them still and assure victory.
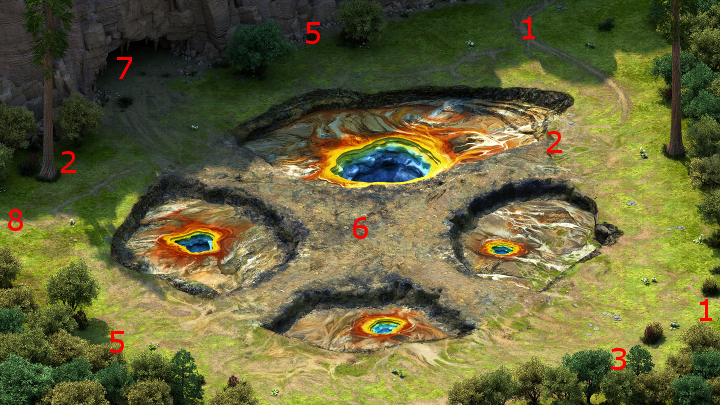
The entrance to the Searing Fall Cave is at #7 on the map of the Searing Falls.
*Evil* Xaurips and Blights
I start at #1 on the map of the Searing Falls Cave. Here I show the perspective of the evil party, partly because Durance provides an interesting observation about the cave itself to start the video.
The walkways in this cave are pretty narrow, enough to provide chokepoints at which Aloth can plant traps ahead of time. I then send Eder or Zakara ahead to lure the Xaurips and Blights over the traps before battle gets locked in for real.
The fights themselves are not particularly difficult. Note, however, that Aloth is for now avoiding the use of Kalakoth's Minor Blights. The reason is that he is pursuing the last upgrade for his Gyrd Haweanes Stenes scepter, which requires that its Dominate effect succeed on at least 15 targets.
There will be a random scroll plus Camping Supplies at #4. So first I wipe out any Xaurips and Blights on the south side of the cave. I next set up camp, selecting the Accuracy vs. Beasts resting bonus in anticipation of the next battle. After that, I grab the Camping Supplies to recoup what I had just expended.
*Evil* Cail the Silent
I show again the evil perspective for this part. An enormous fire-breathing Drake named Cail the Silent will be at #5, along with a few smaller Drakes and many Xaurips. Zakara and her companions stop themselves at the bottleneck south of where Cail and his minions will be waiting.
Aloth plants a Chain Lightning trap just north of the bottle neck, while Durance plants a Warding Seal a little north of Aloth's trap.
Zakara runs ahead to get Cail's attention, and selects the Clever option to start a battle. She doubles back immediately.
Durance initiates an extended sequence of Watchful Presence, Devotions for the Faithful, Consecrated Ground, Circle of Protection, Salvation of Time, and then Interdiction. Recall that Salvation of Time will add an extra 10 seconds to the previous buffs.
Aloth initiates an extended sequence of Eldritch Aim, Chill Fog, Pull of Eora, Malignant Cloud, Essential Phantom, Merciless Gaze and then Kalakoth's Minor Blights. The Essential Phantom is always handy as an extra attacker that inflicts Shocking damage. He starts to bomb away once the sequence is complete.
Zakara tags Cail with Sworn Enemy, and immediately targets it for two Flames of Devotion. She and Eder manage to wear Cail down. After that, it becomes a mop up.
The quest item that I need from Cail's corpse is the Burning Stone. Simply taking it into my possession prompts a dialogue from Durance, who recognizes it as a piece of the Godhammer and by extension a sick practical joke on the part of Magran.
Tidefall
The good party goes into scouting mode, and finds a hidden niche at #8 (you need a high Mechanics skill check to find it). The niche itself has a Greatsword called Tidefall. Grieving Mother uses it as her main weapon for the rest of the game. The best option for a Cipher to build up Focus is through the use a of a two-handed weapon that inflicts more than one kind of damage (e.g. both Piercing and Slashing) in case she runs into a foe that's resistant to one of those types of damage. The ability to recoup Endurance with each hit (and the more damage the better) helps make her less vulnerable as a damaging-dealer that isn't using a shield. The Wounding power makes the weapon even deadlier. I add the Burning Lash enchantment, partly because it fits the location I found it and the backstory. I added the Spirit Slaying enchantment. The idea is that spirits can often teleport to try and reach Sagani, so Grieving Mother will often act as a rearguard on occasions.
*Evil* The blade is definitely a powerful one, but I just couldn't fit it into my plans for the evil party.
However, my plan of arriving here come Day 19 on the calendar month has been realized. The container at #6, which holds an item from the "Searing Fall" section of the Random Drop List, now has a Girdle of Eotun Constitution. Zahua wears it as an interim belt for the time being. Recall that many of a Monk's powers depend on sustaining damage. Any item that provides a substantial boost to Constitution, which by extension means more Health and Endurance, is certainly welcome.
*Evil* Enchanting Resolution
Zakara and company stop off at the Salty Mast. Recall that I found a Ruby earlier in the Searing Falls Cave. I now add the Exceptional Quality enchantment to her Resolution sabre. I also add the Kith-Slaying Enchantment to it as well. The reason Kith-Slaying takes up four enchantment slots is that Kith will be your most common enemies. And yet the ingredients for the enchantment are very common, so I don't mind adding it to weapons that I'll be using on an interim basis.
I likewise add the Kith-Slaying enchantment to Maneha's Hearth Harvest Hatchet.
The video concludes with me selling off my excess gear, and choosing the Shiny Pearl resting option for free.
Cinders of Faith
Alliria delivers the Burning Stone to Fyrga. I choose a dialogue response that gives Fyrga positive encouragement to continue her devotion to Magran. This conversation concludes the Cinders of Faith quest.
Fyrga rewards me with an extraordinary boost to positive reputation with Defiance Bay, and a Flail called Unforgiven. Devil of Caroc now uses it as a new interim weapon.
*Evil* Cinders of Faith
Zakara deliberately chooses a response that causes Fyrga to lose her faith in Magran and herself, and to abandon her calling as a Priestess of Magran. Doing so leads to a moderate loss of reputation with Defiance Bay. I still get Unforgiven though.
A major companion adventure now becomes available. I insist on The Celebrant's Dirge adventure. My reasoning is that I figure the The Celebrant's Gloves will make a decent interim gloves for somebody in the party, especially since it will activate the Holy Meditation spell on its wearer getting Critically Hit. I assign Grieving Mother to the adventure.
Where I go next depends on which party. The good party will now begin quests originating in Brackenbury, with the long-term objective of securing an alliance with House Doemenel.
The evil party will have already done those quests, and goes on to the Pearlwood Bluff.