-

- Forums
- Chatrooms
- Gallery
- Gameplay Videos
- Upload
- Articles
- Mod Reviews
- Shop SP: Games, Movies, Books
|
|
Stormwall Gorge
*Evil* Leaving Defiance Bay
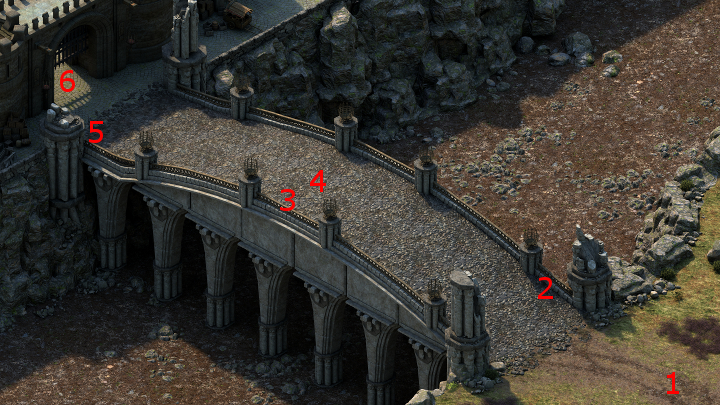
I show this part from the perspective of the evil party. For them, completing The Hermit of Hadret House quest also triggers an average companion adventure. I insist on redoing the dialogue with Lady Webb's spirit until I get the Bound and Buried adventure. The intention is to obtain a belt called the Binding Rope. I intend for Zahua to wear it for the rest of the game.
Once I get the adventure I want, I make my way towards the south end of the bridge. Aloth will want to speak to Zakara about halfway across the bridge. He owns up to his ties to the Leaden Key. I could choose an Aggressive dialogue option that will cause him to leave permanently, but I obviously don't.
The rest of the video consists of questioning Aloth about more of his past, his discoveries regarding Iselmyr, and his past with the Leaden Key. I then make my way to Stormwall Gorge.
Dream and Memory
The good party stops off at Caed Nua first. I rest until Alliria has a vision from Grieving Mother's past. Grieving Mother had apparently as a midwife helped a mother give birth to a Hollowborn child, but then used her Cipher powers to convince the mother that the child was perfectly fine and healthy. That action had apparently disastrous consequences for both the mother and the village, compelling Grieving Mother to flee her village.
I speak at length with Grieving Mother afterwards about the vision. I could select a dialogue option to permanently drive her out of the party, but I obviously don't. I instead choose sympathetic and understanding dialogue choices to ensure she remains in the party. Conducting this dialogue in such a way that she doesn't leave the party for good leads to the successful completion of her personal quest, Dream and Memory.
I rest up some more, for two reasons. One reason is that a Hireling shows up. In this case, it's an Aedyran Nobleman who adds +6 Prestige.
The other reason is that I want it to be Day 1 or 2 of the month once I reach a certain sarcophagus in the ruins Lle A Rhemen, with a view towards obtaining a specific item. Once I hit day 20 on the mon the month, I travel to Stormwall Gorge.
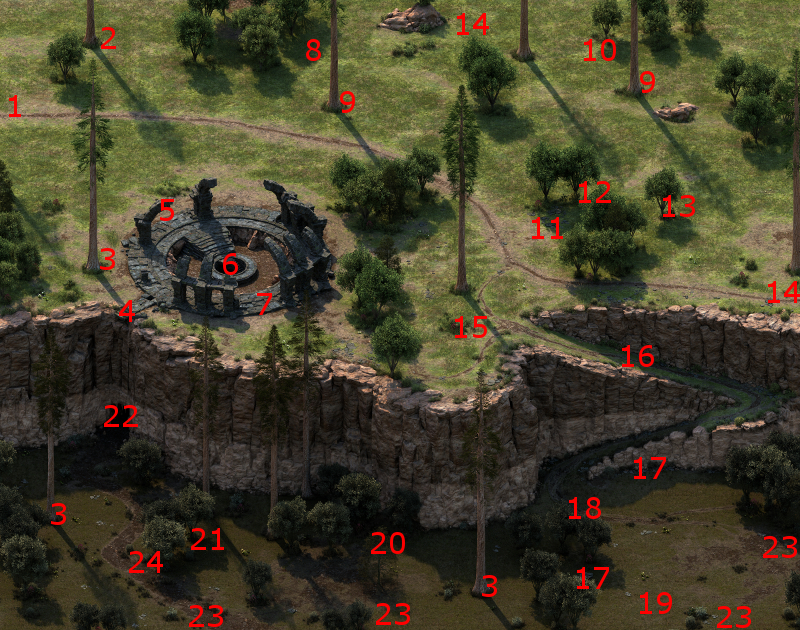
I arrive at #1 on the map of Stormwall Gorge. Grieving Mother wants to speak to Alliria again, with a request that Alliria use her Watcher powers to relieve Grieving Mother of her memories of the Hollowborn child and its mother. As far as I know, there are no in game consequences for any choice you make. Alliria obliges the request.
*Evil* Feral Druids
Zakara speaks with Eder for a bit on arrival, who is clearly disgusted by the riots. The party goes around for a bit in the northwest corner, collecting the odd plant.
A few Feral Druids will be at #8. Keep in mind that I'm trying to do this area and the nearby ruins without Resting, as Camping Supplies are not available here. So as much as possible, if I can win a fight without expending any spells and taking minimal damage to my Health, I'll do it. Here I manage to accomplish it by more or less bull rushing the whole lot of them, and taking only minor damage from their Returning Storms.
Adragan and Lions
A group of Lions led by a Delemgan and an Adragan will be towards the northeast corner. Sometimes you have to play battles by ear. It looks like the Delemgan is going to rush close to the party, so I put Devil of Caroc on her right away. I have Sagani and Ituumak take care of the Adragan. Kana, Alliria and Hiravias form a tank-wall to prevent the Lions from reaching more vulnerable characters like Grieving Mother or Sagani. The battle otherwise takes care of itself.
Leaden Key Wizard
A winding and narrow trail begins to wind and descend from about #15. The area at the end of the trail had been flooded, but can now be explored as of Act 3. At the end of the trail, at #18, will be a few Leaden Key assassins led by a Leaden Key Wizard. I have Sagani, Ituumak and Grieving Mother (with her Crossbow) quickly take out the Wizard. I otherwise let the others come to me and kill them off in melee.
One of the Wizard's minions leaves behind the Girdle of Maegfolc Might. Hiravias wears it for the rest of the game, as it will increase the damage of both his offensive spells and his melee attacks.
*Evil* Leaden Key Wizard
I handle this battle differently with the evil party. Aloth begins with Eldritch Aim, and then a carefully aimed Call to Slumber that will just catch the Leaden Key Wizard at its farthest edge. Call to Slumber is a great way to get the jump on your enemies from the word go. However, there is a risk that the Leaden Key warriors will rush forward and outside the range of Call to Slumber. I therefore send Zakara, Eder and Maneha forward to meet their warriors head on, and keep them within range of Aloth's spell. Once things come off, it becomes a one-sided slaughter.
One of the enemies leaves behind the Girdle of Maegfolc Might. Durance gets it. Increased Might will increase the power of his healing spells, the damage from those few offensive spells that he does cast, as well as his damage during melee combat.
Dank Spores and Slimes
First, I touch the World Map Exit towards the southeast corner in order to open up access to Elmshore.
There will be a couple of Dank Spores and a few Swamp Slimes at #19. I lead the Slimes away from the Spores, and kill them off.
Now I exploit Devil of Caroc's immunity to Confusion and Domination to take out the Spores. Sagani and Grieving Mother help things along with missile fire. Grieving Mother will also use Detonate on a Spore when she's built up enough Focus.
Stelgaers
At #23 will be packs of Stelgaers. Note that damage inflicted by Stelgaers can really add up in a hurry, so in each instance Alliria will use Reinforcing Exhortation on both Kana and Devil of Caroc to enable them to withstand the onslaught as tanks. Grieving Mother will also use Borrowed Instinct once she has enough Focus, to protect herself from harm.
At #24 will be another pack of Stelgaers, but this time led by a Pwgra. The methods are pretty much the same, but with the additional point that Sagani and Ituumak quickly take out the Pwgra before she can get off many spells.
The entrance to the ruins of Lle A Rhemen are at #22. *Note* I'm just a couple of hours away from Day 1 of the month, so I wait it out. The reason being I want to get a certain item from one of the sarcophagi within the ruins.