-

- Forums
- Chatrooms
- Gallery
- Gameplay Videos
- Upload
- Articles
- Mod Reviews
- Shop SP: Games, Movies, Books
|
|
Elm's Reach
Starlit Garb
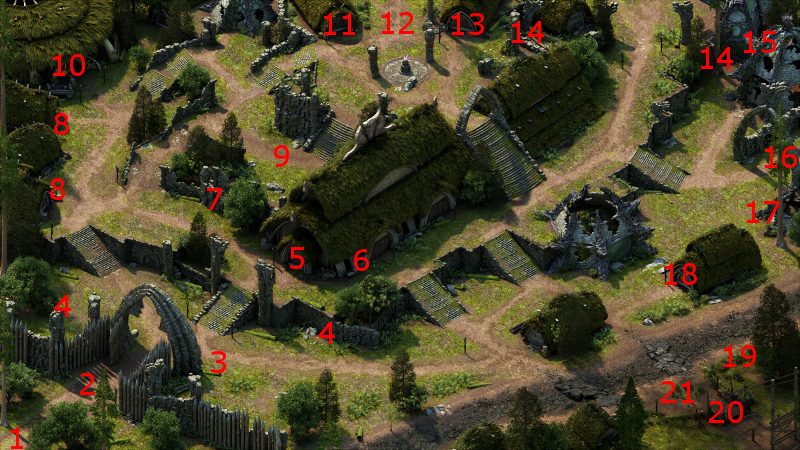
The party starts off at #1 on the map of Elm's Reach. There will be a house at #7. A good enough Mechanics skill will reveal a hidden cache in the house, which has the Starlit Garb.
You can find the Garb in this way, whether or not the Monks told you about it in the course of The Sealed Missive task
Hall of Warriors
The entrance to the Hall of Warriors is at #10.
At the back of the Hall will be the leader of the Three-Tusk Stelgaers, Simoc. He will explain his problem. He does not consider any of his current children to be worthy heirs, partly because they lack strong enough personalities or leadership qualities. There is an Orlan child named Vela who will have those qualities, but is still an infant. The problem is that Vela is a member of a weak tribe called the Fisher Crane. Simoc fears that other tribes won't fear his tribe if his heir is known to have originated from a weak tribe. His solution is to have the child sacrificed at the Blood Sands, and its soul distilled into an essence potion that he can use to produce a worthy heir.
He gives you the Rusty Key so that you can unlock the door to Vela's house. This conversation starts the Sacrificial Bloodlines quest. One way to resolve the quest quickly, if you choose, is to slaughter him and the rest of his tribesmen then and there. One alternative is to refuse him and then work against him, which is the path the good party chooses. Note that his offer is still open, whether you accept it or refuse it at that moment.
I make for the door to the Hall, whereupon his son, Lliras, now confronts me. He wants me to instead procure a poison from the nearby Golden Grove to poison Simoc. Alliria falls in with this request.
*Evil* Hall of Warriors
Zakara falls in with Simoc's request. He gives her the Rusty Key to that end.
She brushes off Lliras' requests, often with Aggressive and Cruel dialogue options, and remains resolute on fulfilling Simoc's aspirations.
Bledha's Poison
Bledha is at #13 on the Elm's Reach map. It won't take much to convince her to give you Bledha's Poison, and the type you choose doesn't matter.
I also bought a few Potions of Major Endurance, a few Potions of Power, and a Sapphire. The good party returns to the Hall of Warriors. At the doorstep, I upgrade Devil of Caroc's Body to Exceptional (hence the Sapphire) and her Sura's Supper Plate to Exceptional.
Sacrificial Bloodlines
I could successfully trick Simoc into imbibing Bledha's Poison, but it requires making either a Resolve check of 19 or an Intellect check of 19, followed by either a Resolve check of 20 or a Perception check of 20. I'm not going to bend over backwards to make the checks, so combat will result when I try to give the poison to Simoc. Doing things this way means that my reputation gains won't be as large as if I had successfully tricked him, but it's a matter of degree and not enough in terms of in-game consequence to motivate me to make the checks.
I begin by carefully positioning the party before speaking to Simoc. I position Kana right next to Simoc to hold up him and his followers. I position both Ituumak and Devil of Caroc just outside the 'door to his office' and near the Wilderwoman at the right side of the 'door'. I position Hiravias just to the left of the 'office door'. Alliria, Grieving Mother and Sagani will be in between Kana and the other tanks (i.e. Devil of Caroc and Hiravias). Kana now speaks to Simoc and offers the poison to start the fight.
Kana holds up the north group, but unleashes his The Killers Grew Stiff power on as many enemies as he can whenever he's built up at least 4 Phrases.
Alliria uses Reinforcing Exhortation on both Hiravias and Devil of Caroc, and then tags Simoc with Sworn Enemy. She resumes attacking any targets within reach afterwards, using her Flames of Devotion whenever she thinks nearby comrades could use healing.
Hiravias gets in following spells in sequence as and when he can: Relentless Storm, Venombloom (to meet the oncoming horde at the south and it won't harm party members), Moonwell and Form of the Delemgan. He then holds tank position against the south horde.
Devil of Caroc, Sagani and Ituumak make it a priority to take out the Wilderwoman near the 'door' as quickly as possible. Sagani and Ituumak then go to work on other targets, while Devil of Caroc holds tank position.
Grieving Mother starts off with Phantom Foes. She then goes into a cycle of attacking nearby targets with her sword (the Wilderwoman near Simoc often being the priority), building up Focus, and then using Amplified Wave on the party member most in the thick of it once she gets at least 60 Focus. I eventually manage to wear out the enemy.
Killing Simoc marks the completion of the Sacrificial Bloodlines quest. There's plenty of loot, including armors and weapons of Fine or Exceptional quality. One item of note is a Large Shield called Thy Clef. I have no use for it though, so I'll just sell it.
A Grand Companion Adventure also becomes available, but I don't care which one. It happened to be They Who Woke The Stars. I assigned Aloth to it.
The evil party went to Hearthsong instead in pursuit of a different path.
*Evil* Vela
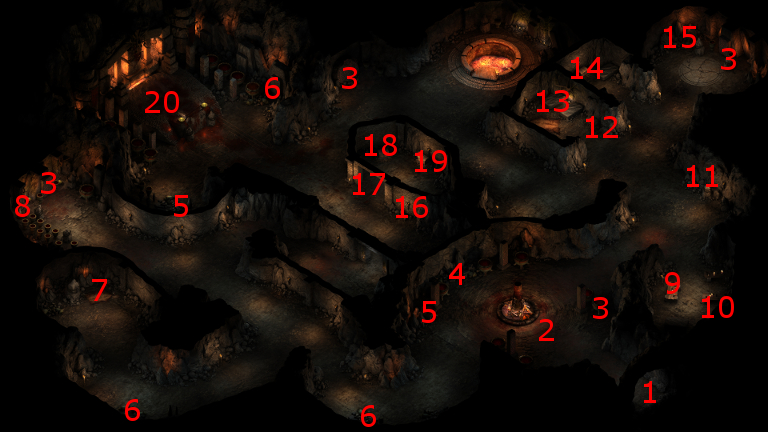
Zakara makes her way to the house at #18 on the map of Hearthsong. She uses the Rusty Key to open the front door.
Once inside, she takes the Orlan Baby from the crib.
*Evil* Lliras
Lliras will be resolute on attacking the evil party once it leaves the house, and there will be no talking one's way out of it. The evil party has little trouble wasting them.
The Assassin at Large
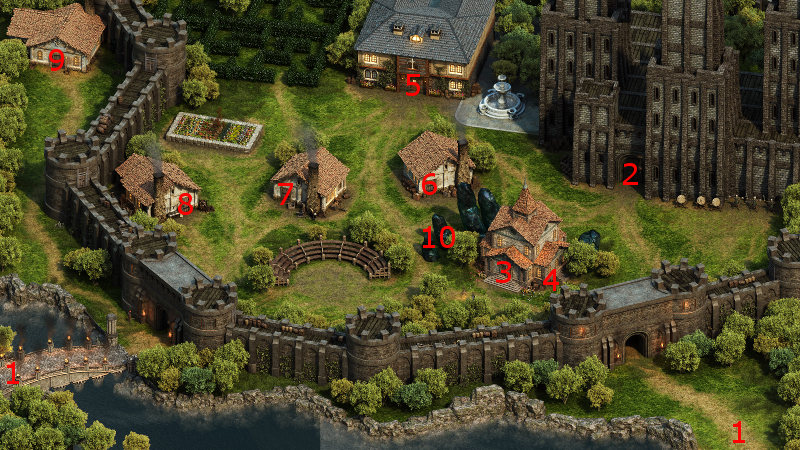
The good party travels to the bridge. Alliria has another vision of Thaos, whereby they had both agreed to lure Iovarra to a trap in a city called Onossius.
The party crosses the bridge. At #18 will be an extended conversation with two Delemgan sisters named Sidha and Rihenwyn. The key piece of information is that the Watcher must gain sufficient favour with one of the gods in order to be safely reach the bottom of a pit in the nearby Burial Isle, and thus continue to the pursuit of Thaos. This conversation marks the completion of The Assassin at Large quest, and the start of the Council of Stars and Court of the Penitents quests.
The door to Teir Evron is at #19.
*Evil* The Assassin at Large
The parallel video for the evil party, where dialogue options emphasizing cruelty and the desire for power are chosen instead.
The Council of Stars
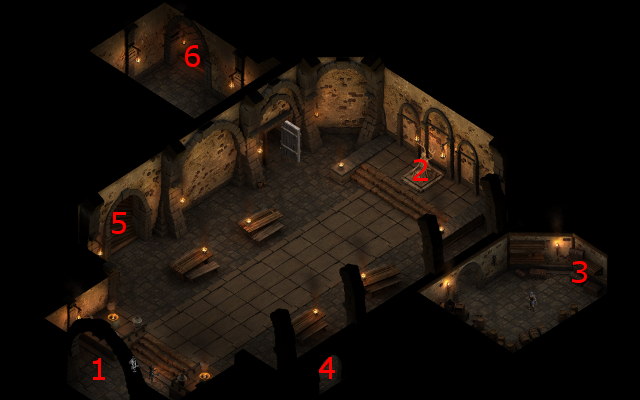
I start off at #1 on the map of Teir Evron. The outer edge of the sanctuary has bookshelves, each with books that provide clues as to how to start prayers with the various gods.
The Luminescent Adra Shard is at #5. Once I have it, I click on the pedestal at #6, whereupon the altars and the central dais fill up with starlight and colors reminiscent of a night sky. The altars are now ready for purposing of praying to the gods.
The good party will now continue its adventures in the Blood Sands. The evil party will visit that area, but only briefly, and for the purposes of completing the Sacrificial Bloodlines quest in its own way as described below.
*Evil* Distilled Essence Potion
Zakara at this point goes to the Blood Sands, the entrance to which is at #21 on the map of Elm's Reach.
Keeper Wrdha will be at #7 on the Blood Sands. I give her the Orlan Baby, and she sacrifices it. The result is that I obtain the Distilled Essence Potion, which is what Simoc wants.
The video concludes with me racking up on some useful potions, and then leaving.
*Evil* Sacrificial Bloodlines
Zakara brings the Distilled Essence Potion to Simoc. I earn moderate reputation with Twin Elms, extraordinary reputation with the Ethik Nol, but lose major reputation with the Ovates.
Simoc rewards me with the Large Shield called Thy Clef. Maneha uses it as an interim shield for now.
*Evil* Aloth and Iselmyr
Speaking with the Delemgan sisters will trigger an awareness on the part of Aloth that his own Awakening condition is permanent, and he will want to speak to you about it afterwards.
*Evil* Lord Sidroc
Zakara enters the Great Hall, and receives a recently arrived visitor named Lord Sidroc. He wants help defending his keep against rivals.
Zakara has already earned the good graces of the Knights of the Crucible, so it's easy enough for her to select that option and earn the 200xp for this visit.
*Evil* The Blind Monk's Venom
Now waiting for me in the rewards chest at #3 will be The Blind Monk's Venom, which is the reward for The Page Unturned companion adventure. I hold onto it for now, since it may prove useful during certain fights, like for example against Dragons.
The good party next goes to the Blood Sands *Evil* The evil party puts that part off until it comes back towards the very end of the game, after they've done almost everything else. They instead go straight to Northweald.