-

- Forums
- Chatrooms
- Gallery
- Gameplay Videos
- Upload
- Articles
- Mod Reviews
- Shop SP: Games, Movies, Books
|
|
Lle A Rhemen
Lle A Rhemen, Lower Level
I start off at #20 on the map of the lower level of Lle A Rhemen. I immediately get attacked by a few Sporelings and a few Swamp Lurkers, but I kill them off easily.
The area in the middle of the level has several Sporelings, along with the odd Menpwgra. The fights are easy as long as I make a point of taking out the Menpwgras as quickly as possible (i.e. the Sagani and Ituumak team up).
A sarcophagus at #24 has an item from the "Lle A Rhemen - Lower Coffin" section of the random drop list. This is the reason I waited outside until it was the 1st day of the month. It now has a Ring of Unshackling, which Sagani wears for the time being. It suppresses negative effects already on party members for 10 or so seconds, which can make it useful in some situations. Note that negative effects that are inflicted on the characters after the use of the ring will not be suppressed.
A button at #26 opens the door at #27. A sarcophagus at #28 has an item from the "Lle A Rhemen - Lower Hidden Room" section of the random drop list, but I'm not hung up on which item I get here. I go back out the exit at #20.
Entrance to Lle A Rhemen, Upper Level
I go back towards the pathway that scaled down the cliffside. A Dank Spore and a few Slimes will be where the Leaden Key Wizard once was. I follow the usual formula of leading the Slimes away from the Spore, and then having Devil of Caroc (with her immunity) and Sagani and Grieving Mother take care of the spore.
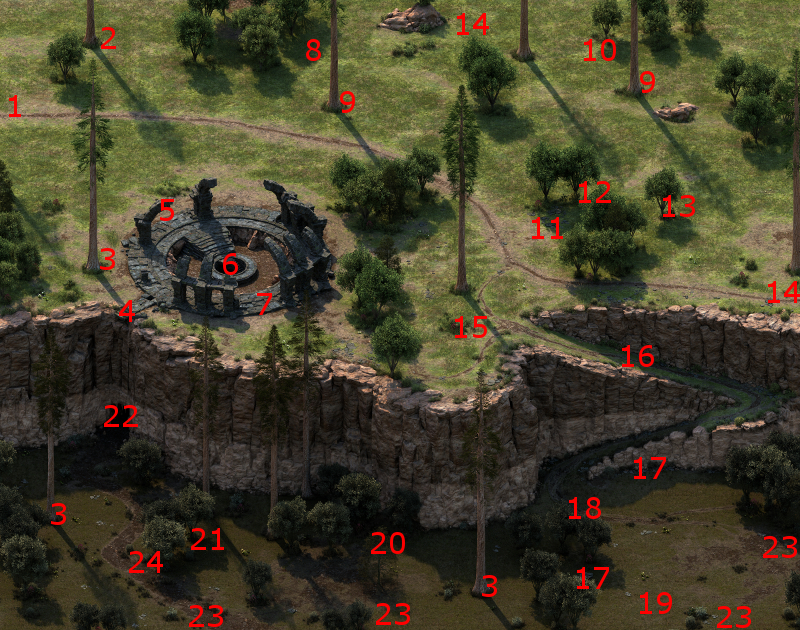
An entrance to the upper level of Lle A Rhemen is at #6 on the map of Stormwall Gorge. There will be a few Menpwgras at the entrance. I rush them and cut them down, helped along by the use of a Twin Stones scroll from Kana.
*Note* If I had wanted to explore the upper level of Lle A Rhemen before Act 3, I would have needed to take on the Bronze Beneath the Lake quest on behalf of The Dozens, and at the expense of an alliance with either House Doemenel or the Crucible Knights. Opening the entrance at #6 would have involved using an Engraved Adra Disc at #6.
Spectres in Lle A Rhemen
I start off at #1 on the map of the upper level of Lle A Rhemen. There will be a few Spectres at #13, who by now are easy enough to kill.
Spider Tunnel
Now I travel northwest towards the center of the first level, where I have to fight a few Crystal Eaters or Widowmakers here and there.
The opening at #12 leads to a scripted interaction that involves making your way through a spider tunnel. The Might check of 16 and the use of a Hammer and Chisel are suboptimal options, since either results in Spiders attacking you and you remaining at #12. The best and simple option is to crawl through.
I end up at #14. Now I have the party retreat and back themselves against the edge behind them, the reason being that the oncoming Spiders are likely to trip the nearby trap and the retreat allows the party members to avoid taking any damage. I kill the Spiders easily enough after that.
*Evil* Nridek
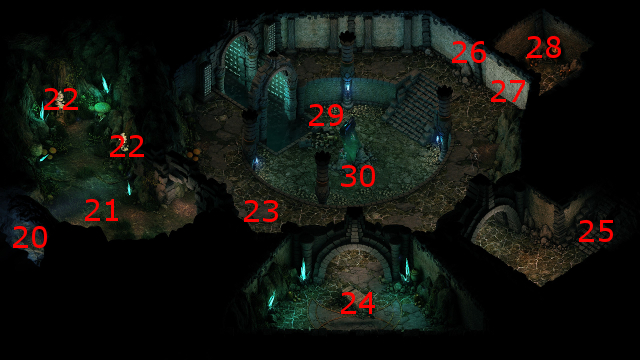
I show the next few parts from the perspective of the evil party. A Vithrack named Nridek will be in the cave at #16, along with several spiders of various sorts. I choose the Aggressive option in order to pick a fight with him.
Zakara tags Nridek with Sworn Enemy and then kills him off quickly with Flames of Devotion. Eder and Maneha hold the flanks against spiders that approach from either side.
Durance proceeds with his sequence of Devotions for the Faithful, Consecrated Ground, Circle of Protection, Salvation of Time and Interdiction.
Aloth first protects himself with Llengrath's Safeguard. He next casts Eldritch Aim followed by Call of Slumber, which temporarily holds up almost all of the enemies just as they close in. He then proceeds with Kalakoth's Minor Blights followed by Merciless Gaze and then bombards his enemies. Victory follows as a matter of course. Nridek leaves behind the Soul Vessel, which can be used to enchant a certain magical weapon described just below.
The sarcophagus at #18 at the spear called Cladhaliath. The spear is the only weapon in the game where you have the opportunity to provide it with enchantments / powers that the usual enchantment system is incapable of adding. I ultimately cannot fit the weapon into my plans for either the good party or the evil party. I will nonetheless show a selection of enchantment that I consider workable for a Rogue.
The niche at #17 will have an item from the "Lle A Rhemen - Upper Boss Hidden Room" section of the Random Drop List. However, there is nothing from that section of the list that I particularly need, so I just accept whatever item it happens to have.
Alliria chose the Benevolent option to let him depart peacefully, even though this loses the chance to add particular enhancements to the Cladhaliath spear.
*Evil* Eder's Concern
The video begins with the evil party making its way back through the spider tunnel. I decide to spend Camping Supplies and rest, since Aloth and Durance have by now taken quite a beating. I choose the Accuracy vs. Spirits option in anticipation of the new couple of battles.
Resting outdoors for the first time in Act 3 results in Zakara having another nightmare. Eder expresses concern over her nightmares seeming to get worse. There are no in-game consequences for any dialogue choices you might make.
They speak again afterwards, with the subject being Eder wondering if he chose the wrong side during St. Waidwen's War. Again, there is no long-term consequences for any dialogue choices you might make.
Cean Gwlas
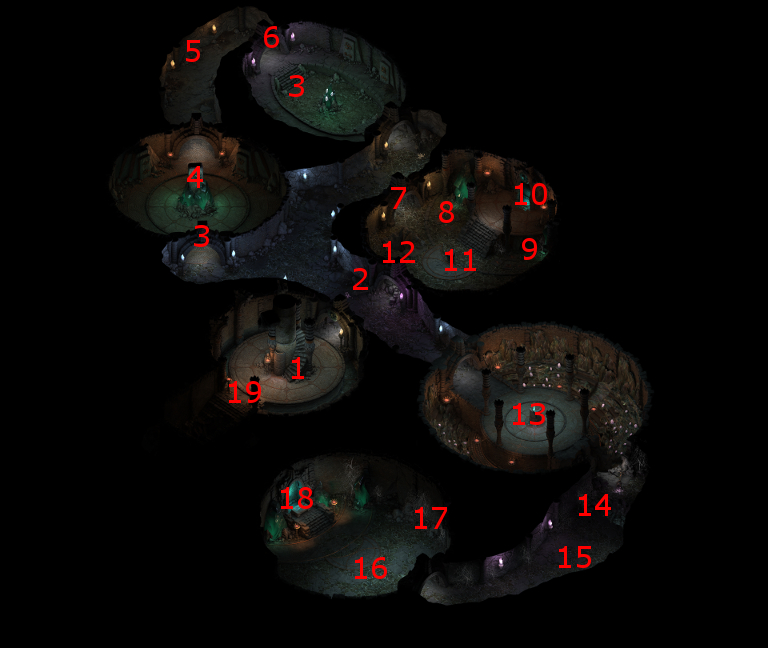
There will be plenty of spirits (i.e. Shades, Shadows and Spectres) led by pairs of Cean Gwlas at spots marked #3. In each instance, I approach cautiously and let them come to me to avoid a jam at the door that limits party members' mobility. Kana also opens each battle with the use of an offensive spell scroll, Fireball for the first one and then Minoletta's Bounding Missiles on a Cean Gwla during the second one.
Hiravias is now freer with his spells, since I'm nearing the end of my exploration of Lle A Rhemen, and these large groups of spirits are easily the most challenging battles in the ruins. He opens each battle with a sequence of Relentless Storm, Moonwell and then Form of the Delemgan. The beauty of spells like Relentless Storm is that it will continue to damage and stun the enemies, even when Hiravias himself is stunned or paralyzed by the Cean Glwas powers.
The good party is now finished and leaves the ruins. The evil party has other ideas though.
*Evil* Stone Heads
The evil party likewise has to battle the spirits at points marked #3. It is an easy enough matter for Durance to cast Prayer Against Imprisonment at the start of each battle. It will protect the party against Paralysis, but not against Stunning, although by now that will be enough. Zakara, Eder and Maneha take charge against the spirits in front of them. A few of the spirits will teleport and go after Aloth. But even then, it's easy enough for Aloth to defend himself with Llengrath's Displaced Image. Zahua and Durance hung back and took down the spirits that went after Aloth.
At #4 is a Stone Head will ask you which power you value most. The choice is potentially important, since it can affect which powers the Cladhaliath spear will have should you complete the ritual to obtain it. The dialogue choices and the corresponding power for the spear are as follows:
*Evil* Cladhaliath
At #8 are a series of runes here that mirror the ones at #4. If you want to enchant the Cladhaliath spear, then be sure to step on the rune that resembles the one you set glowing in #4.
At #9 are another series of runes here that mirror the ones at #6. If you want to enchant the Cladhaliath spear, then be sure to step on the rune that resembles the one you set glowing in #6.
There will be another Stone Head at #10, with which you can complete the ritual to enchant the Cladhaliath. The prerequisites are that you need to have answers the questions posed by the Stone Heads at #4 and #6, you need to have set the proper runes alight at #8 and #9, you need the Soul Vessel from #16, and you need the Cladhaliath spear itself from the sarcophagus at #18.
Once you have met all the prerequisites, the Stone Head will ask if you're prepared to sacrifice a piece of your soul to empower the spear. You can answer yes, since there isn't any negative in-game consequence for your character for doing so.
The urn that you can use to complete the enchantment of the Cladhaliath spear is at #11. Clicking on it after completing the ritual at #10 will open a crafting menu similar to the one you usually get when you select the enchant option for an item. The enchantment option that will be available to you is titled "Engwithan Soul Spear", and the specifics of that enchantment will depend on the answers you gave to the Stone Heads at #4 and #6.
The powers that I chose, based on the answers that I gave at #4 and #6, where the Viscous and Stunning powers. The former adds x1.2 damage to foes that are Flanked, Prone or Stunned. The latter can Stun its targets on a Critical Hit. Although I don't ultimately use the spear, I consider this a decent weapon for a Rogue. Spears will have an inherent +5 bonus to Accuracy as it is. The Stunning power can be used by a Rogue to prime up her targets for subsequent Sneak Attacks. The Viscous power will increase the damage inflicted by Sneak Attacks.
I readily concede that there are other configurations other gamers might prefer. Some players, for example, might prefer the Endurance recovery power. The one enchantment I don't recommend is the Exceptional quality one, the reason being that quality enchantments can be accomplished through the standard enchantment system anyway, and choosing it is a lost opportunity to add unique enchantments to the weapon that you normally wouldn't be able to.
The video ends with the party leaving the ruins, and making its way to Elmshore. I choose the Higher Level difficulty setting.
Azzuro
The good party returns to Caed Nua, and begins a cycle of resting up. A Hireling soon arrives. I reload until I get the Glanfathan Soul Hunter that offers +2 Prestige and +3 Security, and replace the Berathite Cleric with her.
I continue to rest up, and at some a good visitor will arrive. I reload until I get the merchant named Azzuro. That was a priority for me, because I want at least three special items from his inventory. As with the evil party, I pay him the 5,000cp to ensure the delivery of his goods.
I sell off my excess loot to the Merchant in the Great Hall, and then leave Caed Nua for Elmshore. Just like the evil party, I choose the Higher Level difficulty setting.
My next destination is the Elmshore.