-

- Forums
- Chatrooms
- Gallery
- Gameplay Videos
- Upload
- Articles
- Mod Reviews
- Shop SP: Games, Movies, Books
|
|
Twin Elms' Bounties
Sagani's Purpose
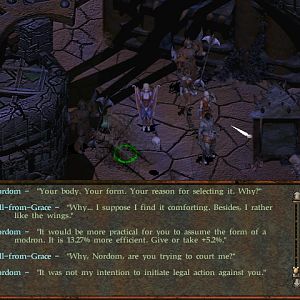
I am back in the courtyard at Caed Nua. I rest up with the Forum bonus (+3 Intellect). Resting up after completing Sagani's personal quest, The Long Hunt means she will want to speak to Alliria about Persoq and the pursuit of Thaos. The dialogue choices themselves have no in-game consequence.
Warden's Lodge
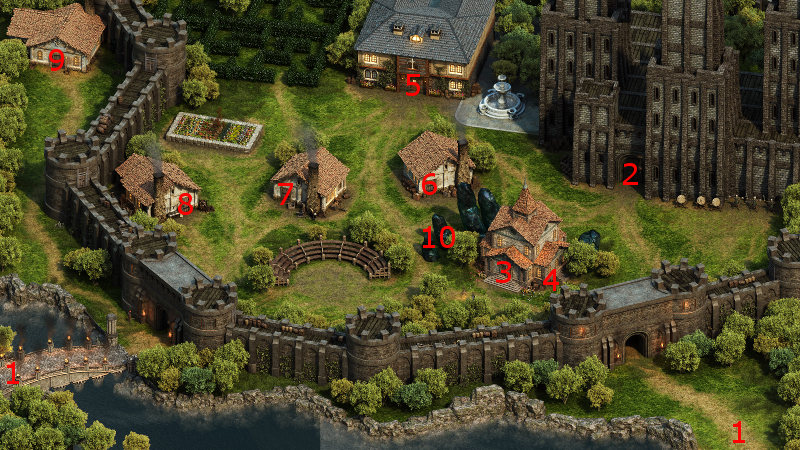
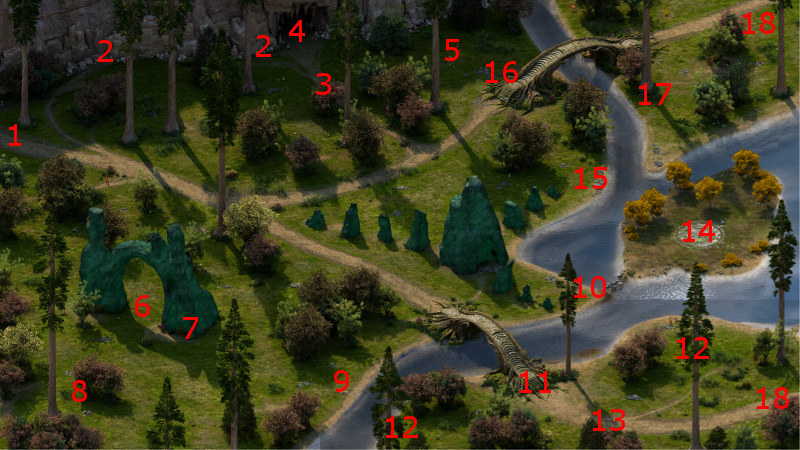
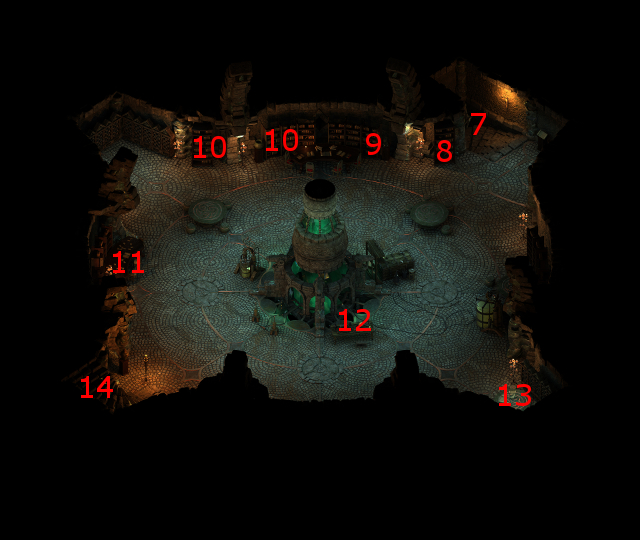
Now for the first time I enter the Warden's Lodge at #9 on the map of Caed Nua. The Warden, during the initial meeting, gives out the warning that the bounties are on especially tough villains and monsters. I inquire about the first one, on Sly Cyrdel, and then travel to Magran's Fork.
Gramrfel the Wayfarer
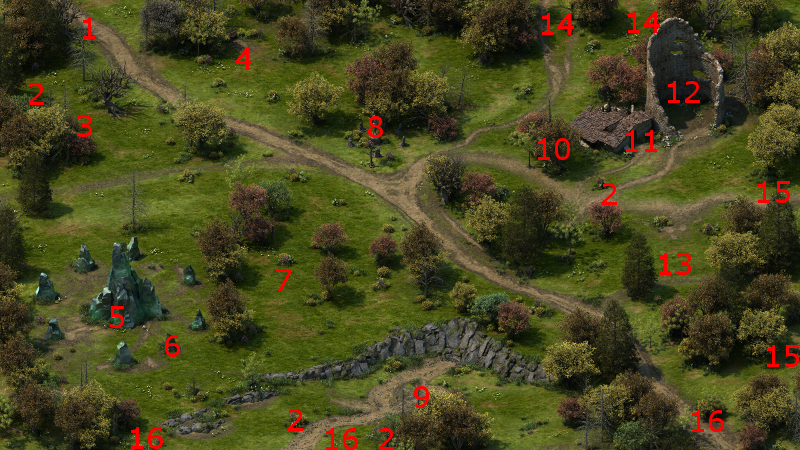
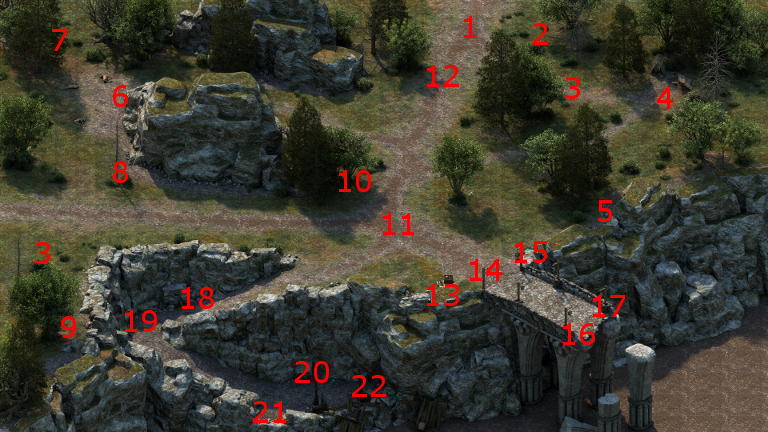
A large group of villains of various professions will be gathered near #8, led by a Death Godlike named Gramrfel the Wayfarer. They'll be here after you've travelled to at least one of the districts of Defiance Bay.
The usual spell sequences and tactics work to whittle them down. Gramrfel leaves behind a pair of boots called Dead Man Standing. I have no use for them though, so I'll just sell them along with the rest of the generic loot I collect from the dead bodies.
Sly Cyrdel
A Fighter named Sly Cyrdel and his gang will be near the Adra pillar at #6. The same tactical themes win this fight too. Noteworthy items are his head and an Estoc named Drake's Bell.
I give the head to the Warden in order to get 2,250cp and the xp reward. I have no use for the Estoc, so I'll just sell it along with the rest of the loot I've collected.
Lovers' Rings
The good party now returns again to the rewards chest in the Great Hall. Inside will be the Copper Lover's Ring and the Silver Lover's Ring, both of which are rewards for the Lover's Light companion adventure. I have no use for them though, so I just sell them off along with the rest of my excess loot. I return to the Warden's Lodge.
*Evil* Ifen's Cradle
The evil party at the same time also returns to the rewards chest in the Great Hall. Inside will be Ifen's Cradle, which is a reward for the St. Ifen's Knot companion adventure. I have no use for it though.
*Evil* 12th Level
Everyone now has enough experience to advance to their 12th levels.
Zakara gets the Scion of Flames talent. This talent will augment the Burning Damage for Flames of Devotion, her Battle-Forged power, and Sacred Immolation, which she will take on her next level up.
Eder acquires Weapon Focus: Noble, which improves his Accuracy with his Measured Restraint rapier.
Maneha acquires Weapon Focus: Peasant, which will improve her Accuracy with Hatchets.
Zahua acquires the Ghost Hunter talent, which will increase his damage against spirits.
Durance selects the Empowered Interdiction talent, which will improve the Accuracy of his Interdiction power.
Aloth acquires the Spirit of Decay talent, which increases his Corrosive Damage. I get it now as he's only recently learned the Death Ring spell.
He also learns Ninagauth's Freezing Pillar. It will inflict Freezing Damage in an area similar to Fireball, but will also leave behind a hazard-zone in its wake that will Hobble any victims that pass through.
The Dweller
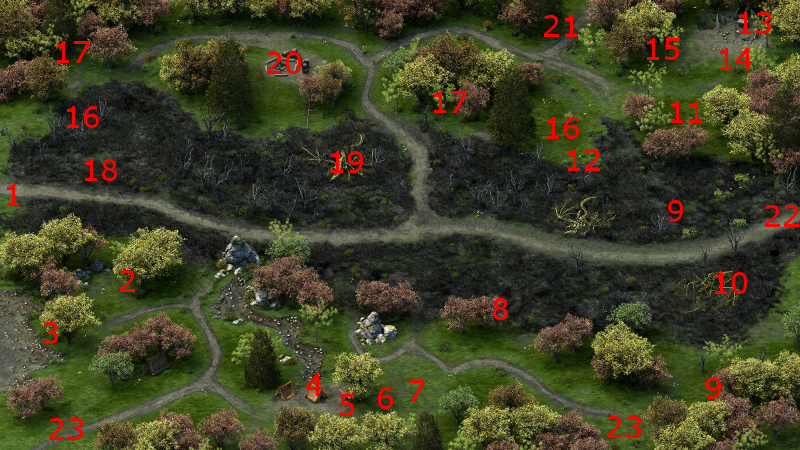
The next bounty is on an enormous Forest Lurker called the Dweller. He'll be at #12 on the map of Black Meadow, and aided by Trolls, Greater Earth Blights, and a Menpwgra. The good party uses the same themes as always, with the added point that Hiravias tosses in a Venombloom for good measure. It inflicts Raw Damage over time, and won't harm party members. It brings down the enemies that much faster.
I bring The Dweller's Head to the Warden for an xp reward, and 2,250cp.
Nalrend the Wise
I start by resting up until it's just about day 17 on the month. There is a specific reason why.
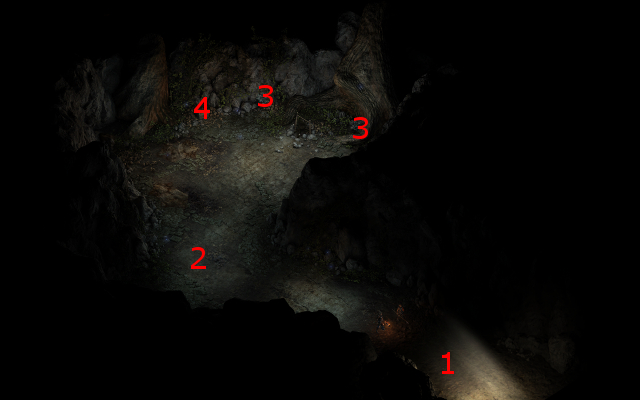
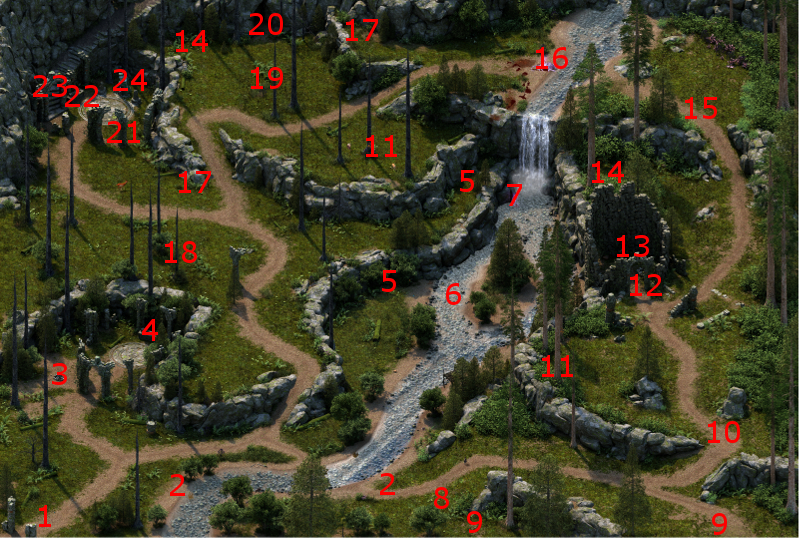
I next accept the bounty on an Ogre Shaman named Nalrend the Wise. I travel to Elmshore, which takes 1 day and 6 hours. The entrance to the Ogre Cave is at #4 on the map of Elmshore.
I start off at #1 on the map of the Ogre Cave. Several Ogres, including a pair of Matrons, and a pair of Druids, and led by Nalrend the Wise, will be just ahead. Alliria tags Devil of Caroc and Kana with Reinforcing Exhortation, both of whom take up tanking positions. Ituumak can't reach any of the Druids just yet, so I'll have to tough out their spells and simply have him and Sagani take out any Ogres they can reach. Grieving Mother starts off with Phantom Foes, and then knocks down the horde with Amplified Wave once she's gotten at least 60 Focus. Hiravias leads off with a sequence of Moonwell, Relentless Storm, and Form of the Delemgan. He then catches several Ogres with Embrace the Earth-Talon to Petrify them and therefore expose them to double-damage attacks, followed by a Nature's Mark spell. Once she gets a chance, Alliria tags Nalrend with Sworn Enemy and lays into him with her Flames of Devotion. She collects Nalrend The Wise's Head once it's over.
A chest at #4 has a random item from the "Elmshore - North Cave" section of the random drop list. It is now day 19 on the month as a result of my planning, so I now take a pair of Glanfathan Stalking Boots from the chest. They become Devil of Caroc's boots for the rest of the game. Attacking enemies susceptible to Sneak Attacks is her bread and butter, and her enemies will very frequently end up Flanked owing to Grieving Mother's use of Phantom Foes. She tucks away her Cat's Whisper boots into the party stash, and saves them for the rare occasions when I want to accomplish certain objectives through Stealth instead of combat.
I collect the xp reward and 2,250cp after bringing the head to the Warden. A major companion adventure now also becomes available, although I don't particularly care which one. It happens to be Ring Finger. I assign Durance to it.

*Evil* Warchief Iklak
I show this bounty from the perspective of the evil party, which is against Warchief Iklak. He can be found at #18 on the map of the Valewood. He will be helped out by many other Xaurips, as well as a few Drakes.
The tanks take up their usual front line positions. Durance first uses a Scroll of Prayer Against Fear. After that, he initiates his other buffs, Devotions for the Faithful, Consecrated Ground, Circle of Protection, and Salvation of Time.
The horde is numerous, and they manage to curl around the tanks and surround the party. That's when Zahua starts to hit hard from the flank, as well as Durance once he's finished his buffs.
Aloth now has the spells to be very effective in this kind of situation, whereby he can keep the enemies locked down with a Call to Slumber, and then devastate them with repeated castings of the Death Ring spell. The battle ends in victory.
Besides his own head, Warchief Iklak also leaves behind the Ivory Wurm Figurine. Maneha equips it in one of her quick-item slots.
I return to Warden Fyrgen to collect 2,250xp and 2,250cp. A grand companion adventure now also becomes available, although I don't particularly care which one. It happens to be the Lovers' Light one. I assign Grieving Mother to it.
*Evil* Geyda
The evil party next enters the Great Hall, since an Animancer named Geyda has arrived as a visitor. She wants test subjects for her experiments.
Zakara assigns to the Devil of Caroc the task of assassinating her.
Daroth Grimault
The next batch of bounties becomes available. I select the bounty for a Fampyr named Daroth Grimault, and then travel to Copperlane.
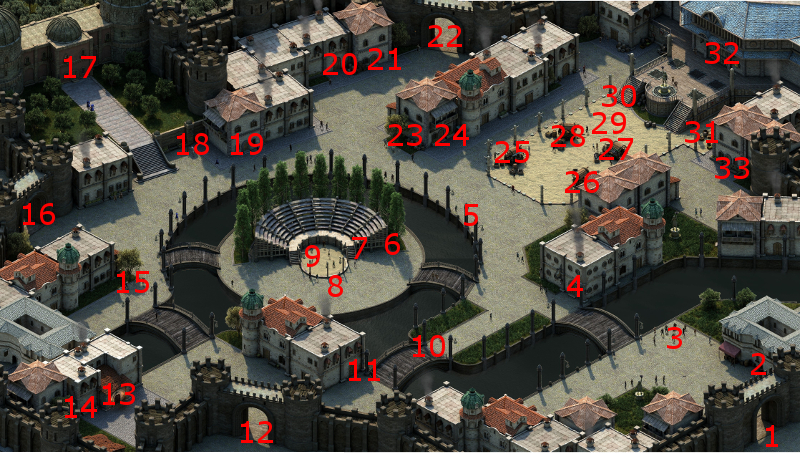
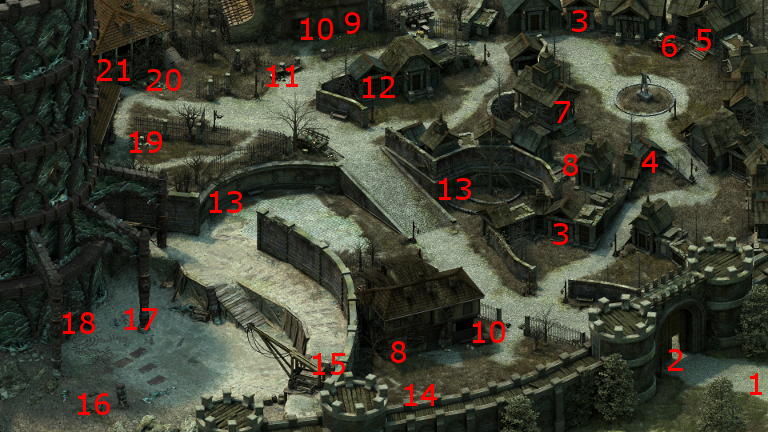
I start off at #1 on the map of the Copperlane District. The entrance to the Catacombs is at #13.
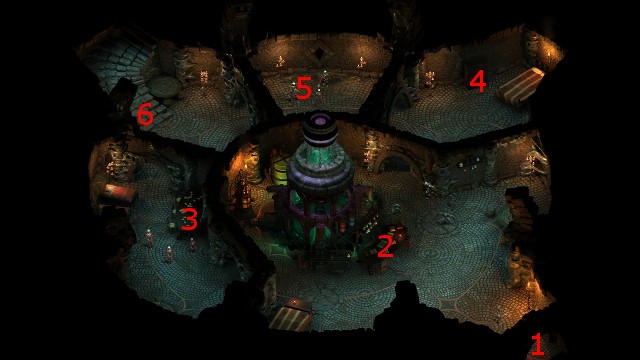
Now I'm at #1 on the map of the Catacombs. Daroth and his undead horde will be at #20. I have to conduct this battle differently than usual, partly owing the Charm and Domination powers of Daroth and the other Fampyrs, and partly owing to the presence of several Skeletal Archers and Skeletal Wizards.
I tuck the party into the niche just south of the central platform and stairs. Devil of Caroc plants a Malignant Cloud trap where the horde will bend the corner to reach the party. She, being immune to Charm and Domination, will go on ahead to get their attention and lead them into the trap. Once the horde arrives, the Archers and Wizards end up perfectly placed to constantly take Raw Damage from the Malignant Cloud. Hiravias adds in a Venombloom spell for good measure.
He follows up with Moonwell and Relentless Storm for good measure. Grieving Mother at some point also gets in an Amplified Wave. The battle is pretty much over after that.
I loot Daroth's body for his head and bring it to the Warden. I receive an xp reward and 2,250cp.
Nidhen's Finger
Alliria now heads over to the Great Hall and collects an amulet called Nidhen's Finger as a reward for the Ring Finger companion adventure.
Thorfen
The next bounty is against a Priest named Thorfen. He and his followers can be found at #3 on the map of Esternwood. I win the battle using the usual tactics.
Thorfen leaves behind two distinctive items. One is the Coat of Ill Payment. Hiravias will wear it for the rest of the game. It is a heavy armor that will protect him when he has to fight up close. Its Resolve bonus will increase his Deflection rating. It also has the Retaliation feature, falling in line with a party that is particularly suited to exploit Retaliation-based items.
The other item is his head, which Alliria brings back to Caed Nua.
A random event is likely to occur once I rest after my return. So I rest and return till I get an event to my liking, which is Azzuro offering Hiro's Mantle for sale.
I bring the head to the Warden for an xp reward and 2,250cp.
Hiro's Mantle
Now I purchase Hiro's Mantle from the Stronghold menu. I enter the Great Hall and take it from the rewards chest.
Devil of Caroc wears it for the rest of the game. It provides welcome bonuses to Crushing and Piercing Damage Reduction, which suits her role as an off-tank and damage dealer. It also provides Retaliation, which will stack with Retaliation from her Sura's Supper Plate shield. In her instance, that means multiple chances to trigger Deep Wounds even on Grazes, or multiple hits of 5 points of Burning Damage in combination with Sagani's use of Combusting Wounds, or multiple tics of extra Burning Damage in combination with Kana's Aefyllath Ues Mith Fyr, or multiple tics of extra damage when Grieving Mother uses Pain Link on her.
I sell off my extra loot and return to the Warden's Lodge.
Glasdial
The next bounty is on a Troll called Glasdial. I travel to Stormwall Gorge.
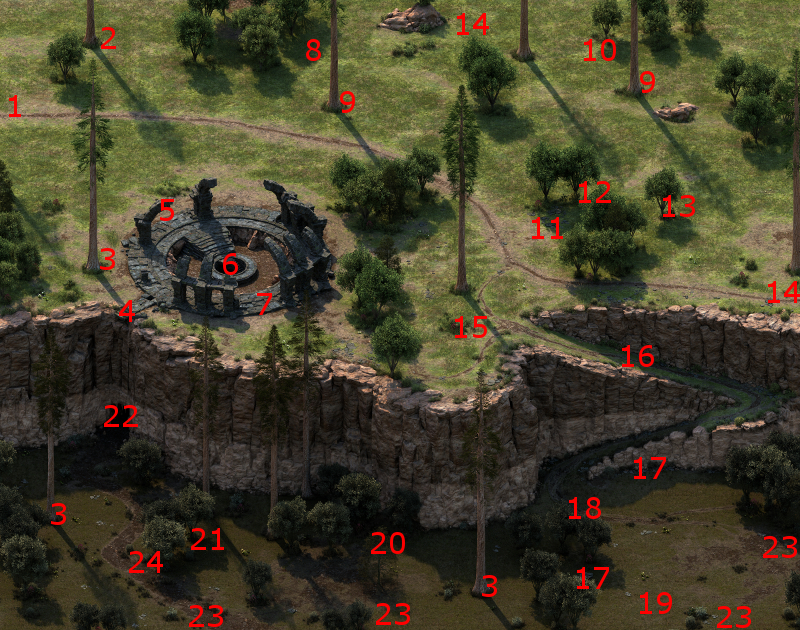
I travel to #22 on the map of Stormwall Gorge, which is the entrance to the lower level of Lle A Rhemen.
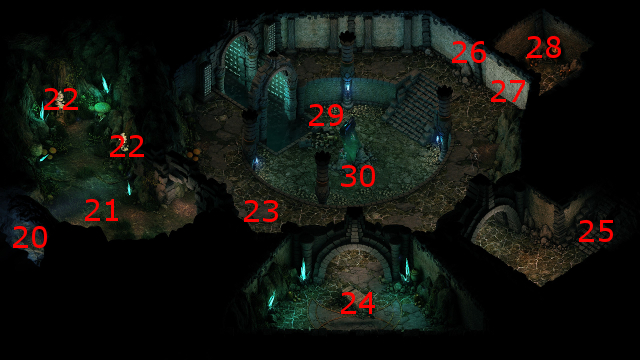
I start off in the room at #21. To the east at #30 will be Glasdial, along with several Menpwgras and Pwgras, several Corrupter Druids, and three Swamp Spores.
I conduct this battle differently, on account of both the Swamp Spores and the sheer number of enemy spellcasters. Devil of Caroc plants a Chain Lightning Trap at the doorway east of #21. She then goes on ahead to get the attention of the monsters, and lure most of them away from the immobile Spores.
Hiravias now goes on the offensive right away instead of buffing open. He uses a sequence of Plague of Insects (just as the monsters approach), Venombloom and Hail Storm. This sequence serves to obliterate the enemy spellcasters almost right away, and minimize the number of spells they can get off. That also means Glasdial is robbed of any meaningful support, and goes down easily.
After that, I send Devil of Caroc forward to hold the Spores' attention, while Sagani and Grieving Mother take them down with missile fire.
Alliria takes Glasdial's Head and brings it to the Warden for an xp and 2,250cp.
*Evil* Lover's Rings
The evil party returns again to the rewards chest in the Great Hall. Inside will be the Copper Lover's Ring and the Silver Lover's Ring as rewards for the Lover's Light companion adventure. I have no use for them though, so I'll just sell them off along with the rest of my excess loot.
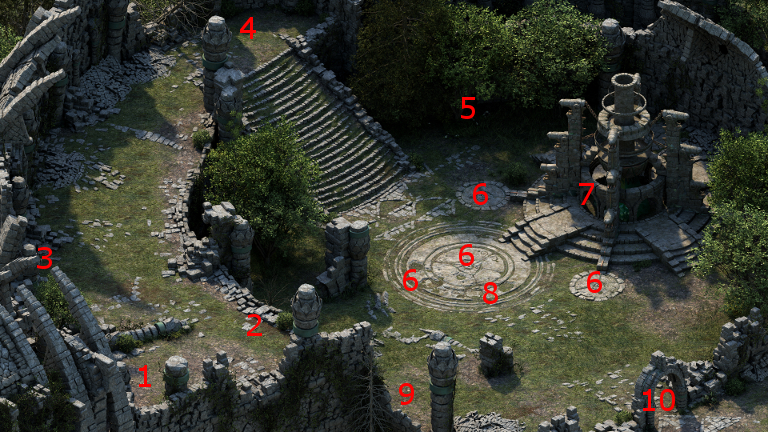
Songsmith Roska
The next bounty is against a Dwarven Chanter named Songsmith Roska. She and her band of Delvers can be found in the outdoors of Cliaban Rilag at #5.
I conduct this battle in a fashion similar to my one against Glasdial, and for similar reasons. A significant number of the Delvers are either spellcasters or archers, so Hiravias leads off with a sequence of Plague of Insects, Venombloom and Hail Storm. The few Delvers that attack up front are gathered in a tight circle around my front-line warriors, so Sagani tags them with Combusting Wounds. The battle otherwise takes care of itself.
Alliria takes Songsmith Roska's Head and brings it to the Warden for an xp reward and 2,250cp. The next batch of bounties also becomes available.
A grand companion adventure now becomes available, but I don't care which one. It happens to be Lavender and Lye. I assign Pallegina to it.
*Evil* Vicious Mercenaries Attack
The evil party has a pending attack on Caed Nua by Vicious Mercenaries to deal with. I now have a full roster of Hirelings on board, so at this point I need to conduct these battles with a view towards minimizing the risk to them.
I rested with the Forum bonus (+3 Intellect) beforehand, with the intention of enlarging the area-of-effect of my spells as much as possible beforehand. Durance hits them with Interdiction once battle begins. Aloth uses a carefully placed Call to Slumber to render as many of the enemies Prone as I can.
At the same time, I spread out my warriors so that each is attacking different clusters of the enemies, with the intention of keeping my Hirelings safe.
Aloth then positions himself in the thick of it in order to unleash multiple Death Ring spells, with the intention of finishing off the enemies as fast as I can.
The battle is soon won, but I make a point of double-checking my Stronghold menu to make sure none of my Hirelings perished.
*Evil* Foemyna
I show this bounty from the perspective of the evil party, which is against a Ranger named Foemyna. She can be found at #6 on the map of the Woodend Plains. She will be helped out by other Rangers, as well as a LOT of wild animals like Lions and Bears and Boars.
The tanks take up their usual front line positions. Durance initiates his buffs, Crowns of the Faithful, Devotions for the Faithful, Consecrated Ground, Circle of Protection, and Salvation of Time. He afterwards hits the enemies with Daze.
Aloth initiates a sequence of Eldritch Aim, Pull of Eora, Malignant Cloud and then Merciless Gaze. He then casts Death Ring multiple times, which gradually wears everything down. Victory is assured.
Besides her own head, Foemyna also leaves behind a War Bow called The Rain of Godagh Field, but I have no use for it.
I return to Warden Fyrgen to collect 4,000xp and 2,750cp. Another grand companion adventure now also becomes available, although I don't particularly care which one. It happens to be The Crossed Eye. I assign the Devil of Caroc to it.
*Evil* Galen Dalgard
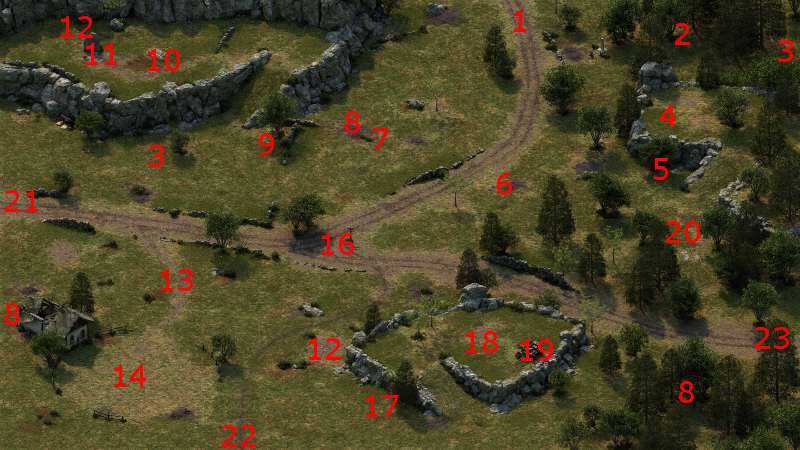
I also show this bounty from the perspective of the evil party. The bounty is against a Paladin named Galen Dalgard, who leads a whole bunch of Aedyran mercenaries at #12 on the map of Madhmr Bridge.
The battle pretty much follows the same pattern. Zakara, Maneha and Eder hold the front line. Zahua hits from the side. Durance cranks out his buffs. Aloth sets up crowd control with Eldritch Aim, Pull of Eora, Malignant Cloud, Chill Fog and Merciless Gaze. The slight difference here is that several of the enemies are well back, so Aloth instead hits them with multiple castings of Chain Lightning.
Galen himself leaves behind a Large Shield called Old Gelun's Wall. Maneha equips that shields, and hands over Thy Clef to Eder.
The video concludes with the evil party returning to Warden Fyrgen to collect 4,000xp and 2,750cp.
Malina's Boots
Azzuro is slated to show up at Caed Nua with an item in his inventory the next time I rest. I rest up and reload until I get Malina's Boots.
I then enter the Great Hall and get the boots from the rewards chest. Kana will wear them for the rest of the game. The bonus to Movement Speed can help him take up tanking position faster. The crucial point is that it will provide +50 bonuses when he is either Prone or Stunned. The bonuses will stack with the same bonuses provided by his shield. This setup is the linchpin in the strategy based on having Hiravias cast Beetle Shell on him, and then have Grieving Mother activate Defensive Mindweb to add +100 bonuses to everyone's defenses.
He transfers his Boots of the Long March to Sagani, who wears them for the rest of the game. She gets them more or less by default, since I have different boots in mind for everyone else, and more Athletics and Endurance never hurt anyone. She in turn stows her Boots of Stealth in the stash, for when the party may want to resolve quests without combat. I return to the Warden's Lodge.
Devwen
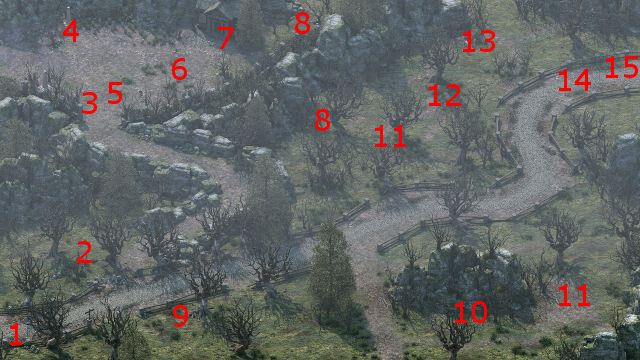
The next bounty is on a Menpwgra named Devwen. The party travels to Northweald.
The entrance to the cave is at #21 on the map of Northweald. She'll be helped by several Pwgras, Forest Lurkers and Corrupter Druids. Hiravias again applies the offensive spell-bombardment approach that reflects the need to wipe the numerous enemy spellcasters as quickly as possible.
Alliria takes her head and brings it to the Warden for an xp reward and 2,750cp.
Lavender Wreath
The good party returns to the Great Hall. Waiting in the rewards chest will be the Lavender Wreath, which is the reward for the Lavender and Lye companion adventure. I have no use for it though, so I just sell it to the nearby Merchant.
*Evil* Second Vicious Mercenaries Attack
The evil party has to fend off another attack by Vicious Mercenaries, and it pretty much follows the same pattern as the previous one.
*Evil* Captain Muarumi
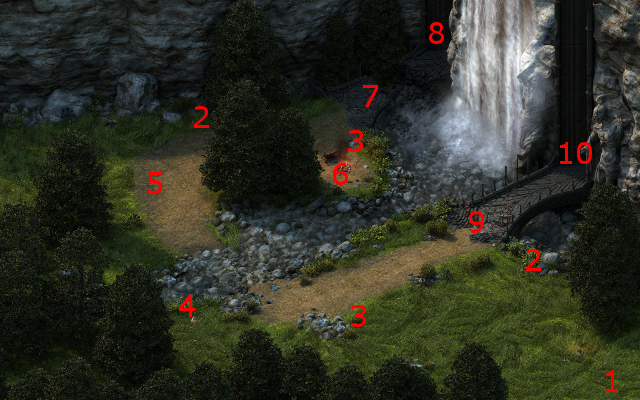
I show this bounty primarily from the perspective of the evil party, which is on Captain Muarumi. He and his crew of Ruautai Pirates and Raiders are holed up in a cave, the entrance to which is at #15 on the map of Anslog's Compass.
I begin by having Aloth set a Noxious Burst trap ahead of the tunnel. Durance sets a Searing Seal further ahead along the tunnel. Zakara goes ahead and leads the enemy back to the rest of the party.
It becomes a matter of Durance setting his buffs while Aloth uses his sequence of Eldritch Aim, Malignant Cloud and Chill Fog. Some of the Pirates hang back and prefer to use guns in the distance, so Aloth uses repeated castings of Chain Lightning on them while the rest of the party takes care of the melee action. Victory follows as a matter of course.
Besides his head, Captain Muarumi also leaves behind an Arquebus called Pliambo per Casitas. Durance will use it for the rest of the game. He'll be able to fire it with a hefty +16 bonus once he has both the Weapon Focus (Soldier) and Inspired Flame talents. Some people certainly enjoy builds that are centred around the use of firearms, although that requires extensive investment in talents like Gunner and other abilities (e.g. Chanter's Sure-Handed Ila Nocked Her Arrows with Speed) and/or items (e.g. Gauntlets of Swift Action) to overcome what amounts to a horrendous reload time. An equally valid approach is to treat a firearm as a first strike weapon before moving on to other combat actions. And this gun certainly makes a great first strike weapon before he initiates his buff spells. Its debuff powers can leave its target quite exposed to follow up attacks. I add the Wilder Slaying and Burning Lash enchantments to it as well.
The video concludes with the evil party returning to Warden Fyrgen to collect 4,000xp and 2,750cp.
Captain Muarumi
The good party conducts this bounty differently. Alliria tags Devil of Caroc and Kana with Reinforcing Exhortation. Kana steps forward into attacking position.
Hiravias does his sequence of Relentless Storm, Moonwell and Form of the Delemgan, but also hits the distant enemies and melee enemies alike with a carefully placed Hail Storm.
Several of the raiders are tightly clustered around my party, so Sagani uses Combusting Wounds on them. Ituumak also manages to go around the main group and start hitting enemies from the rear.
Grieving Mother leads off with Phantom Foes, builds up some focus with a shot from her Crossbow, and then connects an Ectopsychic Echo to Ituumak that she runs over the enemies over and over again. The battle is won in short order.
Hiravias equips Pliambo per Casitas for the rest of the game. He may not always want to engage in front-line action against especially dangerous enemies like Dragons. So this gun gives him the option to tag such an enemy with a first strike that makes it more vulnerable to attacks by other party members as a long-distance attack or first strike option.
13th Level
Everyone now has enough experience to advance to their 13th levels.
Alliria gets Sacred Immolation. This ability causes the Paladin to pulse fire in a certain radius around the Paladin every few seconds for a base duration of 30 seconds. Each pulse inflicts a small amount of Raw damage on the Paladin, but will also at the same time cause Burning Damage to all enemies near the Paladin, and heal a small amount of Endurance for nearby allies. If the Burning damage kills an enemy, it will trigger Strange Mercy for Alliria. There is also the additional point that the pulses will also trigger the additional +5 points of Burning Damage for any enemies affected by Combusting Wounds.
Kana selects the Phrase called They Shielded Their Eyes 'Gainst the Fampyr's Gaze. It provides to resistance against Charmed, Confused and Domination, with an extra bonus to the Will Defense on top. He sets up a separate Phrase modal that alternates between this Phrase and At the Sight of Their Comrades, Their Hearts Grew Bold. The former will always be active, since the latter has such a short duration. It becomes my Phrase modal of choice when facing off against enemies such as Fampyrs.
Devil of Caroc acquires Deep Wounds. Adds a little extra Raw Damage over time with each Hit. It may not be a big deal, especially when she can mow down a single opponent very quickly. But Retaliation will trigger it, and that can become useful for softening up multiple enemies that surround her.
Hiravias selects Returning Storm as his mastered 3rd-level spell. It promises to zap a random enemy with Shocking Damage and Stunning every few seconds, which can make a great lead-off for every battle during extended dungeon treks.
Grieving Mother selects two Powers. One is Time Parasite, which provides an option to slow down enemies Attack Speed while speeding up her own at the same time. Can be very useful in prolonged battles against masses of enemies.
The other is Stasis Shield. It allows for the temporary removal of one enemy from the battle, which cannot be harmed while the power lasts. Can be useful for temporarily removing one particularly annoying enemy, or spellcaster, from the picture and allowing the party to deal with the easier mooks.
Sagani acquires Twinned Arrows. It allows the firing of two arrows instead of just one with each attack, but at the expense of a -10 penalty to Accuracy, which by this point I can now ignore. In her case, that now means multiple chances to trigger Returning Storm with her Stormcaller bow.
*Evil* Crossed Patch
Now the evil party returns to the Great Hall. Waiting in the rewards chest will be a hat called the Crossed Patch, which is the reward for The Crossed Eye companion adventure.
One of the more interesting abilities of the Ranger is Powder Burns. It is a modal ability that adds Burning Damage in a cone area-of-affect when the Ranger discharges a firearm. Be forewarned that it will hurt any allies caught in the blast, so aim carefully. If you do want to design a Ranger built around this ability, another drawback to keep in mind is that it will temporarily blind the Ranger. Therefore, the Crossed Patch is a vital item for this kind of Ranger build, since it is the only item that confers immunity to Blindness. Be that as it may, that kind of build is not in my plans for either the good or the evil party, so I'll just sell it.
High Arcanist Ysly
The next bounty is against a Moon Godlike Wizard called the High Arcanist Ysly. I travel to the Heritage Hill district in Defiance Bay.
I am next at #1 on the map of the Heritage Hill district. The entrance to the Tower is at #6.
The party is next at #1 on the map of the first floor of the Tower. The stairs to the next level are at #18.
Ysly and her minions will be near the table at #12 on the map of the second floor. Hiravias leads off with Weather the Storm and Moonwell to help the party weather any damage they might sustain from enemy spellcasters. Grieving Mother tags an enemy Sorceror with her Crossbow, which gives her enough Focus to unleash an Amplified Wave. That buys Sagani and Ituumak time to peck off enemy Sorcerors, including Ysly, one by one. That in turn gives my warriors the luxury of taking down their warriors. The battle soon takes care of itself.
Ysly leaves behind a Rod called Pretty Pretty's Rib, which I'll just sell, and her head. Alliria brings the head to the Warden for an xp reward and 2,750 cp.
A Legendary companion adventure now becomes available. I reload and give the head over and over again until I get The Coal Eater, since I'll get a useful Figurine out of it. I assign Durance to it.
*Evil* 13th Level
Everyone now has enough experience to advance to their 13th levels.
Zakara gets Sacred Immolation. This ability causes the Paladin to pulse fire in a certain radius around the Paladin every few seconds for a base duration of 30 seconds. Each pulse inflicts a small amount of Raw damage on the Paladin, but will also at the same time cause Burning Damage to all enemies near the Paladin, and heal a small amount of Endurance for nearby allies. If the Burning damage kills an enemy, it will trigger The Black Path for Zakara.
Eder acquires Weapon Specialization: Noble, which increases his damage with his Measured Restraint rapier.
Maneha acquires Blood Thirst. This ability erases her need for Recovery time whenever she lands a killing blow on her target. This ability in particular allows a Barbarian to play at both a heavily-armored tank and a damage dealer at the same time.
Zahua acquires The Dichotomous Soul. It basically allows a Monk, once he has acquired enough Wounds, to summon two pretty powerful clones of himself. One will be made of fire, while the other will be made of ice. This is one of Zahua's key abilities during fights against tough bosses (e.g. Dragons).
Durance selects Circle of Protection as his 3rd-level Mastered spell. It basically now allows him to add +15 to all defenses for 10+ seconds each Encounter. With its short duration, it will be the last of the buffs that I cast each fight.
Aloth learns two spells. One is Tayn's Chaotic Orbs, which inflicts random negative status effects only on enemies. It can be useful in some situations, like for example if you want to debuff several enemies who are right in the mix with your warriors.
He also learns the Wall of Draining. This spell can be used when I conduct fights where the enemy has to approach me through a bottleneck. Any beneficial effects they may have (e.g. Barbarian Frenzy) will lose duration, and at the same time increase any beneficial effects that Aloth may have on himself (e.g. Eldritch Aim).
He also chooses Kalakoth's Minor Blights as his 3rd-level mastered spell. It's really an easy choice. During long treks through dungeons where careful use of spells may be required, Aloth can simply choose to use both Kalakoth's Minor Blights and Merciless Gaze together every fight and then bombs away.
Naroc the Prophet
The next bounty is against a Cipher named Naroc the Prophet. He and his followers can be found at #8 on the map of Cilant Lis.
I win the battle with standard methods, but now with a new twist. Alliria, after protecting both Devil of Caroc and Kana with Reinforcing Exhortation, now activates her new Sacred Immolation power to meet the oncoming horde. Once battle positions are locked, Sagani catches as many enemies as she can with Combusting Wounds. The result is that whenever the Sacred Immolation pulses, the Combusting Wounds will also add +5 Burning Damage on top. She and Ituumak thereafter quickly take out Naroc himself.
Naroc leaves behind two items afterwards. One is a Breastplate called Elardh Dwr. Alliria wears it as an interim armor. It has an Exceptional +4 bonus to Damage Reduction. Its +5 bonus to the Fortitude Defense, as well as defensive bonuses against Prone and Push, allow her to better withstand the rigors of physical combat. I nonetheless keep the Hand and Key breastplate in the stash, for fights against creatures like Fampyrs and Swamp Spores and the like.
The other is Naroc the Prophet's Head. Alliria brings the head to the Warden for an xp reward and 2,500cp.
*Evil* Naroc the Prophet
I also show this bounty from the perspective of the evil party. I pretty much win the same way, through a combination of Durance's buffs and Aloth's crowd-control.
An average companion adventure becomes available, although I don't care which one. It happens to be the Skulls for Mother one.
Sserkal
The next bounty is against a Vithrack Exarch named Sserkal. First, I stop off at the Chapel in Caed Nua. I sell off my excess loot, and at the same time purchase a Scroll of Protection and equip it in one of Kana's quick-item slots. It can really come in handy when facing off against multiple Vithracks, all of whom can inflict nasty things like Dominate, Confusion, Charm, Paralysis and Stun. Kana also switches over to his Modal Chant that includes Shield Their Eyes 'Against the Fampyr's Gaze.
I travel to Pearlwood Bluff. He, along with several other Vithracks and some Crystal Eaters, will be at #6 on the map of Pearlwood Bluff. Kana leads off with his Scroll of Protection. I still have a party member get stalled with something like Paralysis or Confusion, but the usual tactics still win with some persistence.
Sserkal himself leaves behind two items. One is a Robe called Gwik Glas. I have no use for it, so I'll sell it.
The other is his head. Alliria brings it to the Warden for an xp and 2,750cp.
Both parties now head for the Temple of Hylea.