-

- Forums
- Chatrooms
- Gallery
- Gameplay Videos
- Upload
- Articles
- Mod Reviews
- Shop SP: Games, Movies, Books
|
|
Temple of Hylea
*Evil* Odeyna Fyrgest
The evil party travelled to Elm's Reach, but heads back to Caed Nua after learning that Odeyna Fyrgest has arrived as a visitor. I pay her 5,000cp to facilitate a move out of Dyrwood, with the objective of increasing my Prestige by +1.
I could have obtained the same result by having either Eder or Maneha assist her, but the evil party doesn't want to lose the services of either, even temporarily.
Prayer to Hylea
It turns out that the materials to craft Scrolls of Valor (+15 Accuracy), Scrolls of Defense (+20 all Defenses) and Scrolls of Protection (-50% duration of all negative effects) are pretty common. So I craft four more of each and equip them in Kana's quick-item slots. I do this in anticipation of a battle soon to come. I travel to Elm's Reach.
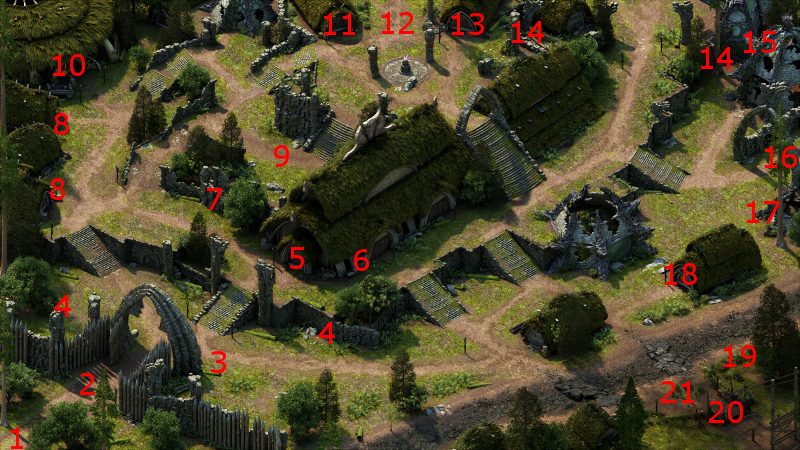
I start off at #1 on the map of Elm's Reach. The entrance to Teir Evron is at #19.
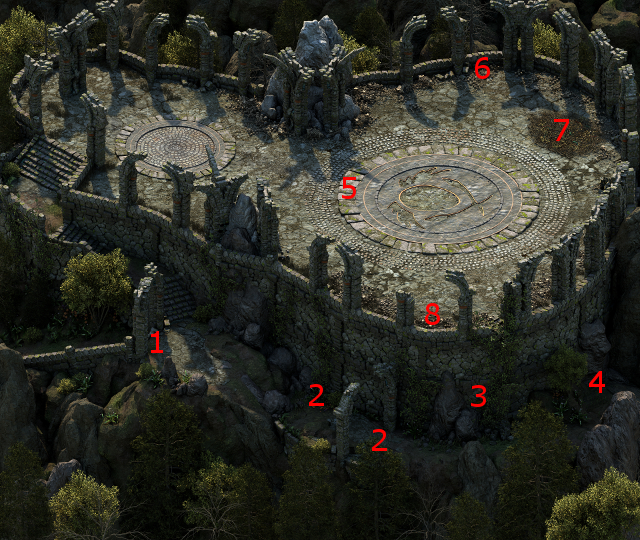
I am now at #1 on the map of Teir Evron. I click on the Shrine of Hylea at #7, and use the words "Live every note of life's song" as a prayer. Hylea provides a vision that reveals something unwelcome has taken over her temple. She would like me to rid the temple of it. The conversation triggers The Nest Above the Clouds quest.
Torc of the Falcon's Eyes
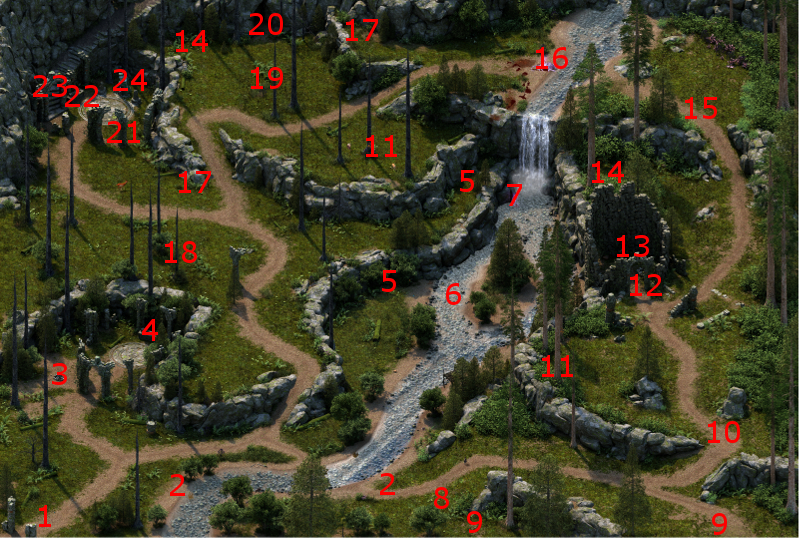
I start off at #1 on the map of Northweald. I travel towards the northwest corner.
At #21 will be a few Adra Beetles and a few Adragans. I send Ituumak ahead and towards one of the Adragans. It's risky, since he gets surrounded. But it pays off, since Grieving Mother quickly brought herself up to 60 Focus by hitting another Adragan with her Crossbow, and then using Ituumak to unleash an Amplified Wave that knocks all my enemies down and makes the battle that much easier. Hiravias also starts to make use of his mastered spells when he can, Woodskin on the party, Returning Storm and Nature's Mark on the enemies. I accomplish my objective of winning this fight with nary a scratch.
A hidden niche has a Torc of the Falcon's Eyes, but I'll just sell it.
Stairs to Hylea's Nest
I click at #23 to start a scripted interaction. I use a Hammer and Chisel to clear the boulder out of the stairway, and pave the path to the Temple of Hylea.
Sky Dragon
I start off at #1 on the map of the Temple of Hylea. First, I have Kana change his Phrase Modal to the one that includes the Power of the Saint so as to increase the party's resistance against Fear and Terror. I climb north and left up the stairs.
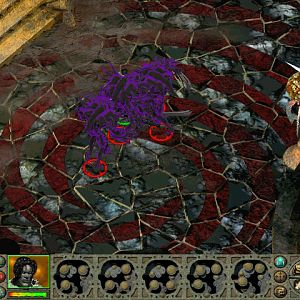
At #5 will be the Sky Dragon. It can be pretty tough for a number of reasons. One, its breath weapon can inflict a LOT of Burning Damage on multiple party members if they get caught in the cone. Second, it can regularly use a Relentless Storm-effect, which if used often and successfully enough, can keep an entire party Stun-locked. It is also helped out by a Wurmling, and several Greater Rain Blights.
First things first, I spread the party out in two different directions. I keep Hiravias and Sagani back. I send Alliria and Kana to the north. I send Ituumak, Devil of Caroc and Grieving Mother to the south. Doing so serves two purposes. One, it spreads the party out with the hope that not all party members will get caught by the breath weapon. Second, it allows me to take out the Blights and Wurmling on both sides of the map quicker and leave the Dragon by itself.
After that, Alliria uses Reinforcing Exhortation on both Kana and Devil of Caroc. She also tags the Dragon with Sworn Enemy. She and Devil of Caroc then stay on the Dragon and keep hitting it with everything they've got. Sagani fires at her from a distance, while Ituumak also joins in on the front-line action.
Grieving Mother hits the Dragon from the flank. She also uses Disintegrate to inflict Raw Damage on the Dragon whenever she's accumulated at least 60 Focus.
Kana tanks against the Dragon. But, he'll also use his Scrolls of Defense, Protection and Valor when he can (and if previous scroll durations have run out) in order to bolster the party against the Dragon's attacks and Stuns. He'll also try to hold the Dragon still with his Paralysis wave (although it didn't work this time) or buff up his comrades with his Brideman Slew Thirty whenever he's accumulated enough Phrases.
Hiravis hangs back and uses spells according to the situation. He may occasionally try to hold the Dragon still with Embrace the Earth Talon (didn't work this battle). His most reliable offense against the Dragon is to cast a Venombloom on its spot in order to whittle it down with Raw Damage. He also makes a point of keeping Moonwell spells on the party when the previous one has run out. He'll also make use of Weather the Storm in order to boost the party members' resistances against the Dragon's breath weapon. He otherwise will try to tag the Dragon with his Pliambo per Casitas whenever he's not casting spells, with the hope of exposing it to harder attacks by his comrades.
I eventually do manage to wear it down. It leaves behind lots of Dragon Meat, plus a pair of Sky Dragon Eyes.
Sky Dragon Hoard
At #8 is a ring called Pensiavi Mes Rei, Alliria equips for the rest of the game. It adds a +3 bonus to Might, while keeping her belt slot free for the Binding Rope. The might bonus will increase the damage of her physical attacks, the Burning Damage of Sacred Immolation, and the healing provided by both The Sword and the Shepherd and Strange Mercy.
At #6 is a Warhhammer called Godansthunyr. Hiravias equips it for the rest of the game. The Stun on hit power can help him out when he's forced into melee combat. The +1 bonus to Might will stack with the Might bonus from his belt, increasing even further the damage not just from his physical attacks, but more importantly the damage from his offensive spells.
Lastly, I rest in the Temple, and that meets the requirement for the last upgrade for Sagani's Stormcaller bow. That means the bow now has the Superb enchantment, and it also now allows her to use the Crackling Bolts spell twice per Rest.
I leave and travel to Hearthsong.
*Evil* Sky Dragon
Likewise the immediate priority for the evil party is to get rid of the Blights as fast as possible. To that end, Aloth helps matters along by bombarding them with his Kalakoth's Minor Blights + Merciless Gaze combo. He also plants an early Malignant Cloud in the center of the area to inflict some early damage on the Dragon herself, and the incoming Blights.
My warriors surround the Dragon once the Blights are gone. That's when they use Potions of Iron Skin and Potions of Power just as they close in. They are also prepared to use Potions of Major Endurance if they take enough damage, which is pretty much assured in this battle.
Durance meanwhile often casts buffs and healing spells repeatedly, especially Consecrated Ground. An additional tweak here is that Durance sometimes casts Litany Against Major Afflictions on Zakara in order to immunize her against Stunning, since she will be my heaviest hitter against the Dragon.
Aloth continues to do what he can to help bring it down. That includes casting carefully-placed Malignant Clouds on it in order to inflict Raw damage on it. At one point, Aloth casts Eldritch Aim followed by Gaze of the Adragan spells to try and hold it still so that the warriors can inflict double damage on it. It worked once at least. It was close, but I eventually managed to wear it down.
Durance equips Godansthunyr on an interim basis, since it will benefit from his Weapon Focus (Soldier) talent. I add the Burning Lash and Spirit Slaying enchantments to it.
Zakara equips Pensiavi Mes Rei, which becomes one of her rings for the rest of the game. It adds a +3 bonus to Might, while keeping her belt slot free for the Blunting Belt. She now also replaces Stolen Engwithan Amulet with The Core, with the point of replacing the Might bonus in that slot with a Perception bonus of +2 instead.
Godansthunyr
The good party is now in Hearthsong. The entrance to the Market is at #10.
I start off at #1 on the map of the Market. I replenish my Camping Supplies by buying a set from Rhanet at #10.
I next buy a few Potions of Major Endurance, and a Sapphire, from Alarhi at #8. Now that I have both a Sky Dragon Eye and a Sapphire, I add the Superb quality enchantment to Hiravias' Godansthunyr hammer. I also add the Shocking Lash enchantment to it. The video concludes with the good party travelling to Elm's Reach.
*Evil* Father's Teeth
The evil party afterwards returns to the rewards chest at #3 in the Great Hall. Inside will be an amulet called Father's Teeth, which is a reward for the Skulls for Mother companion adventure. I have no use for it though.
The Nest Above the Clouds
I return to Teir Evron, and receive an xp reward from Hylea for slaying the Dragon. That marks the conclusion of The Nest Above the Clouds quest. Note that I could have completed the quest even if I had left the Dragon alone, but that would have required making an Intellect check of 18 when speaking to Hylea, and giving up the Sky Dragon Eyes (which I didn't want to do.
Alliria ultimately does intend to obtain Hylea's favour in her pursuit of Thaos. But for now, she reserves her decision so that she can complete the remaining quests offered by other gods. The video concludes with the good party travelling to Old Song.
*Evil* Zakara temporarily dismisses the Dunryd Psion and the Vicious War Criminal in order to get rid of their Prestige penalties and replace them with Hirelings that, although weaker, also bring Prestige bonuses. I now want to maximize my chances of getting Legendary companion adventures.
Zakara also does not accept Hylea's reward, since she wants to speak to the other deities first.
*Evil* The Trials of Durance
Zakara speaks to Durance, now that I've finished a quest given by one of the Gods. The gist of it is having to convince Durance that Magran does indeed want him dead, and would have killed him by now but for the fact that his spirit's condition is such that she cannot hone in on where he is.
The dialogue marks the completion of Durance's personal quest, The Trials of Durance.
Both parties continue on to Oldsong.