-

- Forums
- Chatrooms
- Gallery
- Gameplay Videos
- Upload
- Articles
- Mod Reviews
- Shop SP: Games, Movies, Books
|
|
Raedric's Hold - Dungeons
I prefer to do the Dungeons first, because in my view it is the beginning of the relatively quickest path to a place within the Keep where I can Rest without limit, without expending Camping Supplies. Details of the pathway will emerge as I go along.
Raedric's Hold Sewer Grate
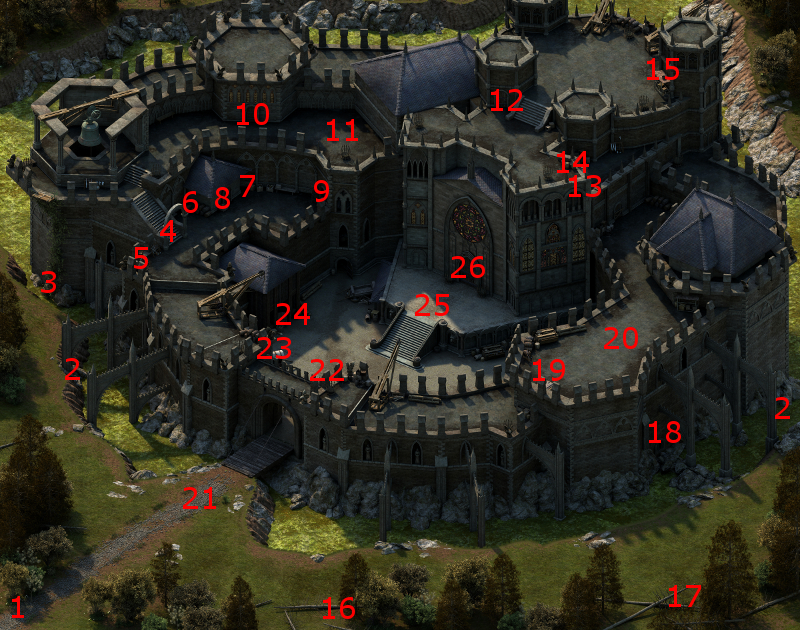
I start off at #1 on the map of the exterior of the hold. I creep along the south edge of the area, collecting various plants along the way.
At #18 is a sewer grate. Getting through it requires bending the bars to clear a passage. I could use a Prybar to open it, but I prefer to save those kinds of items whenever possible. You never know when you'll need it for real during a different scripted interaction.
Instead, I have Alliria consume one of the Goldrot Chews that I had found earlier before starting the scripted interaction for its +3 bonus to Might. She then makes a Might check of 18 to clear the way to the Dungeons.
Guls and Revenants in the Dungeons
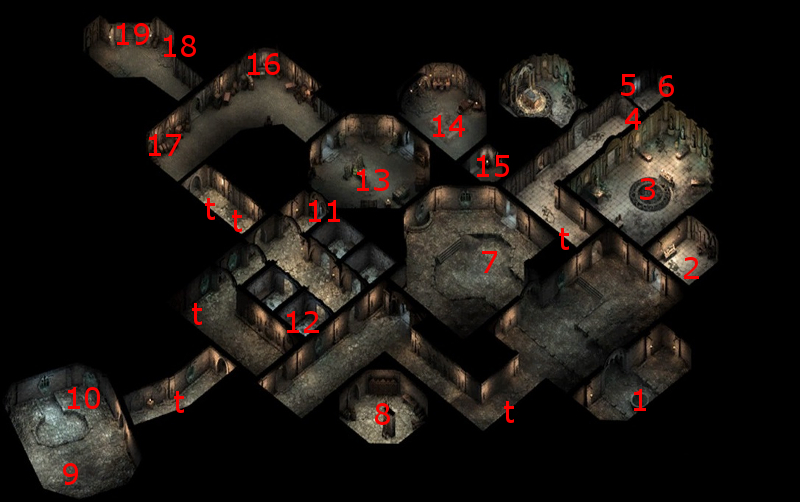
I start off at #1 on the map of the Dungeons. I go along the passageway that leads north and east, disarming a trap along the way.
I continue on, but some Guls and Revenants come at me from the room at #7. The battle isn't that difficult. Aloth softens them up with his Grimoire Slam power. Alliria is able to trigger her healing powers with frequency.
I next edge towards the room at #3. I have the Orlan Rogue plant a Dart Trap near the door, and then have Eder lead the Guls and Revenants out of the room. The battle otherwise plays out in similar fashion.
The room itself has two trapped sarcophagi with random items in them. One of them yielded a Fine Brigandine Armor, which becomes an upgrade for Kana.
The video concludes with the party making its way a bit west and south of the initial entrance.
Black Oozes in the Dungeons
I edge a little towards the hallway leading to the room at #8, and disarm a trap in the hallway.
I go the length of the hallway, ignoring the room at #8 for now, and encounter the odd Black Ooze. Alliria uses both her Flames of Devotions whenever I'm fighting just one at a time, in order to keep the party members healed and to bring each one down as quickly as possible.
I continue north past the doorway, and disarm a trap on the other side. I then kill a lone Revenant.
There is another trap in the hallway leading west towards #9 and #10. My Orlan Rogue doesn't yet have enough skill ranks in Mechanics just yet, so I have to go around it. I kill another Black Ooze in the hallway.
There will be several Black Oozes in the room at #9. This can be a tough fight, especially if the Oozes hit the same character with multiple projectile attacks. I rush in and split the party into two groups, each attacking one of the Oozes, since I don't have the space to move around for one at a time just yet.
Durance uses a sequence of Blessing, Consecrated Ground and then Interdiction for this battle.
Alliria also makes early use of her Flames of Devotion, with the intention of reducing the number of Oozes attacking me as quickly as possible. Kana also summons a Phantom to help out when he can. I manage to outlast them.
The video concludes with the party going back around the trap that the Rogue couldn't disarm, and back in to the adjacent hallway. It is tempting to rest now, but I don't. There's a specific reason why.
*NOTE* I'm leaving the room at #8 alone for the time being. The reason being that I want some time to pass before I cherry pick it for an item from the Random Drop List.
Dungeon Prison Cells
There will be a couple of traps in the hallway running east towards #11. I can't disarm them yet, so I just sneak past them and then fight the numerous Skeletons near #11. They aren't difficult.
At #12 is a hidden niche that has an item from the "Raedric Keep - Dungeon - Prison Cell Hidden" section of the random drop list. It is still day 2 of the month, so I loot it for a Ring of Searing Flames.
I save it for Sagani when she joins. The idea is that she can use it to put a Combusting Wounds spell over the party when they're in it thick and tight against numerous foes. Any attack by party members within the radius will inflict an additional 5 points of Burning Damage. In my good playthrough that will eventually include numerous items with the Retaliation property, and also Alliria's Sacred Immolation power much later on. The reason I don't have Aloth learn the spell for the evil party was because he usually had other spells that he was inclined to cast, and it was hard to fit this one into his sequences. Sagani by comparison will possess this distinct option as an alternative to firing arrows or attacking with a pike, so she'll use it with considerably more frequency.
*Evil* The evil party didn't particularly care which item was found in the niche, so would just sell it for cp.
Dungeon Torture Chamber
There will be a couple of traps in the hallway leading north and west from #11. I have the Orlan Rogue disarm them, which gives him enough experience to advance to his 4th level of experience. He learns the Vicious Fighting talent. It is an improvement on the Dirty Fighting talent so as to result in an aggregate 20% chance of converting Hits to Critical Hits.
The Rogue also adds a point to his Mechanics skill, so now he disarms the traps in the hallway going west as well.
The room at #11 is a torture chamber with several undead, which I kill fairly easily. I loot the various containers for miscellaneous items.
The video concludes with the party resting up before a key fight. Kana, upon awakening, questions Alliria about how she finds travelling in Dyrwood as an Aedyran.
*Evil* Osrya
I show this part from the perspective of the evil party. At #14 will be Lord Raedric's pet Animancer, Osrya. She will have a Flesh Construct and a Revenant on either side of her, and a Skeleton Mage to her left.
I could enter into her allegiance for purposes of the Lord of a Barren Land quest. But I don't find that very beneficial, since she wants Nedmar dead and good or bad I want to keep Nedmar alive.
Zakara makes a Perception check of 12 (that also earns Deceptive disposition) to convince Osrya that she's simply lookin in on Lord Raedric's behalf. That ends the dialogue without hostilities, and that in turn allows me to position everyone at leisure. Zakara places herself right next to Osrya. Eder positions himself next to the Flesh Construct on the left. Kana positions himself next to the Revenant on the right. Durance and Aloth hold back.
Once everyone is in place, I have Zakara begin by force attacking Osrya. She manages to kill the Animancer quickly with a Flames of Devotion of Attack. However, she's also taking a beating from the nearby Flesh Construct and Skeleton Mage, so she also gulps a Potion of Minor Endurance when she needs to.
Eder is holding up the Flesh Construct and Revenant to the left. Aloth catches as many enemies on the right-hand side as he can with repeated castings of Ghost Blades. It becomes a mop-up at some point.
Numerous containers in the room have random items and coins. Osrya leaves behind Rusted Iron Cell Key and Osrya's Grimoire. Aloth uses the Grimoire to inscribe two spells, Concelhaut's Corrosive Siphon and Fireball.
*Evil* Black Cat Pet
In a corner of the room will by Osrya's Black Cat. Zakara takes it as her interim pet.
*Good* Alliria doesn't accept the cat. She waits for a different pet.
Giacco
I use the Rusted Iron Cell Key to open the door to the cell at #11. Giacco can be found prisoner within. I could kill him, or I could have earlier let him go before clearing out the Dungeons of all its monsters, which would also result in his death.
However, for either the good or evil party, I find it more beneficial to set him free so that he can return to Magran's Fork. I get a moderate boost to positive reputation with Gilded Vale for informing him of Osrya's death, and another for freeing him of the Dungeons. It is ultimately more beneficial for either party to pursue this course for purposes of the Lord of a Barren Land quest.
I continue north and recoup my Camping Supplies from the crate at #17.
I also loot the chests at #16. I happen to get a Fine Mail from one of them, which becomes an upgrade for the Orlan Rogue.
There will be stairs going up at #19. My next destination is the Sanctuary of Raedric's Hold.