-

- Forums
- Chatrooms
- Gallery
- Gameplay Videos
- Upload
- Articles
- Mod Reviews
- Shop SP: Games, Movies, Books
|
|
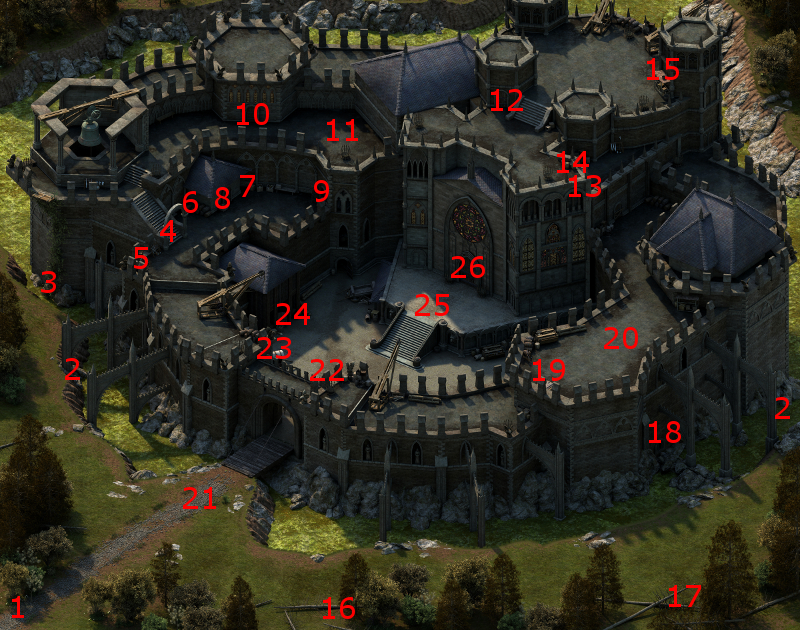
Raedric's Hold Keep
Keep Foyer
I arrive at #1 on the map of the Keep. There will be several of Raedric's minions about the foyer. A new kind of enemy will show up here as well, Wizards called Spellwrights.
Durance uses the Blessing, Consecrated Ground and Interdiction sequence for the first large cluster. The fights against the remaining enemies are definitely easier after the first one.
Fountain Room
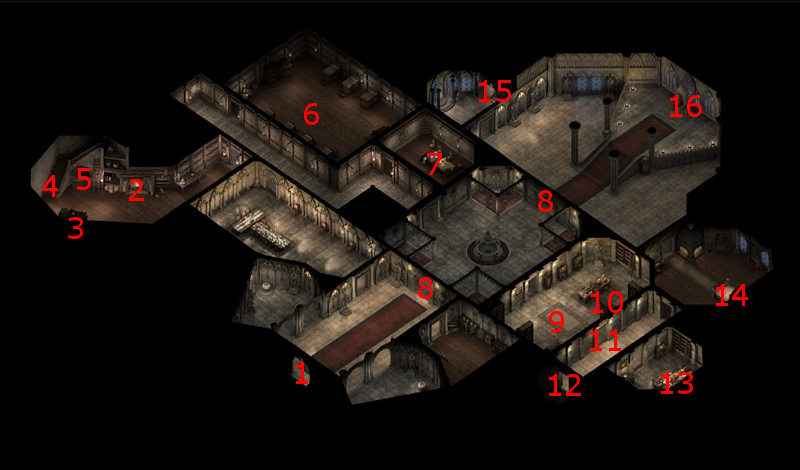
The central room is in between the doors marked #8, both of which require the Burnished Steel Key. I open the one to the southwest.
I remain behind the door and have the Orlan Rogue set a Poison Dart Trap at the door. Eder goes on ahead to get their attention to lead them back to the party.
Durance uses his sequence of Blessing, Consecrated Ground and Interdiction, while Aloth sets up a Chill Fog at the door. The battle runs its course once all of that is set up. Any stragglers remaining in the room will be much easier to take care of afterwards.
Lord Raedric's Study
I enter the room at #9, which is Lord Raedric's Study. Some of the containers have books, although one of them had a Scroll of Defense which I save for Kana.
The switch at #10 opens the door at #11. There will be two chests on the desk at #13. The chest that's more to the north will have an item that is on the "Raedric Keep - Main Floor - Chest on Desk" section of this version of the random drop list. It's day #4 of the month, so I get a pair of Gloves of Manipulation.
I have the Orlan Rogue wear them. And ultimately the Devil of Caroc will keep them as well. They are valuable, as they are the only item that provides a bonus to Mechanics. Even though the Devil of Caroc will ultimately wear different gloves during the latter parts of the game, she'll still keep them in case she runs into a door or trap that requires a boost to Mechanics to get past.
The video concludes with the party returning to the Fountain Room.
Keep Barracks
I now fight my way through the rooms on the west side of the Keep. The foes mostly come in small groups, so I win them easily enough.
However, the room in #6 has quite a few of Raedric's minions, so I have Durance cast Blessing and Consecrated Ground. Kana summoning Phantoms also helps.
The chests in the room will have random armors and weapons. The Orlan Rogue finds a Fine Spear as an upgrade, so he hands his Fine Sword over to Alliria. She wields it in her main-hand as an upgrade, and transfers her Sabre to her off-hand.
I next go up the stairs at #4.
*Evil* Lord Raedric's Study
The evil party went to Study after having cleared out the Barracks. They rest near Nedmar until Day 17 of the month, with the point of extracting Gauntlets of Accuracy for Eder.
Attack Speed is not a priority for Eder, who operates as a tank. The priority is instead to keep numerous enemies locked down around him under threat of getting knocked Prone by Disengagement Attacks. I therefore prefer to maximize his Accuracy, to not only increase his chances of landing Disengagement Attacks, but also increase the chances of those attacks knocking their targets Prone.
Dungeons Ladder Chest
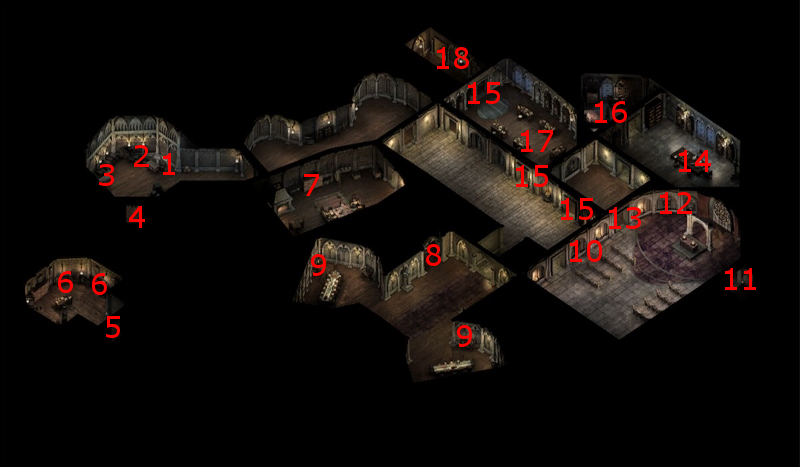
The good party is now at #1 on the map of the Sanctuary. I head over to Nedmar at #14 and rest up until it's day 5 of the month. I go back down the stairs at #1.
That brings me back to the stairs at #4 of the Keep map. I now go down the stairs at #5.
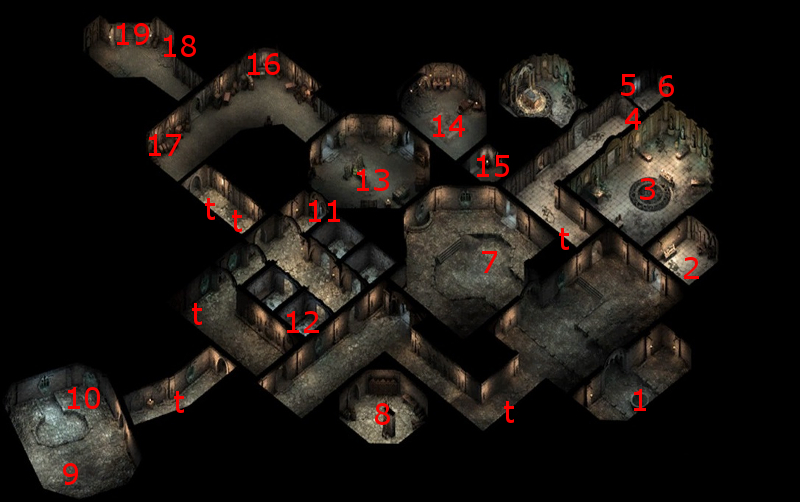
That brings me to #19 on the map of the dungeons. I go south to the room at #8. A chest on the left side of the room has a random item or two.
The chest on the right side of the room has an item from the "Raedric Keep - Dungeons - South, Chest Near Ladder" section of this version of the random drop list. It is day 5 of the month, so now I take a Blunting Belt from the chest. Kana now has a useful interim belt. He is the main tank for the good party, so it makes sense for him to raise his Damage Reduction with an item like this. Note that I don't rely on Kana to hit heavy in melee combat, so it's not imperative to use his Belt slot on a Might-enhancing item.
Captain of the Guard
I go up the ladder at #8, and wind up at #19 of the Exterior of the Keep. The Captain of the Guard, along with several Raedric's Guards and Sellswords and Archers, will be at #20. They attack immediately. Durance does his usual buffs while Aloth blasts away with his Grimoire Slam attacks. The fight otherwise plays itself out naturally. I go back down the way I came.
Lord Raedric's Bedroom
I go all the way back to Nedmar and rest up until it's day 6 on the month. I take the stairs back to the Sanctuary and make my way to Lord Raedric's bedroom, which is #14 on the map.
Lord Raedric's wife lies dead and murdered on the bed. A chest at the foot of the bed has an item from the "Raedric Keep - Main Floor - Chest Beside Bed" section of this version of the random drop list. As it's day six, I now obtain a Stalker's Torc.
I save it for Sagani when she joins. I plan on getting the Stalker's Link ability for her, which gives her a +10 Accuracy bonus when she fires her arrows at the same target as is being attacked by her pet. The Torc will add a +20% bonus to damage in addition to the Accuracy bonus.
*Evil* Lord Raedric's Bedroom
The evil party rests until it's day 2 of the month, in order to obtain Gloves of Manipulation for Aloth, and for similar reasons as for Devil of Caroc.
Ceiling Hidden Chest
The good party returns to Nedmar and rests up until it's day 9 of the month. This time I go up the stairs at #8 of the Sanctuary map.
That brings me to #12 on the Keep Exterior map. I loot the crates at #13 and #14 for random items.
A hidden crate at #15 has an item from the "Raedric Keep - Ceiling" section of the random drop list. As it's day 9 of the month, I get Gloves of Accuracy from the chest. Eder wears them, and for the same reasons, granted that he won't be in the good party for that much longer. I thereafter return to the Sanctuary.
Lord Raedric
I go down the stairs at #18 on the Sanctuary map, which leads to #15 on the map of the Keep. I have Alliria put a Potion of Ironskin she had found earlier into one of her quick-item slots.
Waiting for me will be Lord Raedric at #16. He himself is a more powerful version of a Paladin of Berath. His retinue includes a pair of Archmages, a more powerful Priest called the Favored of Berath, a few more powerful Paladins of Berath called Champions of Berath, several Bodyguards, and a few Archers.
I step up to the large dais in order to speak to Lord Raedric on his throne. Note that this leaves the party in a less than ideal position, since their flanks will be exposed to some of Lord Raedric's minions from the sides once battle starts. Alliria cuts to the chase with Passionate replies in order to provoke Lord Raedric into a fight then and there.
First, Eder goes after the Champion of Berath to his right and closest to Durance, and thereby holds three enemies on the right side by himself.
The Orlan Rogue takes on the Bodyguard to his immediate left, and thereby prevents enemies from reaching Aloth from the left side.
Durance initiates a sequence of Blessing, Consecrated Ground and Interdiction.
Aloth puts a Chill Fog in front of the party and over the top of oncoming enemies. He afterwards hits as many enemies as he can with multiple castings of Ghostblades and Grimoire Blasts.
Alliria begins by using the Potion of Ironskin on herself, which turned out to be a good thing. She ends up having to absorb Lord Raedric's initial onslaught, and the two of them fight each other one on one.
Kana first uses a Scroll of Defense that he found earlier on the party in order to raise all of their Defenses by +20. Very soon thereafter, the Favored of Berath and an Archmage get close to the front lines. Kana therefore grabs the opportunity to use a Scroll of Insect Swarm he had found earlier on the two spellcasters plus Lord Raedric.
The overall result is that the enemy spellcasters go down very quickly under the barrage of spell-effects, while Alliria takes down Lord Raedric in short order with both her Flames of Devotions. Once the battle reaches that point, victory becomes inevitable.
There's a lot of loot to be accumulated here, but the key acquisition is a Great Sword called Justice. I save it for Grieving Mother when she joins.
Lord of a Barren Land
I make for the door south of the throne room. Kolsc arrives and gleefully takes over rulership over Gilded Vale. I get an xp reward and Kolsc's assurance that I'm welcome to any treasure left in the building (which I've already cleaned out). That marks the conclusion of the Lord of a Barren Land quest for the good party.
*Evil* Audience with Lord Raedric
Zakara speaks with Lord Raedric briefly, and agrees to kill Kolsc at his behest.
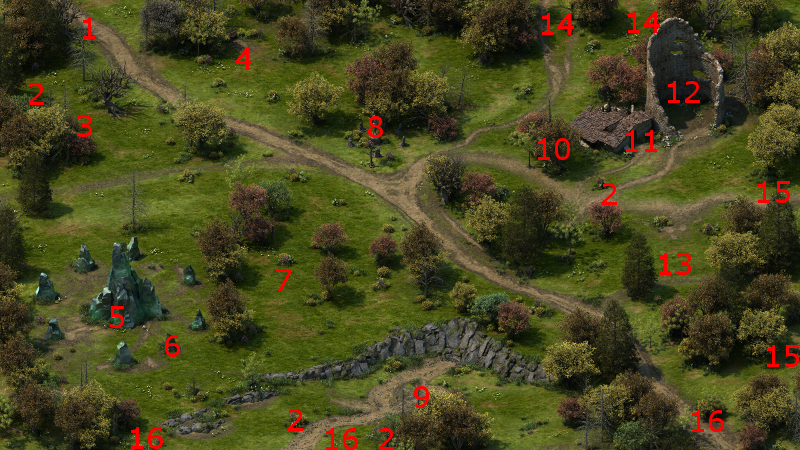
*Evil* Killing Kolsc
Kolsc and his minions will be in the house at #11 on the map of Magran's Fork.
Aloth goes with Eldritch Aim followed by Chill Fog in front of the party. Durance goes with Blessing, Consecrated Ground, and then Interdiction. Kolsc's Wizard comes forward and near Eder, so I have Eder take him out up close. The battle concludes rather easily.
The key acquisition is the Fine Sabre that Kolsc leaves behind, which becomes one of Zakara's weapons for now.
*Evil* Lord of a Barren Land
First, I collect a quest bonus by informing Lord Raedric that I've killed Kolsc. I get 500cp, plus his Great Sword named Justice.
Now I decide to kill Lord Raedric as well. The battle is similar to the one waged by the good party, allowing for a few differences. One, I get the luxury of having Aloth plant a Boiling Spray trap at the foot of the throne beforehand. Second, I get to position my party at the top of the stairs so that I can keep my spellcasters clearly behind the tanks and start the battle by having Eder force-attack one of the nearby Bodyguards. Third, I get a second Justice after looting Lord Raedric's corpse.
I don't show it any videos, but either party will return to Gilded Vale, sell off its abundant excess loot at the Black Hammer Smithy save for a few items that I want to save up for future party members (e.g. Justice for Grieving Mother) and rest up at the Black Hound Inn. My next destination is Caed Nua while it is still a dilapidated ruin.