Pillars of Eternity logo


Pillars of Eternity Online Walkthrough by David Milward


INTRODUCTION & ABOUT  |  WORLD MAP  |  WHITE MARCH MAP
General:  
Quests  |  Tasks  |  Bounties  |  Items  |  Characters
Areas:  
Act 1 Areas  |  Act 2 Areas  |  Act 3 Areas  |  Act 4 Areas  |  Caed Nua  |  White March - Part 1  |  White March - Part 2  | 
Disable all ads!

Quests:   Main Quests  |  Act 1 Side Quests  |  Act 2 Side Quests  |  Caed Nua Side Quests  |  Act 3 Side Quests  |  White March Part 1 Quests  |  White March Part 2 Quests  |  Companion Quests  | 

Act 1 Side Quests:   A Mother's Plea  |  The Smith's Shipment  |  Buried Secrets  |  Lord of a Barren Land  |  A Farmer's Plight  |  Blood Legacy  | 

Lord of a Barren Land

Esternwood

  1. Kolsc
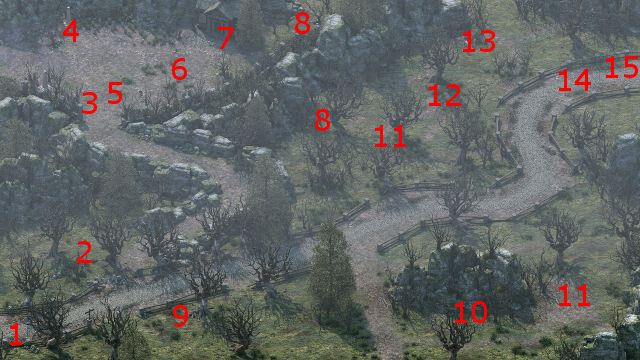
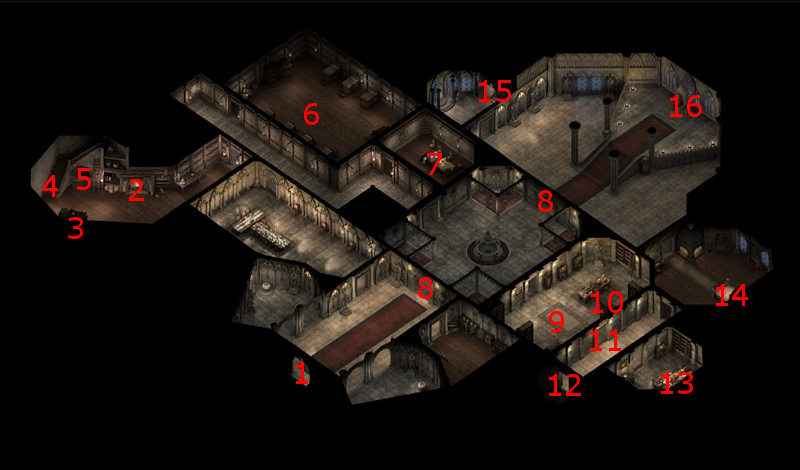
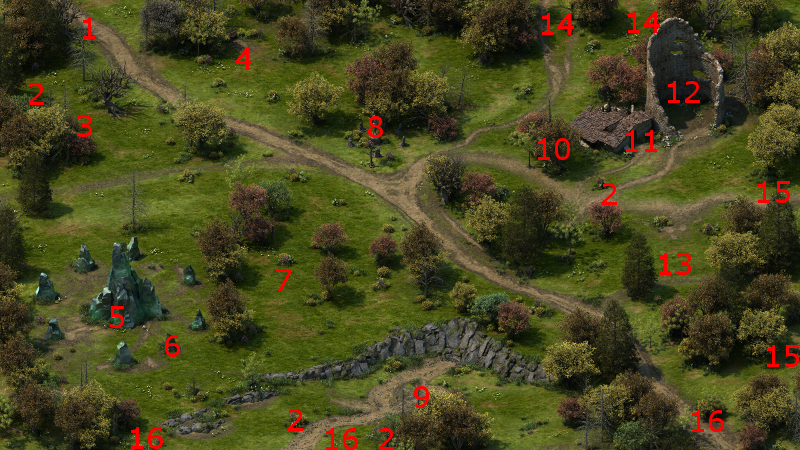
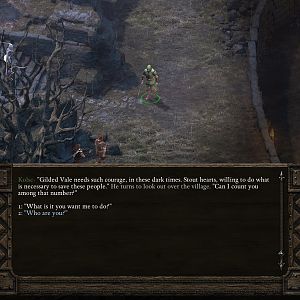
If you build up a good reputation in Gilded Vale, then Kolsc will come talk to you and try to recruit you to his cause against Lord Raedric. This will happen almost immediately after completing enough tasks or quests that raise your reputation to good with Gilded Vale.

    If you maintain a neutral reputation with Gilded Vale, then Kolsc will make the same offer at #14 on the map of the Esternwood.

    Kolsc will avoid you altogether if you have a bad reputation with Gilded Vale, but then you can just to Raedric's Hold on your own in any event.
  2. Raedric's Hold, Exterior

  3. Once you arrive at Raedric's Hold, it will be a fully manned castle with a lot of Lord's Raedric's minions spread throughout, both outside and within. If you want to reach Lord Raedric while keeping the fighting to a minimum, there are two distinct pathways. And the start of either pathway requires you to reach the Dungeons. And it turns out there is more than one efficient way to reach the Dungeons.

  4. One way involves going to a spot at the west wall of the Hold, at #3. There will be a spot where you can use Vines to climb up the wall. Any characters that don't have an Athletics rank of at at least 3 will end up fatigued. That can, however, be avoided if the party uses a Rope and Grappling Hook. You will then need to fight a couple of Raedric's Guards and an Archer at #4. At #8 is a door that leads to the Hold Sanctuary at #4. Very close by will be another set of stairs, at #1, that lead further down to the Keep at #5. And again very close by will be another set of stairs, at #4, that lead further down to the Dungeons at #19.

  5. The other involves making your way to the sewer grate at #18 on the Raedric's Hold map. You can get across by walking over the shallows that are barely visible beneath the water. The grate itself provides an entrance to the Dungeons of the Hold at #1. But you need either a Prybar or a character with a Might of at least 18 in order to widen the bars of the grate enough to gain entrance.

  6. Raedric's Hold Dungeons

  7. There will be two distinct pathways to reaching Raedric that are made available from two different individuals who reside in the dungeon. One is Giacco, who is being held prisoner at #18 in the Dungeons. Any character with a significant Mechanics skill can open the door to his cell. You can also open the door if you're willing to kill Osrya at #13 for her Rusted Iron Cell Key. He'll want you to free him so he can leave. In order for him to escape alive, you need to have killed every hostile monster in the Dungeons first. Otherwise, he'll end up getting killed. If he does leave alive, he'll end up at Magran's Fork. The point of rescuing Giacco is that you can then elicit a favorable response from Nedmar, who can then help you reach Lord Raedric.

  8. The other pathway is available through Osrya, who is at #14 of the Dungeons. She will want you to assassinate a Priest of Berath named Nedmar.

  9. Whichever pathway you choose, you can make further progress by going up the stairs at #18, which leads up to the Keep at #4. The nearby stairs at #5 will lead further up to the Hold Sanctuary at #1.

  10. Raedric's Hold, Sanctuary

  11. The barrels at #2 and #3 of the Hold Sanctuary map will each have three Berathian Priest Robes. Characters having these robes will not be attacked by the devotees of Berath on this level. That, by itself, however is not quite enough. Once in a while a Paladin of Berath or an Acolyte of Berath or a Priest of Berath will have some suspicions and interrogate the party on the spot. Very often a Resolve check of varying degrees, 12 Resolve at minimum or 18 Resolve at the highest, will suffice. Once in a while a High Priest will get suspicious, in which case you need an Intellect check of at least 12 to deflect suspicion. So in summary, having all six party members equipped in Berathian Priest Robes, and your Watcher character having at least 18 Resolve and 12 Intellect, suffices to give you complete free run of the Sanctuary level.

  12. The next step, for either pathway, is to make it to the skull in the Chapel at #12. Going into scouting mode will reveal a hidden button in the eye socket of the skull. Pressing the button will open the secret door at #13.

  13. The next crucial point is when you find Nedmar at #14. If you had previously rescued Giacco from the Dungeons, then Nedmar is willing to give you the Burnished Steel Key voluntarily. The key allows you to open the doors at points numbered as #15. You can then make a shortcut to Lord Raedric by going down the stairs at #18, which leads to the Keep at #15.

  14. Osrya will want you to kill Nedmar for her. He's easy to kill, but doing so blows your disguise and everyone in the Hold Sanctuary will turn hostile, even if your whole party is wearing Berathian Priest Robes. If you still want to keep the fighting to a minimum, the shortest way is probably to fight your way through the chapel and take the stairs at #11. The stairs lead down to the Dungeons at #6.

    Osrya will reward you by opening the way to the stairs at #15 of the Dungeons. Those stairs lead to the Keep at #12. If you didn't loot Nedmar's corpse for the Burnished Steel Key, you can still go north to Raedric's bedroom at #14 of the Keep, and then going west through the door to his throne room.

  15. *NOTE* You could of course just slaughter pretty much anything and everything in sight in every part of the hold. You won't get anymore xp for it though, since the game will not reward grinding. A significant benefit, though, is that can acquire a LOT of loot that you can sell off. If you want to do things this way, I still recommend rescuing Giacco and then staying on Nedmar's good side. The reason being that getting and staying on Nedmar's good side provides you an option of asking him to watch over you while you rest. That allows you to rest up between battles without having to expend any camping supplies.

  16. Raedric's Hold Keep

  17. The party will encounter Lord Raedric himself at #16 on the map of the Keep. Passionate replies will be available during your conversation with him. Whether you choose to kill him and install Kolsc as the new Lord of Gilded Vale, or assassinate Kolsc at Raedric's behest, is the fundamental decision that concludes the quest.

  18. If you do decide to fight, it's a pretty tough battle. Lord Raedric himself is a much more powerful version of a Paladin of Berath. He will be helped by more powerful versions of Paladins of Berath called Champions of Berath, a more powerful Sellsword called a Bodyguard, an Archer, a Priest of Berath called the Favored of Berath, and a couple of more powerful Spellwrights called Archmages. If you do commit yourself to a battle, my advice is to make the Favored of Berath your number one priority until he is killed. Hit him with missile fire and spells right away. Send a damage dealing warrior to finish him off. The reason is that his spells, especially Consecrated Ground, can keep the rest of your enemies going strong even after you've inflicted significant damage on them. The Archmages should ideally be next. If you prevail, Lord Raenric will leave behind a Great Sword called Justice.

    Once the battle ends, make your way to the south end of the throne room. Kolsc will arrive. Kolsc will attack you if you have a negative reputation in Gilded Vale, forcing you to kill him and resulting in a further loss of reputation in Gilded Vale. Otherwise, he becomes the new Lord of Gilded Vale and the quest concludes. You also get a major boost to your reputation in Gilded Vale, as well as full access to the Hold and any treasure that may be found within. Lastly, concluding the quest this way also paves the way for The Champion of Berath quest during Act 3.

  19. Magran's Fork

  20. The alternative course of action is to take up Lord Raenric's offer to assassinate Kolsc for him. If you choose to do so, Kolsc can be found in his house in Magran's Fork at #12. You can, if you're so inclined, decline to fight with him and go back to your original task of killing Lord Raedric.

    Giacco will be present if you had previously rescued him from the Dungeons. In fact, you can feint going back to your original purpose of taking out Lord Raedric to temporarily end the conversation with Kolsc. That gives you the opportunity to convince Giacco to leave Kolsc with a dialogue tree that starts with a Benevolent option. A Resolve check of 16, a Might check of 15, or Stoic or Benevolent follow ups, can get him to leave.

    If you're resolved to kill Kolsc, he will be helped out by a Chanter named Popo, an Archer, a Wizard, a Priestess, and a couple of Rogues. Take out the Priestess and the Wizard first and foremost, and let the rest take care of itself. The Archer will leave behind a War Bow, a Leather Armor, and an Acorn Helm. The Priestess will leave behind a Club, a Small Shield, and a Robe. The Wizard will leave behind a Wand, a Robe, a Cape, and a Spellwright Grimoire. The Chanter will leave behind a pair of Swords, a Padded Armor, and a Cape. Each rogue will leave behind a pair of Rapiers, a Scale Armor, and an Acorn Helm. Kolsc himself will leave behind a Fine Sabre and a Padded Armor.

    If you follow through and report your success to Lord Raedric, you will conclude the quest. Another result is you gain a large amount of negative reputation with Gilded Vale, but also gain a major reputation boost with Defiance Bay. Lord Raedric will then reward you with 500cp plus the Great Sword, Justice.

    You could also, after having killed Kolsc and gotten your reward, Kill Lord Raedric as well. That would add +1 towards the Cruel disposition.


Amazon.com
Amazon.ca
Amazon.co.uk
Sorcerer's Place is a project run entirely by fans and for fans. Maintaining Sorcerer's Place and a stable environment for all our hosted sites requires a substantial amount of our time and funds on a regular basis, so please consider supporting us to keep the site up & running smoothly. Thank you!

Disable all ads!