Pillars of Eternity logo


Pillars of Eternity Online Walkthrough by David Milward


INTRODUCTION & ABOUT  |  WORLD MAP  |  WHITE MARCH MAP
General:  
Quests  |  Tasks  |  Bounties  |  Items  |  Characters
Areas:  
Act 1 Areas  |  Act 2 Areas  |  Act 3 Areas  |  Act 4 Areas  |  Caed Nua  |  White March - Part 1  |  White March - Part 2  | 
Disable all ads!

Quests:   Main Quests  |  Act 1 Side Quests  |  Act 2 Side Quests  |  Caed Nua Side Quests  |  Act 3 Side Quests  |  White March Part 1 Quests  |  White March Part 2 Quests  |  Companion Quests  | 

Act 1 Side Quests:   A Mother's Plea  |  The Smith's Shipment  |  Buried Secrets  |  Lord of a Barren Land  |  A Farmer's Plight  |  Blood Legacy  | 

Blood Legacy

Dyrford Village

  1. You can find the House Harond Guard at #8 in the Dyrford Village. An Aggressive reply is possible early in the conversation. He indicates that his boss, Lord Harond, wants help locating his daughter, Aelys.

    The entrance to the Dracogen Inn is at #13 on the Dyrford Village map.

  2. Dracogen Inn, Main Floor

  3. Lord Harond
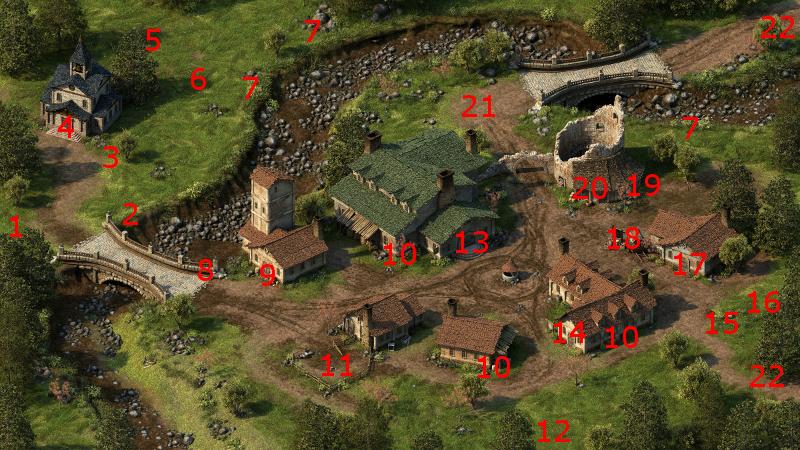
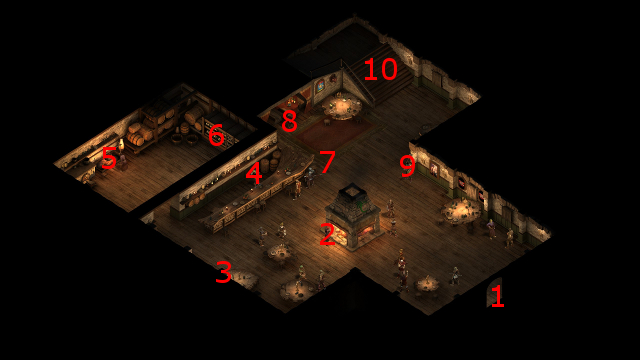
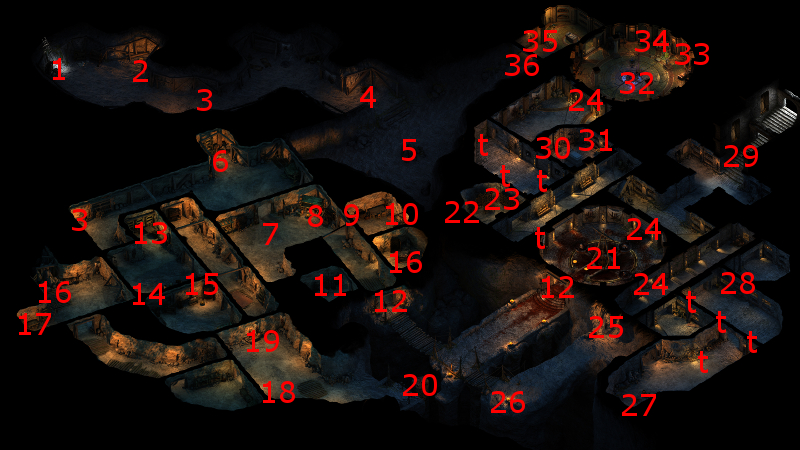
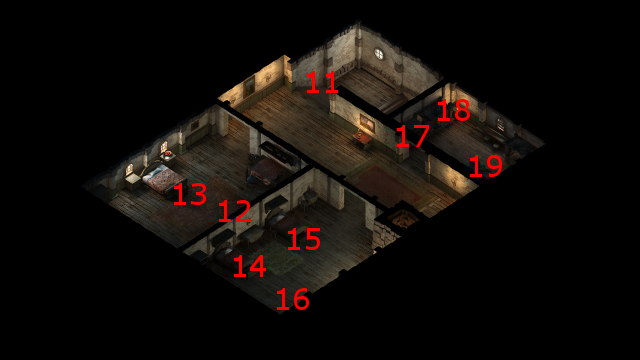
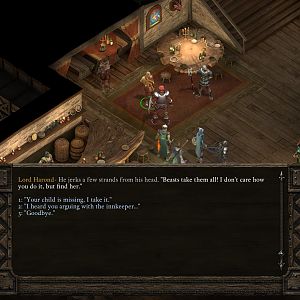
Lord Harond can be found at #7 on the main floor of the Dracogen Inn. He obviously wants you to find his daughter, Aelys, who has gone missing. Perception 14, Lore 4 and Survival 5 checks can be made to ascertain more details of what he and his daughter were doing in the area.

  4. Now there's a little more to be learned from the locals. Dengler the inn keeper is at #4, but he needs some convincing in the form of either a 1,000cp bribe or a Perception check of 13.

    After that, a Benevolent check of 3 or an Honest check of 3 or a Resolve check of 12 suffices to provide more details. The picture that emerges is that Aelys was looking for an opportunity to get away from her father.

  5. Trygil's Curriery

  6. The entrance to Trygil's Curriery is at #20 on the Dyrford Village map.

    Trygil is at #3 on the Curriery map. Whether it is by an Honest dialogue option or a Deceptive Dialogue option, Trygil will lie and say that he saw Aelys get kidnapped by an Ogre. It's actually the same Ogre who's the subject of the quest called A Farmer's Plight.

  7. Dyrford Crossing

  8. Your search will take you to the Dyrford Ruins, and there is more than one way to get into them. One way is at the base of the statue at #12 on the Dyrford Crossing map. There's three ways to open the entrance:

    • Make a Might check of 19.
    • One of characters can make a Mechanics check of at least 8.
    • Use both a Hammer and Chisel and a Prybar to open the entrance.
    • Use the Skull Key from #16.

    Once opened, the stairs lead to the Dyrford Ruins at #29.

  9. Grisly Cave

  10. Another way involves going through Trygil's Curriery, and there's more than one way to force that entrance. There's an entrance to the Grisly Cave at #14 on the Dyrford Crossing map.

    The Ogre named Korgrak will be at #8 on the Grisly Cave map. If you ask him about Aelys' whereabouts, he'll emphatically deny having anything to do with her disappearance. How you deal with Korgrak as part of the quest called A Farmer's Plight is up to you.

    Going back to Trygil and calling him out on his lie will provoke him as well as Sabhan into attacking you. Alternatively, attempting to open the door at #4 in Trygil's Curriery will likewise provoke them into attacking you.

    The door at #4 in Trygil's Curriery requires either a Mechanics skill of 8 to open, or the Curriery Key from #2. Beyond the door are stairs at #6, which lead down to the Dyrford Ruins at #1.

  11. Dyrford Ruins

  12. You ultimately want to get to #32 on the Dyrford Ruins map, and there's more than one way to go about it:

    • If you started off at #1, the entrance from the Trygil's Curriery, then one way is to travel along the western edge of the Ruins, and then southeast until you reach the chasm at #20. You will need to use a Rope and Grappling Hook to cross the chasm. Be forewarned that characters with an insufficient rank in the Athletics skill may end up fatigued.
    • Another way if you start off at #1 is to get the Old Dungeon Key from the chest at #9 and use them to open the doors at #12.
    • You can also enter the Ruins at #29 from the Dyrford Crossing instead, which will place you significantly closer to #32 to begin with.

    However you do it, you will then need the Crypt Master's Key from the table at #22. It can be used to open doors at spots marked #24, including the one leading to #32.

  13. Wymund
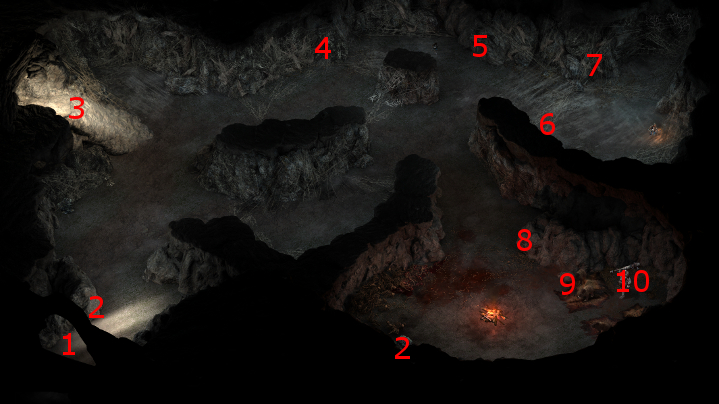
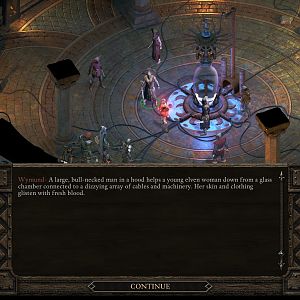
At #32 is where you find several Skaen Cultists, led by Wymund, surrounding the Elven girl named Aelys. Aggressive, Deceptive and Passionate replies are possible in response to the revelation that Aelys is Lord Harmond's niece, and is pregnant with his child. A Benevolent reponse is also possible after you learn what Wymund's plan is, to have Aelys, acting under his influence, murder Lord Hamond and the rest of her family. There are several ways to go about things:

    • You can allow Aelys to go free under Wymund's influence, which basically amounts to falling in with his plan. He and the rest of the Skaen worshippers will then become friendly and you'll be free to leave the Ruins without any further conflict.

    • You can free her from Wymund's influence. Doing so requires either you being a Priest of Skaen, the option for which appears very early in the conversation, being a Cipher, or taking Grieving Mother up on her offer to free Aelys if she is in the party. Choosing this will oblige Wymund and the rest of the Cultists to attack you.

    • You can, very late in the conversation, choose the Rational response of snapping Aelys' neck. That will likewise lead to a battle with Wymund and his servants.

    If you do end up in a battle, it can be pretty tough. Wymund himself is a fairly powerful Priest of Skaen. Two of the other Cultists will be Sentries, and the other two will be Ciphers. What makes it harder is that they'll be spread out, which can make it hard to catch with area-of-effect spells and powers. My advice is to take out Wymund himself first and foremost, and then the Ciphers. This can also be a good fight for using your summons and figurines. Hold nothing back, since it's the last fight in the dungeon. They'll leave behind:
    Wymund personally leaves behind:
    The last item can be used to open the chest at #33, which includes the dagger called Aattuuk, as well as Wymund's Notebook.

    If Aelys survives following a battle with Wymund, she will then speak to you. Diplomatic, Honest, Passionate and Stoic replies are available in response to her first remembering how she came to her current plight. Clever, Honest, Diplomatic and Rational replies are possible in response to her wondering what Wymund was up to. Benevolent, Deceptive, Honest and Passionate replies are possible when it comes to suggesting where she can go afterwards, any of which does not involve going back to Lord Harond.

  14. Dracogen Inn, Upper Floor

  15. The quest concludes when you return to Lord Harond. He will now be at #16 on the upper floor of the Dracogen Inn. The possibilities depend in large part on what choice you made with respect to Aelys:

    • If you allowed Wymund to finish his ritual on Aelys, you can choose a Deceptive option on Lord Harond that convinces him that Aelys is safe and sound. He will reward the party with 1200cp and the Amulet of Summer Solstice. If you leave it at that and let him go, you'll get a moderate positive reputation gain with Dyrford Village. If you choose Aggressive or Diplomatic responses to press for more, he throws in an extra 250cp and you also get an extraordinary positive reputation gain with Dyrford Village.

    • If you allowed Wymund to finish his ritual on Aelys, you can choose an Honest option to inform Lord Harond of what Wymund did. Benevolent, Clever and Stoic replies will be available immediately therafter. His immediate inclination will be not to give you any reward. If you're content with that, you'll also get a major positive reputation gain with Dyrford Village. If you make a Might check of 14 or a Resolve check of 14, then you'll get 750cp, an extraordinary reputation boost with Dyrford Village, and a moderate gain of negative reputation with Defiance Bay.

    • The third set of possibilities stem from either freeing Aelys from Wymund, breaking her neck yourself, or using a Deceptive option to mislead Lord Harond into believing she's dead even if you had previously freed her from Harond. Aggressive, Passionate, Rational and Stoic responses will be available shortly thereafter. His initial reward will be 1,200cp. You'll get a major reputation boost with Dyrford Village if you're content with that. Making a Might check of 14 or a Resolve check of 14 results in an extra 250cp, an extraordinary reputation boost with Dyrford Village, and a moderate gain of negative reputation with Defiance Bay. Killing Lord Harond results in gaining a net of 1,450cp, Aedyre Clothing, the Amulet of Summer Solstics, an extraordinary reputation boost with Dyrford Village, and a major gain of negative reputation with Defiance Bay.


Amazon.com
Amazon.ca
Amazon.co.uk
Sorcerer's Place is a project run entirely by fans and for fans. Maintaining Sorcerer's Place and a stable environment for all our hosted sites requires a substantial amount of our time and funds on a regular basis, so please consider supporting us to keep the site up & running smoothly. Thank you!

Disable all ads!