-

- Forums
- Chatrooms
- Gallery
- Gameplay Videos
- Upload
- Articles
- Mod Reviews
- Shop SP: Games, Movies, Books
|
|
Elmshore
Adra Arch
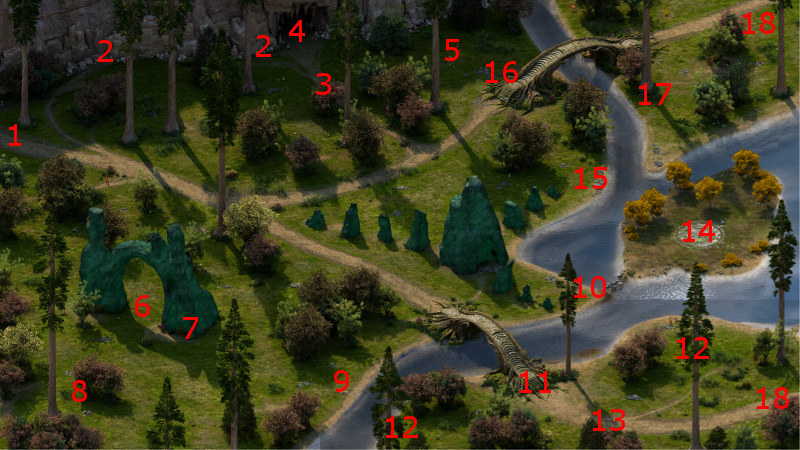
I start off at #1 on the map of Elmshore. I continue southeast and run into a Troll, a pair of Forest Lurkers, as well as a few Stone Beetles and Adra Beetles. Stone Beetles can burrow underground and reappear elsewhere, often attacking more vulnerable characters that your tanks were trying to protect, while Adra Beetles can use projectile attacks that cause Shocking Damage. I win this battle easily enough, especially after Grieving Mother sets up an Ectoplasmic Echo.
There is an Adra arch at #6. Waiting underneath it will be a LOT of Adra Beetles and Stone Beetles, a few Forest Lurkers, and several Adragans. This battle can be difficult, especially if the Adragans get off several spells. A very real danger is an Adragn petrifying party members, making them vulnerable to physical attacks, especially from the Forest Lurkers. *Note* Although it didn't come to it this time around, Sagani was prepared to use her Ring of Unshackling to relieve her comrades of Petrification or other nasty conditions if she had to.
I inch forward just until battle starts. Kana uses a scroll to plant a Wall of Flame underneath the arch itself, with the hope that the Adragans will take continuous damage from it. Alliria tags both Kana and Devil of Caroc with Reinforcing Exhortation.
Once the enemies are in view, Hiravias hits them with a Plague of Insects spell, hoping to minimize the spellcasting of the Adragans. He follows up with Moonwell and Form of the Delemgan.
Grieving Mother hits one of the Adragans with a crossbow bolt, and targets as many nearby enemies as possible with Ringleader in order to sow division amongst the enemies.
I have Ituumak circle around the main force and go after the Adragans. Sagani and her pet then set to taking out the Adragans as quickly as possible. I eventually win.
Kana uses a Scroll of Ancient Enemies in order to raise everybody's skill ranks in Lore. There will be a soul essence under the Arch itself. Alliria uses her Watcher powers to ascertain that Persoq was here recently, making a Lore check of 9 for a little more information, in order to advance Sagani's personal quest, The Long Hunt.
*Evil* Adra Arch
For the evil party, fulfilling Sagani's personal quest has no relevance. But I definitely have different objectives in mind.
For the group of enemies east of the Arch, I have everybody else attack the Troll and Forest Lurker. I have Zahua switch over to his Greenstone Staff and attack one of the Adra Beetles by himself. It is risky, and Zahua does take plenty of damage. But there is a purpose for it. As the battle nears its end, only a Stone Beetle is left. I let Zahua have it too. I thereby complete the first upgrade for the Greenstone Staff, which can be fulfilled by using it to inflict 125 damage on Beetles.
As for the enemies at the Adra Arch itself, the usual suffices, albeit the battle now takes more effort to win. Durance begins his usual sequence of Devotions for the Faithful, Consecrated Ground, Circle of Protection, Salvation of Time and Daze.
Aloth begins a sequence of Eldritch Aim, Pull of Eora, Malignant Cloud, Kalakoth's Minor Blights and Merciless Gaze. He then bombs away. At some point his Pull of Eora and Malignant Cloud expire, and plenty of the enemies are still going strong. He therefore adds in a Call to Slumber to give the party more time and safety to go to work. He also defends himself with a Llengrath's Safeguard when an Earth Blight and a Forest Lurker get too close.
The Adragans also summons a couple of Earth Blights behind the party. I have Zahua kill them with his Greenstone Staff. And indeed, the second upgrade for the staff can be obtained by using it to kill at least 5 Blights. The battle is long and hard, but I do eventually manage to outlast my enemies.
Apostate in Creitum
Crossing the bridge over to #11 prompts another vision of Thaos, and remembering a previous conversation with him. It is also your opportunity to define what your relationship with Iovarra had been in the distant past. Alliria chose sister, while Zakara chose lover.
*Evil* Boots of Stability
I show this part from the perspective of the evil party. There will be a few Adragans and Earth Blights gathered near the dead body at #8. I begin with the usual set of buffs from Durance, and crowd-control + bombardment from Aloth.
However, I tend to prioritize having Zakara, Eder and Maneha go after the Adragans and leave the Blights alone. As much as possible, I want Zahua to kill the Blights personally with his
Greenstone Staff. And indeed, I make progress towards the second upgrade when he manages to kill two more Blights personally.
The dead body itself has
Boots of Stability, which I don't need, and a welcome set of Camping Supplies.
Ogre Matrons
There will be several Ogres and a few Ogre Druids led by a pair of Ogre Matrons. This battle can be really tough. All of the Ogres are capable of hefty damage and knocking party members Prone. The Druids can be really dangerous, especially if they get off multiple instances of Plague of Insects.
I creep forward very slowly until only one or two Ogres come into view, and just enough to start the battle. I have Devil of Caroc and Sagani use their figurines to set up a wall of meat shields. This serves two purposes. One, it provides alternative targets for the spells cast by the Ogre Druids.
It also buys time for Hiravias to start off with a Plague of Insects of his own over all of the Ogres, followed by Moonwell and Form of the Delemgan.
Alliria tags both Devil of Caroc and Kana with Reinforcing Exhortation. Grieving Mother hits one of the Druids with a crossbow bolt to bring her Focus to at least 50.
I close in once the summons are pretty much gone. Alliria tags one of the Matrons with Sworn Enemy. At that point, I have Hiravias position himself to cast a Relentless Storm to catch as many Ogres as possible, which makes things easier.
The warriors are hacking away. Kana holds tank position, and also unleashes his paralysis wave once he's accumulated enough phrases.
As a few Ogres fall, I finally manage to have Grieving Mother get off a Ringleader on the survivors to sow division amongst them, and thus seal their fate.
*Evil* Ogre Matrons
I conduct this fight somewhat differently with the evil party. I also start by having almost everyone use their figurines to set up a wall of meat shields. In this instance it buys Durance and Aloth time to set things up.
Durance goes with Devotions for the Faithful, Shields for the Faithful and Consecrated Ground. Aloth begins with Kalakoth's Minor Blights and Merciless Gaze. He then initiates Eldritch Aim, Pull of Eora, Malignant Cloud and Chill Fog. Aloth bombs away, while the warriors attack only when any Ogres happen to come close enough.
Just this sequence by itself is not enough, because the Ogres have a lot of health, and they can sometimes knock multiple party members Prone. In fact, Aloth has to use his crowd-control and cloud-damage sequence multiple times. Durance likewise has to use spells like Consecrated Ground and Shields for the Faithful multiple times in order to keep the party on its feet.
It was never a given, but I do eventually manage to outlast the Ogres. At this level, this really was the kind of fight that forced me to expend all of my per Rest resources in one go.
*Evil* Adragans and Rain Blights
I show this part from the perspective of the evil party. There will be two groups of Greater Rain Blights east towards #15, each led by a pair of Adragans. The second group will have a few Will-O-Wisps. Aloth does his usual Eldritch Aim + Pull of Eora + Malignant Cloud as a combination of crowd-control and damage.
However, I make a point of having Zahua kill at least one of the Rain Blights with his Greenstone Staff. I thereby kill a fifth Blight in such a manner and obtain the second upgrade for the Staff.
The video concludes with the evil party grabbing a random potion and some coins from the hidden niche at #16.
Dying Monk
At #17 will be a Stelgaer and an Elder Stelgaer near a Dying Monk. I kill off the Stelgaers easily enough. The Dying Monk gives Alliria a Sealed Missive with the hope that she'll give it to other members of his order without opening it, thus starting The Sealed Missive task.
She chooses to stow it in her pack without opening it, and for the moment returns to Caed Nua.
*Evil* Dying Monk
Zakara prefers to open the Sealed Missive and end up with the Open Sealed Missive.
Berolt
The good party rests up for a while until the visitor named Berolt arrives. Alliria chooses to give him 2,000cp to facilitate his trip through Eir Glanfathan, which has a few advantages. It adds +1 Prestige permanently. It avoids a loss of reputation with Twin Elms. It also avoids losing either Hiravias or Sagani, even if temporarily.
Hearthsong is the next destination.