-

- Forums
- Chatrooms
- Gallery
- Gameplay Videos
- Upload
- Articles
- Mod Reviews
- Shop SP: Games, Movies, Books
|
|
The Salty Mast
Beaten Noble
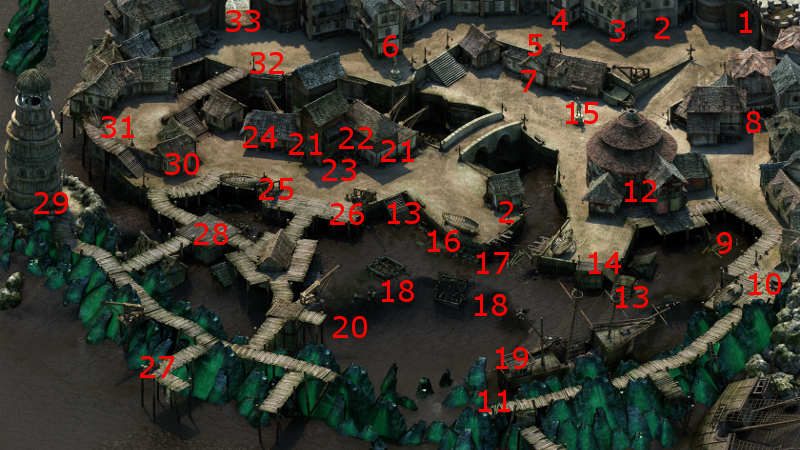
The entrance to the Salty Mast is at #12 on the map of Ondra's Gift. The party witnesses a group of Thugs beating a Noble to a pulp just outside the door. The ensuing conversation indicates that the Salty Mast is also a brothel with prostitutes providing their services within.
Club of Refined and Prestigious Gentlemen Membership Ring
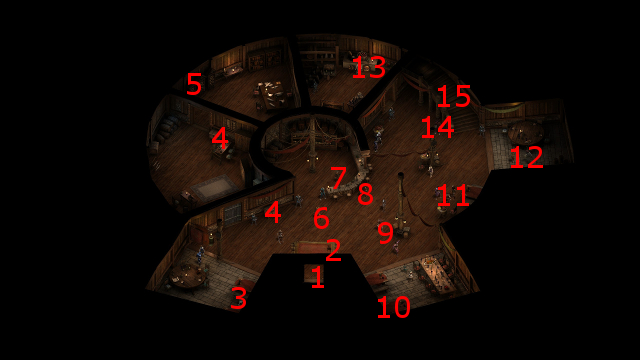
I start off at #1 on the main floor of the Salty Mast. The Old Drunkard is at #14. He gives me the Club of Refined and Prestigious Gentlemen Membership Ring with very little prompting. The stairs to the next level is at #15.
*Evil* Vincent Dwellier
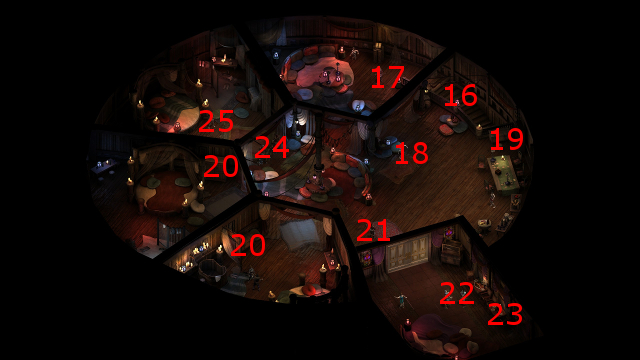
I show this part from the perspective of the evil party. They arrive at #17 on the map of the upper floor. Zakara puts on the Club of Refined and Prestigious Gentlemen Membership Ring. Becker Odroe, the bouncer at #21, will recognize her as a Club member and allow her to pass through the door.
Vincent Dwellier will be at #22, and sells a variety of enhanced weapons. I purchased the Silver Crow Axe for Zahua as an interim item. *Good* The good party doesn't buy anything, and is content to simply sell off their excess loot.
Maea
I return to the first floor. Alliria switches out the Club of Refined and Prestigious Gentlemen Membership Ring for the Ring of Wonder.
I speak to Maea at #6. She wants me to look into Thugs harassing her workers. The dialogue triggers the Supply and Demand quest.
Harassing Thugs
There will be some Harassing Thugs gathered around the statue at #15. I keep most of the party a ways south, but send Alliria ahead to fight them by herself. She gets overwhelmed and unconcsious, but that's what I want. The Second Chance power from her Ring of Wonder revives her, and thus gets her closer to the last upgrade for St. Ydwen's Redeemer.
The rest of the party now charges in. Hiravias protects Alliria with a Beetle's Shell spell, while Kana holds them in place with his paralysis wave Invocation.
One of the Thugs leaves behind the Rusted Bronze Key. I use it to open the door at #30.
*Evil* Zakara handles this battle the same way and for the same reason. The difference is that Durance now has 5th level spells, so he can cast Revive the Fallen on her once there's only one or two Thugs left.
Aefre
Aefre and her band of Harassing Thugs will be inside the house. I could make either an Intellect check of 15 or a Resolve check of 16 that earns Aggressive disposition to convince Aefre to willingly stop her harassment of Maea's employees. Maea afterwards would have rewarded me with 600cp, a moderate gain of positive reputation with Defiance Bay, and cheaper fees for the prostitutes.
However, I side with Aefre and agree to try and convince Maea to lower her prices. I return to the Salty Mast.
*Evil* Aefre
The evil party decides to slaughter Aefre and her Harassing Thugs then and there. As before, Zakara lets herself get ganged up, and then Durance casts Revive the Fallen on her when pretty much only Aefre is left. The intention as before is to make progress towards the last upgrade of St. Ydwen's Redeemer.
Once the battle concludes, a Grand-tier Companion Adventure becomes available. I insist on it being The Wax Maker companion adventure. I insist on that one, reloading if I have to, which I only had to do once. Once I do get it, I assign Pallegina to it.
The reason for my insistence is that I want The Helwax Mold. The intention is to make a duplicate of the Bittercut sabre, but not until it has been fully upgraded.
Supply and Demand
I have Grieving Mother lend her Talisman of the Unconquerable to Alliria. In combination with a +2 Intellect Resting bonus, it raises Alliria's Intellect to 18.
Alliria now speaks to Maea. There are four possibilities:
*Evil* Cutthroat Bandits Attack
Resting in the Salty Mast results in a pending attack on Caed Nua by Cutthroat Bandits, so I head back to resolve it.
I start by having Aloth hit the oncomers with Call to Slumber, while Durance buffs with Devotions for the Faithful and Consecrated Ground.
A distinct danger in these 'attack on Caed Nua' battles is the risk of losing your special Hirelings permanently if the enemies kill them during the battle. And indeed, two of the Bandits go after my Fellow of St. Waidwen. I take two measures to address that. One, I send Zahua after those two Bandits. Second, I have Durance protect the Fellow of St. Waidwen with a Withdraw spell once he finished his initial buffs. The battle is soon won without any casualties.
The video concludes with me adding the Kith Slaying and Burning Lash enchantments to Zahua's Silver Crow Axe.
Odda
The entrance to Odda's house is at #7. She indicates that her husband, Weyd, and her son, Derrin, have gone missing. I agree to go looking for them. This dialogue triggers the Brave Derrin task.
Weyd
I enter the Salty Mast. Wade can be found at #8 on the map of the main floor. He lets on that he was taking Derrin for a fishing trip, but the boy went missing while he went into the Mast for a 'quick drink'.
Derrin's Soul
It happens to be daytime, so I can venture into the shallows below the docks themselves. Derrin's dead body will be at #9. Alliria uses her Watcher powers to converse with his soul, and learns that Derrin died standing up for a woman against two Thugs.
She sets his soul free. He leaves behind the Thug's Dagger. I return to the Salty Mast.
Brave Derrin
Alliria switches out her Ring of Wonder for the Ring of Changing Heart. Her Resolve score is now at 15.
She then goes up the stairs to the second floor of the Salty Mast. A prostitute named Iqali will be at #18 on the map of the second floor. She pays Iqali 300cp to add another +1 to Resolve, and raise it to 16.
Now she goes back down to the main floor to speak with Weyd. I could lie to Weyd and say that Derrin has boarded a ship out of to earn Deceptive disposition. Weyrd will then leave, and Odda will give me the standard reward for this task.
You can tell Weyd the truth, upon which a number of other dialogue options become available. The Cruel, Honest and Stoic options lead to Weyd staying in the Salty Mast in self-pity and without telling Odda anything. That in turn means that you will have the full range of disposition-based dialogue options available with Odda when you see her, and the rewards will be the same (more on this soon).
Lastly, you can tell Weyd the truth, followed by making a dialogue option that requires a Resolve check of 16 and earns Passionate disposition. That option will convince him to return home and try to be a better father to his remaining child. This is the option that Alliria took.
Now I return to Odda in her home. If I had gone straight to Odda with the news, a number of different options would have been available, but the reward will always be the same. The Deceptive option will convince her that Derrin has departed elsewhere. The Cruel option will likewise lead straight to the standard reward. The Diplomatic, Honest and Passionate options lead to a further dialogue branch that includes Aggressive, Cruel, Passionate, Rational and Stoic options.
Ultimately, however, the rewards are always a moderate gain of positive reputation with Defiance Bay, a Fine Dagger and a Ring of Minor Protection.
However, previously breaking the news to Weyd in any way that also involves him staying with Odda will lead to the same rewards without any Disposition-based dialogue options when you speak to Odda, which is what happened in this playthrough. The dialogue ends the Brave Derrin task.
*Evil* Brave Derrin
Zakara first stops off at the Salty Inn and uses the Cruel option to inform Weyd of Derrin's death, so as to shame him into leaving town.
She also uses the Cruel option to inform Odda of Derrin's death, but her rewards will be the same regardless.
Bragan
Bragan and his gang of Thugs will be at #30 on the map of Ondra's Gift. I intend to kill the lot of them as the murderers of Derrin, but also to make progress towards the last upgrade for St. Ydwen's Redeemer.
I send Alliria well ahead of the others to start the dialogue and ensuing fight. I have to adjust my strategy a little here. The reason is that their Wizard is going to help kill off his own fellow Thugs when he aims spells at Alliria, which means they won't be around long enough to gang up on her. So I simply wait until they're taken care of, and keep her at a discreet distance from the Wizard once he's the only one left. I let him shoot his wand at her non-stop until she's knocked unconscious and her Second Chance power triggers. She finishes him off easily afterwards. She now has 3 out of 5 towards the next upgrade.
*Evil* Zakara does the same things, and for the same reason.
The good and evil parties will diverge pathways at this point, and the reason involves the various factions in Defiance Bay hoping to gain an alliance with the Watcher. Those three factions are The Dozens, the Knights of the Crucible, and House Doemenel. I can do quests for each of them, but there comes a point where doing that last quest for one of the factions means committing yourself to an exclusive alliance with that faction only, and no longer being able to do quests for any of the other factions. I've already done all I can for The Dozens short of forging an exclusive alliance with them.
The evil party will ultimately want an alliance with the Knights of the Crucible, because Zakara prefers the Talent they offer as a reward for allying with them. The evil party therefore begins to do quests for House Doemenel. I can do as many quests as I can for the House without committing myself to them, before pursuing a permanent alliance with the Knights. After that, it will become a sequence of Crucible Keep, the Vailian Embassy, Searing Falls, Pearlwood Bluff, Brackenbury, Charred Barrel, the Sanitarium, Hadret House, and then Heritage Hill.
The good party will ultimately want an alliance with House Doemenel, because Alliria wants their reward Talent for her build. The good party therefore starts doing quests originating in First Fires, starting with Crucible Keep. I do as many quests for the Knights as I can, before pursuing a permanent alliance with House Doemenel. After that, it will become a sequence of the Vailian Embassy, Searing Falls, Brackenbury, Charred Barrel, House Doemenel, the Sanitarium, Hadret House, Heritage Hill, and then Pearlwood Bluff.
After those sequences, both parties' paths converge as they both go to Cliaban Rilag and then the Ducal Palace.