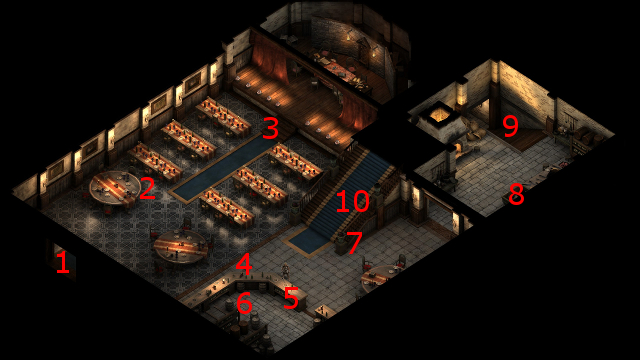
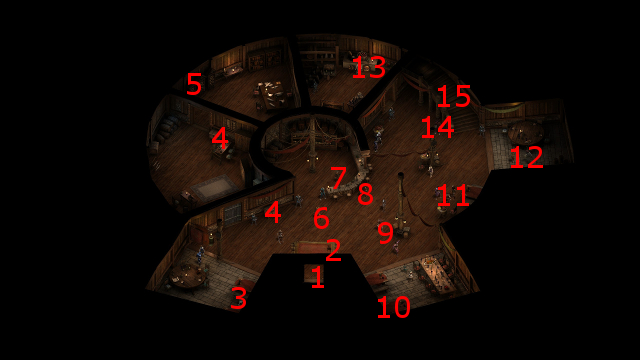
At #2 on the main floor of the Charred Barrel will be an Elf named Thristwn. Aggressive, Benevolent, Clever and Rational replies are possible in response to his initially glum demeanor.
He would like you to recover an Engwithan Medallion from a courtesan that he's had a falling out with, Serel. Aggressive, Honest and Rational options are available in response to his request. You can also refuse his request with an additional Honest reply.
The proprietor of the Salty Mast, Maea, is at #6 on the map of the Main Floor. One way to see Serel is to purchase a night with her from Maea for 1,000cp, although Maea will drop the price down to 500cp if you had previously completed the Supply and Demand quest to her satisfaction.
You could also not bother with Maea, but getting the medallion that Thristwn wants would then require killing Serel and/or her bodyguards. That in turn would limit your options in terms of possible quest outcomes (more on this later).
The stairs to the next floor are at #14.
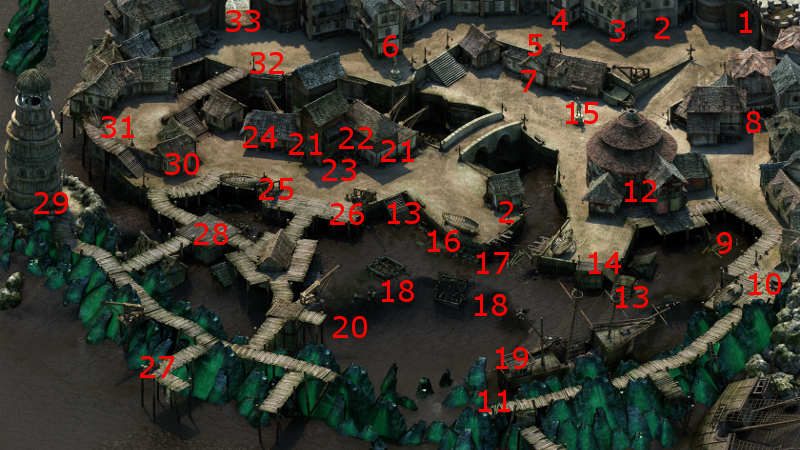
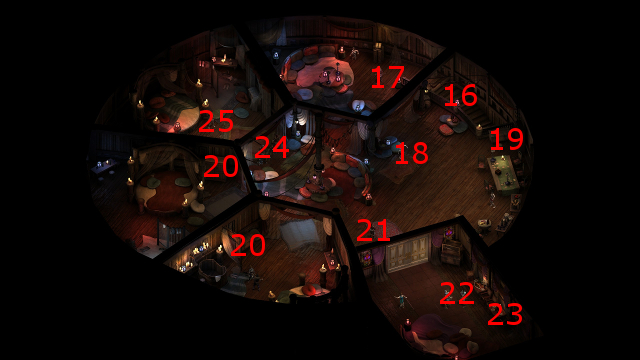
At #24 on the map of the second floor will be Serel's two bodyguards. The door they stand guard over will be closed unless you previously paid Maea her fee for Serel's services, in which case the door will be open and they'll let you through without any fuss.
If you want to get through to Serel without paying Maea's fees, then you pretty much have to kill the Bodyguards. Killing each one will result in a minor loss of reputation with Defiance Bay. Each one also leaves behind a pair of Fine Battle Axes and a Fine Hide Armor.
If you kill the Bodyguards, the only way to get the Stolen Engwithan Medallion from Serel is to either Intimidate her with a Might check of 14 or kill her for it. If you do decide to kill her for it, she'll also leave behind Serel's Ring and you'll also accrue a minor loss of reputation with Defiance Bay.
Serel herself will be at #25. One possibility is to decide you'll let her keep the Stolen Engwithan Medallion.
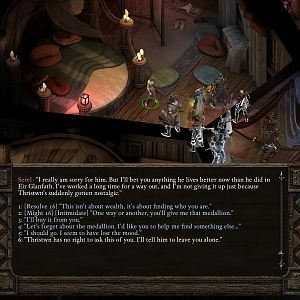
When you return to Thristwn, he won't be happy with you. A Resolve check of 17 or a Might check of 16 will convince him to walk away defeated.
Return to Serel, and she'll give you Serel's Ring however things shook out with Thristwn. However, you will lose minor reputation with Twin Elms (coming up during Act 3) if you left Thristwn alive, and moderate reputation with Twin Elms if you had killed him.
As previously mentioned, you could kill her and/or her Bodyguards.
You can offer to purchase the medallion for 6,000cp. An Intelligence check of 18 can reduce the price to 4,000gp.
You can offer to purchase the medallion, but then make a Resolve check of 19 to convince her to hand it over on the pretense that you will find a buyer for it. This choice results in a slight loss of reputation with Defiance Bay. However, you can speak to Serel again and choose an Honest dialogue option that pays her the 6,000cp. She will then be willing to give you Serel's Ring.
You can make a Might check of 16 to take physical hold of her, and then a Dexterity check of 14 to hand gag her and prevent her from crying out for the Bodyguards. This choice results in a minor loss of reputation with Defiance Bay. She will cry out and force you to fight the Bodyguards if you are unable to make the Dexterity check. She will be intimidated enough to hand over the Medallion afterwards.
You can make a first Resolve check of 16 and then a second Resolve check of 18 to convince her to willingly hand over the Medallion. That results in a moderate gain of positive reputation with Defiance Bay.
You tell him that you are keeping the Medallion, which will result in a moderate loss of reputation with Twin Elms. You can then choose to attack him, possibly with an Aggressive dialogue option. He'll leave behind a Fine Hatchet, a Battle Axe, a Fine Robe and the Cloak of Many Feathers.
You tell him that you are keeping the Medallion, which will result in a moderate loss of reputation with Twin Elms. You can talk him out of a fight with a Might check of 16 that earns Aggressive disposition, and he'll leave the Charred Barrel for good.
You can make a Resolve check of 19 that earns Deceptive disposition to convince him that Serel sold the Medallion away. This choice will not result in any rewards or reputation consequences.
You can return the Medallion and accept his offer of 2,000cp. You'll earn a minor boost of positive reputation with Twin Elms.
You can return the Medallion and select the Benevolent dialogue option that refuses his offer of 2,000cp. You'll earn a moderate boost of positive reputation with Twin Elms.
You can return the Medallion and accept his offer of 2,000cp but also insist on more. He'll give you the Cloak of Many Feathers plus the 2,000cp. You'll also earn a slight boost of positive reputation with Twin Elms.
Sorcerer's
Place is a project run entirely by fans and for fans. Maintaining
Sorcerer's Place and a stable environment for all our hosted sites requires a substantial amount of our time and funds on a regular basis, so please consider supporting us to keep the site up & running smoothly. Thank you!
Supporting Sorcerer's Place
Has Sorcerer's Place been useful? If you'd like to show your appreciation
for our hard work on the site, and help us pay the bills the site generates
every month, please consider helping support SP.
Thank you!

 Serel herself will be at #25. One possibility is to decide you'll let her keep the Stolen Engwithan Medallion.