Pillars of Eternity logo


Pillars of Eternity Online Walkthrough by David Milward


INTRODUCTION & ABOUT  |  WORLD MAP  |  WHITE MARCH MAP
General:  
Quests  |  Tasks  |  Bounties  |  Items  |  Characters
Areas:  
Act 1 Areas  |  Act 2 Areas  |  Act 3 Areas  |  Act 4 Areas  |  Caed Nua  |  White March - Part 1  |  White March - Part 2  | 
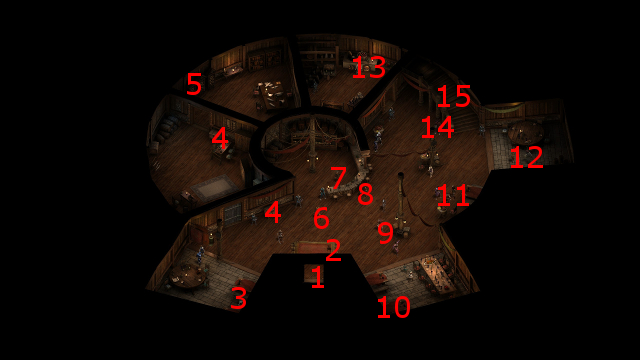
Disable all ads!

Act II Areas:   Copperlane  |  Copperlane Catacombs  |  Temple of Woedica  |  First Fires  |  Brackenbury  |  Sanitarium  |  Ondra's Gift  |  Lighthouse Ruin  |  Heritage Hill  |  Heritage Hill Tower  |  Cliaban Rilag  |  Searing Falls  |  Searing Falls Cave  |  Pearlwood Bluff

Salty Mast

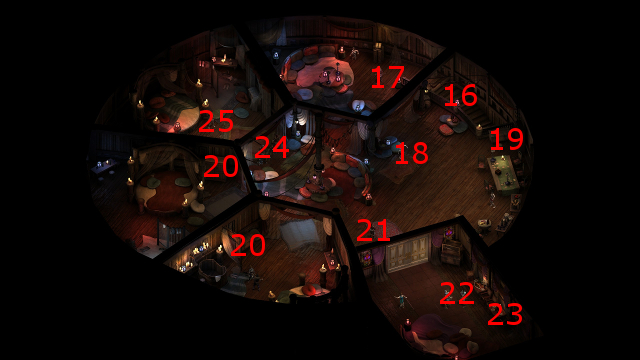
*Note* There will be several prostitutes in this establishment. Each offers a "prostitution bonus" after sleeping with him or her that will stack with other bonuses for 2 Rests. Also, you can convince one of them to become a Hireling at the Stronghold if you can make a combined Constitution check of 19 and Dexterity check of 19. If you make that check and then ask that Prostitute to go to your Stronghold, that is the prostitute that will take up residence in the Brighthollow. You can not make that check and offer for any other prostitute afterwards.

That means you can only choose one prostitute to make your Hireling. Once you make that choice, you can then make the Prostitute one of your Hirelings through the Stronghold interface menu. After that, you can always avail yourself of that Prostitute's bonus when you visit the Brighthollow.

Salty Mast, Main Floor

  1. This exit goes back out to Ondra's Gift at #12.

  2. A prostitute named Orico will go back and forth just to either side of the front door. His bonus is +1 Perception and +1 Survival.

  3. Tucked into this corner will be an Orlan prostitute named Big Durmsey. His bonus is +2 Resolve, +1 Might and +1 Survival.

  4. These chests will have a random armor, as well as a random potion or two.

  5. The bookcase here will have a random potion and some coins.

  6. Here is Maea, who offers the Supply and Demand quest.

    She also demands a 1,000cp fee for the services of her prize prostitute, Serel, who is upstairs on the second floor. The fee can be reduced to 500cp if you have previously completed the Supply and Demand quest.

  7. Here is Lines "Two Lips", who offers the food and room services for the Salty Mast. The sleeping options are:

    • Broad Beam (180cp): +1 Dexterity and +1 Perception for 2 Rests
    • Shiny Pearl (140cp): +1 Constitution and +1 Athletics for 2 Rests
    • Common Room (25cp): No bonuses

  8. You will find Weyd here, who is potentially relevant to the Brave Derrin task.

  9. Here is Captain Pepperjack, whose soul history can be read by your Watcher abilities.

  10. You can find Oly here as a witness after triggering The Final Act quest.

  11. A prostitute named Gjefa will wander about the east side of the Salty Mast. Her bonuses are +1 Constitution and +1 Mechanics.

  12. Here are Ten Lui and Omedam, whose soul histories can be read by your Watcher abilities.

  13. A barrel here will have random alcoholic drinks.

  14. The Old Drunkard here will willingly give you the Club of Refined and Prestigious Gentlemen Membership Ring. The ring can be useful for purposes of accessing a shop on the second floor.

  15. The stairs here lead to #16 on the second floor.

  16. Salty Mast, Upper Floor

  17. These stairs lead back down to the first level at #15 of the first level map.

  18. Here is a Dwarven prostitute named Lyrinia. Her bonuses are +2 Constitution, +2 Might and +1 Athletics.

  19. Here is a prostitute named Iqali. Her bonuses are +2 Dexterity, +1 Resolve and +1 Stealth.

  20. Here is a prostitute named Aldwyn. His bonuses are +2 Intellect, +2 Perception and +1 Lore. He will replace Serel as the prize prostitute is she dies or otherwise ends up leaving the Salty Mast.

  21. These chests will have random armor items in them.

  22. Here is a bouncer named Becke Ordoe. He will not let you in through the adjacent door unless your main character has the Club of Refined and Prestigious Gentlemen Membership Ring equipped.

  23. Here is Vincent Dwellier. He will attack you if you speak to him without your main character having the Club of Refined and Prestigious Gentlemen Membership Ring equipped. If your main character does have the Club of Refined and Prestigious Gentlemen Membership Ring, then he will open his shop to you. His wares are as follows:
  24. This table has the Club of Refined and Prestigious Gentlemen Guestbook.

  25. Here are Serel's Bodyguards. They will not let you through to see her unless you either kill them first, or have previously paid Maea's fee for Serel's services.

  26. Here is Serel herself, who is a focus of the Far From Home quest.


Amazon.com
Amazon.ca
Amazon.co.uk
Sorcerer's Place is a project run entirely by fans and for fans. Maintaining Sorcerer's Place and a stable environment for all our hosted sites requires a substantial amount of our time and funds on a regular basis, so please consider supporting us to keep the site up & running smoothly. Thank you!

Disable all ads!