-

- Forums
- Chatrooms
- Gallery
- Gameplay Videos
- Upload
- Articles
- Mod Reviews
- Shop SP: Games, Movies, Books
|
|
Great Hall
Record of Production
Entering the Great Hall for the first time marks the completion of the Durgan's Battery quest and triggers The White Forge quest.
I go westwards, collecting random items along the way and witnessing memory fragments of the Dwarves that used to live in the Hall. They reveal that there was considerable strife between their three leaders, Chief Curate Exandru, Coinmaster Zoltun and Armsmaster Marunn.
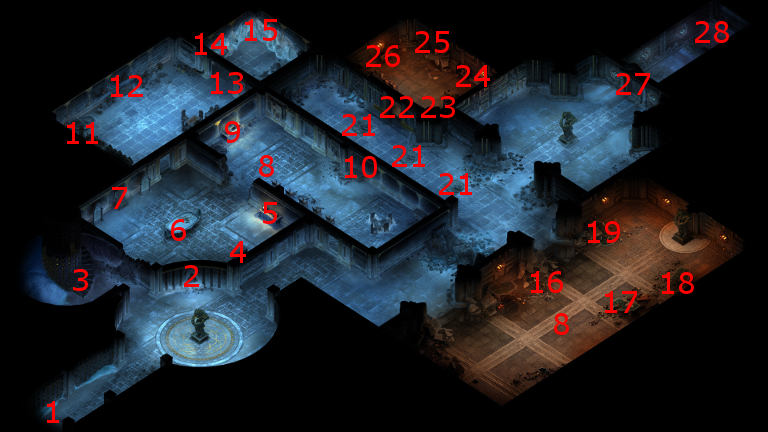
I find a Record of Production on the table at #6.
Letter to Zoltun
I go east from the table, and fight a horde of Battery Defenders, Battery Shieldwalls and an Ice Blight. They are not difficult to defeat. The chest at #9 has the Letter to Zoltun, which sheds some light on the reasons for past conflicts.
Bill of Sale
Devil of Caroc plants a Fireball trap at the door leading to the room to the north. I lead the Battery Defenders, Wraiths and Cean Gwla through the door and trap, and then defeat them.
The chests at #12 have a Shimmering Cloak that I'll sell, and a Bill of Sale that confirms that Coinmaster Zoltun has been selling Durgan Steel outside the battery.
Guard's Key
A hidden button opens the door at #13. At #15 is a dead Dwarf lying encased in ice and holding a satchel. There are several possibilities for freeing the satchel:
Gauntlets of Puissant Melee
I continue on to the room on the south side, where I witness yet more arguments between spirits of the past. There will be some item containers with random items about the room.
The one set item is the Gauntlets of Puissant Melee at #18, which I'll just sell. A hidden corpse at #18 will have a high-tier gem or two.
*Evil* Garodh's Chorus
The evil party easily defeats the Ice Blights and Battery Priests at #20. I then disarm the traps at points marked #21, and use the Guard's Key to open the door at #22.
The crate at #23 will have a Durgan Iron Ingot and Camping Supplies in it. I take the Ingot but leave the Supplies for now.
The chest at #25 will have the Girdle of the Driving Wave in it, but I have no use for it.
The chest at #26 will have a medium shield called Badgradr's Barricade in it. I raise its quality enchantment to Exceptional, and then have Maneha equip it for now on an interim basis. The key feature of the shield is that its Bash attacks will also hit its target with a Thrust of Tattered Veils spell on a Critical Hit. That makes the shield an intriguing possibility for a character build that can both tank and inflict Critical Hits with a high degree of probability. Barbarians, more so than any other class, are well suited to take advantage of this kind of shield since shield Bash attacks also benefit from Carnage. And in this instance, that also means the Thrust of Tattered Veils effect triggering more often and on more targets.
*Good* I also considered it for Devil of Caroc, but my problem was that Bash also means less attacks with her axe, which over the long haul inflicts far more damage. I ultimately decided to let her stay with Sura's Supper Plate.
The chest at #24 will have the Battered Helm. Taking the helm results in another vision of Garodh, where again you have a choice between attacking the foe head on or playing dead to avoid a confrontation. I chose the former. Having this vision now results in the completion of the Garodh's Chorus task, and the obtaining of the helm called Garodh's Chorus.
As previously mentioned, the dialogue choices that I made during the visions affect the properties of the helm. My brave choices give it the Retaliation property, while cowardly choices would have given it defensive bonuses that trigger on its wearer becoming Prone or Stunned. The evil party always choses the former, since it fits in with my plans for Zahua.
My reasons are as follows. First, the helm provides the obvious benefit of +3 Might for Zahua. Second, Zahua activates his Dichotomous Soul power fairly often. The fire and ice clones of Zahua will themselves enjoy the Retaliation feature of the helm, which means that any enemies that hit them will take damage. It's like inflicting Retaliation damage on your enemies with no harm to the party members themselves.
Garodh's Chorus
Grieving Mother gets Garodh's Chorus in the good party. She'll often get struck in combat since she doesn't have great Deflection, so Retaliation comes into play quite often. If Sagani puts Combusting Flames into play, so much the better. The bonus to Might will enhance the damage from her melee blows, as well as the damage for some of her Cipher powers.
Fragment of Marunn
At #27 is a door that's barred by the spirit of Armswarden Marunn. You can choose to attack, in which case you'll have to fight a Fragment of Marunn along with a few Bitter Spirits and some Wraiths. The only loot will be a few Spirit Residues.
You can also attempt to deceive your way past the door. Note that Marunn deeply resents Zoltun, so dropping his name will lead to a fight. One lie that works is to mention the Leaden Key, and then suggest that have covert business going on with Zoltun. That way increases Deceptive disposition.
Another way is to make a Resolve check of 12 and indicate that Exandru is waiting for your party. After that, suggesting that you're here to worship Abydon is the only way to avoid a fight. Any other lie will lead to a battle.
The stairs leading down will be at #28 on the map.
*Evil* Fragment of Marunn
Zakara cuts straight to the chase and provokes Armsmaster Marunn into a fight. Several Bitter Spirits and Wraiths join in.
Zakara tags the Fragment of Marunn with Sworn Enemy, who is right at the door, and then nails it with Flames of Devotion.
Durance does his usual buffs while Eder and Maneha hold tank positions against the oncoming spirits coming from behind.
The fight is pretty much won after Aloth protects himself with Llengrath's Safeguard, and then initiates Eldritch Aim and Death Ring.
The video concludes with me disarming the trap ahead, resting with the Accuracy vs. Vessels option, obtaining the Camping Supplies and then descending into the Mines.